Running two different operating systems on one computer with two different companies is pretty interesting. Like macOS is the series of Apple and Windows 10 is the series of Microsoft Inc. In this case, installing these two operating systems with those highlighted features is great. As now macOS Big Sur is in Public Beta mode, but it can be unstable for your PC, or it will risky. Due to that, it’s required to install a stable operating system alongside the macOS Big Sur. And that is Windows 10 operating system, you might think how to run Windows 10 alongside macOS operating or it’s impossible.
However, Apple Inc made everything possible as after this they are launching the Mac computer with Intel-based processors. As they have highlighted it’s the first Intel-based processor with Silicon name at the recent WWDC 2020 in June. Usually, we have covered the installation of macOS Big Sur on PC-Hackintosh. It was working pretty well, also we have performed the dual-booting of macOS Big Sur with Windows 10 on a single SSD drive.
Moreover, when macOS Big Sur 11.0 was released at the Beta 1 version, after that, we have created it’s first ISO file for Virtual Machine. And successfully without any issues, we performed its installation on VMware Workstation, and VirtualBox. When the macOS Big Sur Beta 2 version released we have covered its installation on a laptop without any problem.
Therefore, we can say that macOS Big Sur 11.0 can be counted as the first biggest operating system of Apple Inc that released this year. Overhaul, most of the interesting features that expected by users are highlighted and added to macOS Big Sur 11.0. Mostly, all the macOS Big Sur interface features are being inspired by iOS 14 and iPadOS 14. Don’t forget that easily you can upgrade macOS Catalina to macOS Big Sur on your laptop, or upgrade macOS Mojave 10.14 to macOS Big Sur. For completing your experience with macOS Big Sur you can upgrade macOS Big Sur to the latest version on Virtual Machine also.
Related:
Why Dual Boot?
There are few reasons for dual boot, whether dual-booting two macOS operating systems or two Windows 10 operating systems. But indeed it’s very important when you are using the Beta version of an operating system on your computer. It means, your files and documents are not safe in the Beta version operating system. In addition, that’s important to use two operating systems with Beta version and complete version on your computer.
Dual Boot macOS Big Sur with Windows 10 on Laptop
The system which I want to dual boot macOS Big Sur with Windows 10 is having the following specifications. It means, if you are having the same computer with these specifications then easily you can dual boot macOS Big Sur with Windows 10.
Before starting the process you need to download some required files, which include the Commands, OpenCore Configurator, Windows 10 ISO file, and BalenEtcher.
- Download Commands
- Download OpenCore Configurator
- Download Windows 10 ISO file
- Download BalenEtcher
- Download EFI files
- 16GB USB flash drive for macOS Big Sur Bootable drive
- 8GB for EFI Files
- 8GB for Windows 10 Bootable USB drive
If you are using different PC, then for installing macOS Big Sur on that, you need to create an OpenCore EFI files in order to fix the drivers.
#Step1. Create Bootable USB Drive for macOS Big Sur
For creating Bootable USB Drive you need to download the macOS Big Sur installer file from the Apple Developer program website. Or you can download the installer file from below down-link. For creating a bootable USB drive for macOS Big Sur check the below links.
- Download macOS Big Sur DMG File for a Perfect Installation
- How to Create a Bootable macOS Big Sur USB Installer
- How to Create macOS Big Sur Bootable USB Drive on Windows & Mac
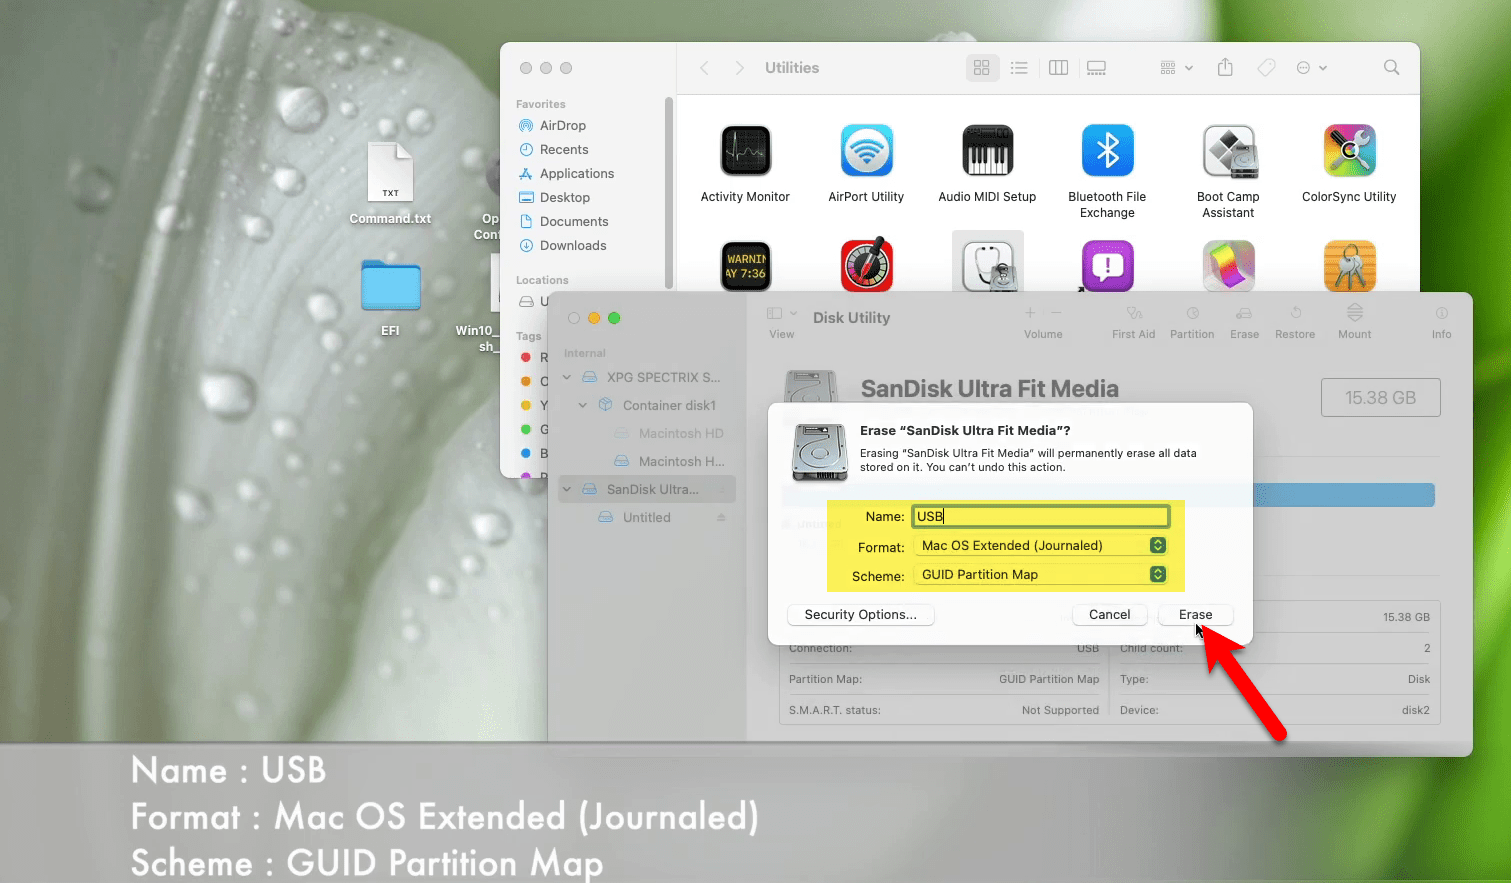
For being sure about creating macOS Big Sur bootable USB drive, navigate to top Go>Utilites. When the Utilities window opened open the Disk Utility. Select the USB drive and format it with the below settings.
- Name: macOS Big Sur
- Format: Mac OS Extended (Journaled)
- Scheme: GUID Partition Map
Once the USB drive formatted, head over to search spotlight type terminal and press enter to open. When the terminal opened copy and paste the below commands and press enter to proceed. For the confirmation type “Y” and press enter. Wait until it should copy the macOS Big Sur installer file to the USB drive.
hdiutil create -size 12G -fs hfs+ -volname macOSInstaller -type SPARSEBUNDLE /Users/Shared/macOSInstaller

hdiutil attach /Users/Shared/macOSInstaller.sparsebundle

sudo /Applications/Install\ macOS\ Beta.app/Contents/Resources/createinstallmedia --volume /Volumes/macOSInstaller --nointeraction

hdiutil makehybrid -o /Users/Shared/macOSInstaller /Users/Shared/macOSInstaller.sparsebundle
Now attach the next USB flash drive for the EFI files, then open the OpenCore Configurator then mount the EFI partition of USB flash drive.
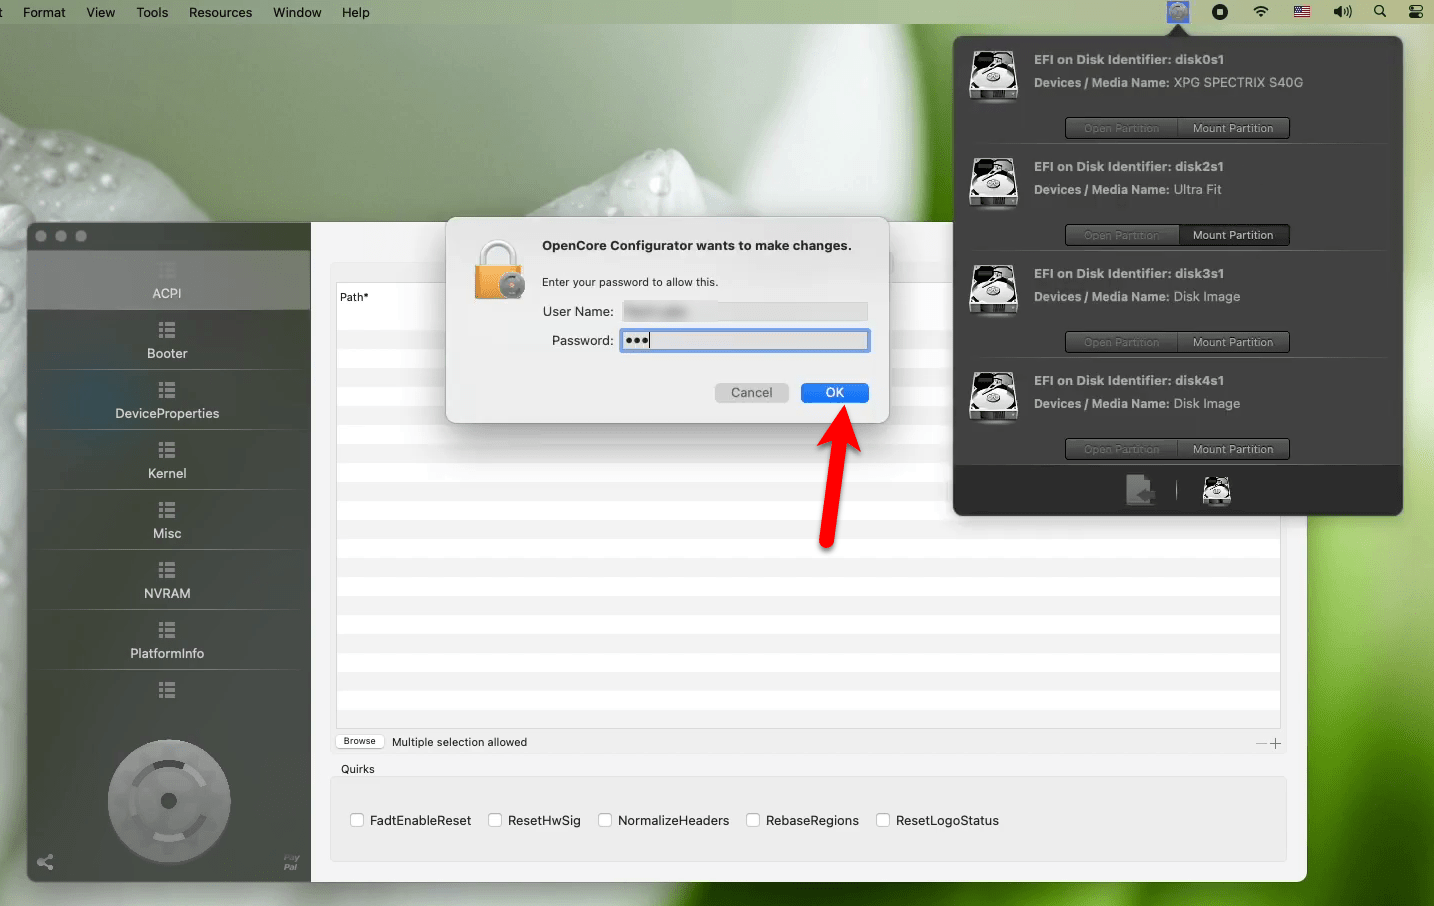
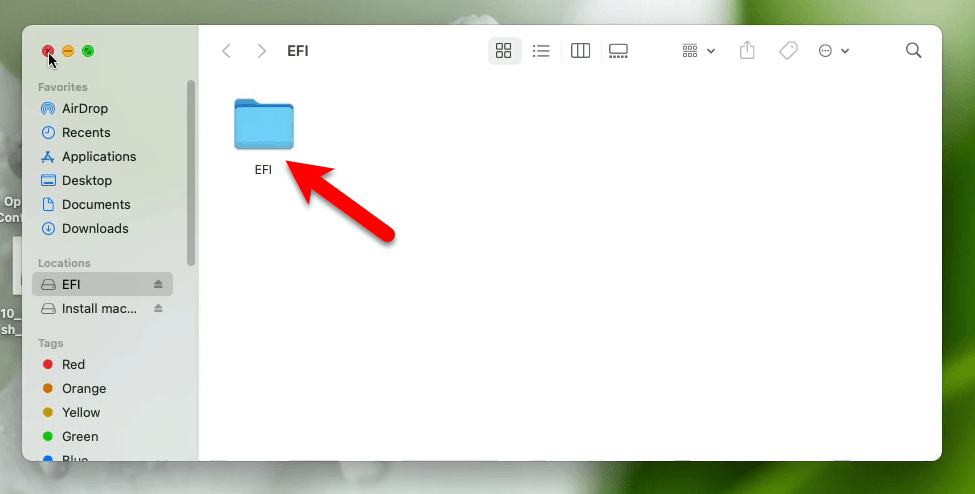
When the EFI partition mounted to the desktop, copy and paste the EFI files to the EFI partition of the USB drive.
#Step2. Create Windows 10 USB Drive
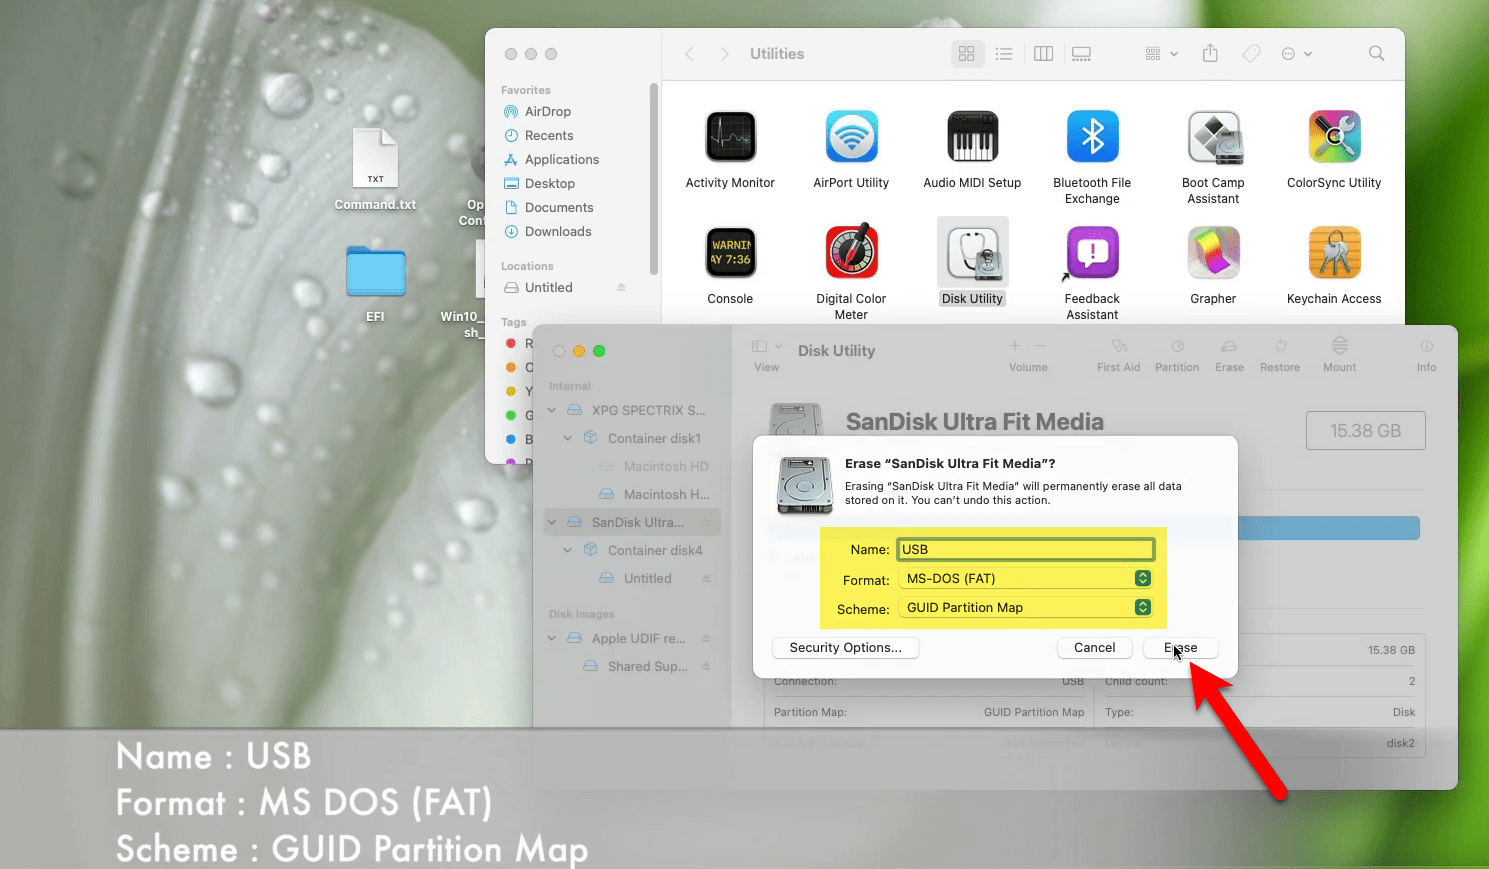
For creating Windows 10 USB flash drive, attach the USB flash drive then navigate to Go>Utilites, and open Disk Utility. Format the USB flash drive with the below settings.
- Name: Windows 10
- Format: MS-DOS (FAT)
- Scheme: GUID Partition Map
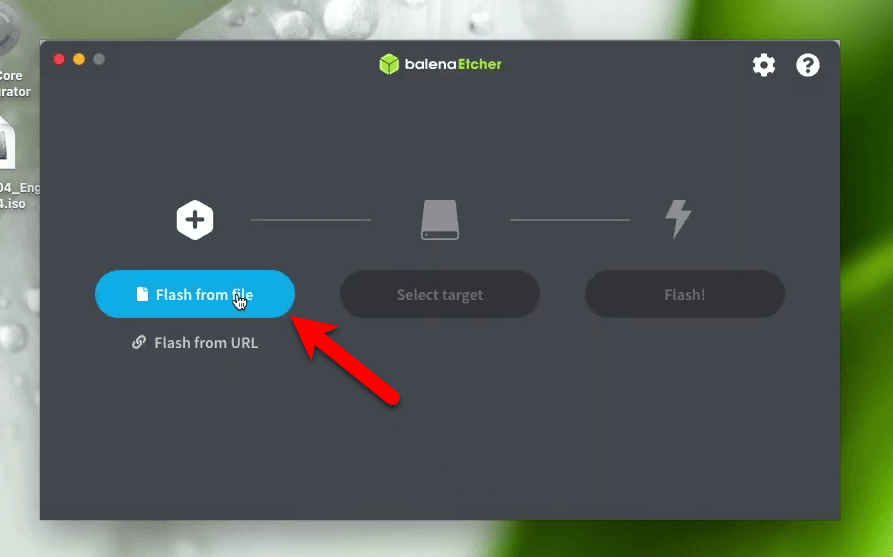
When the USB drive formatted, open up the BalenaEtcher and click on the “Flash from file” option.
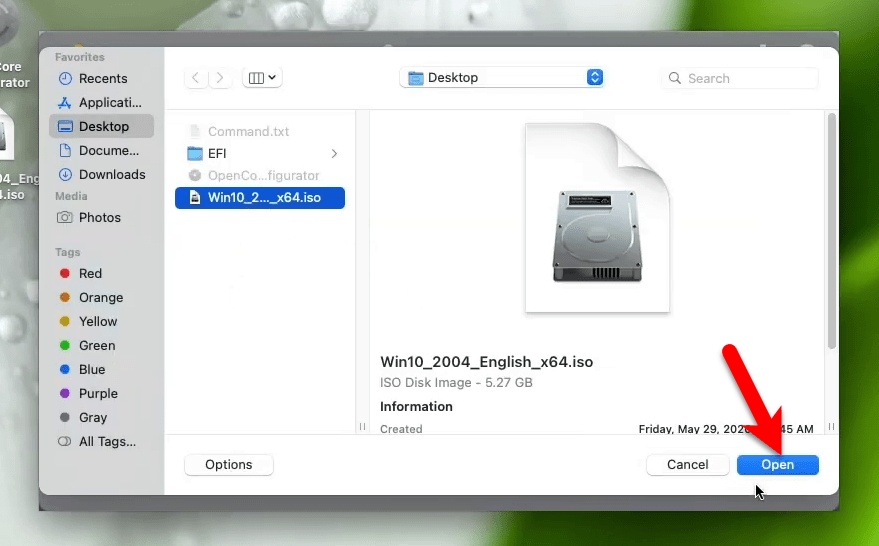
Now select Windows 10 ISO file and click open.
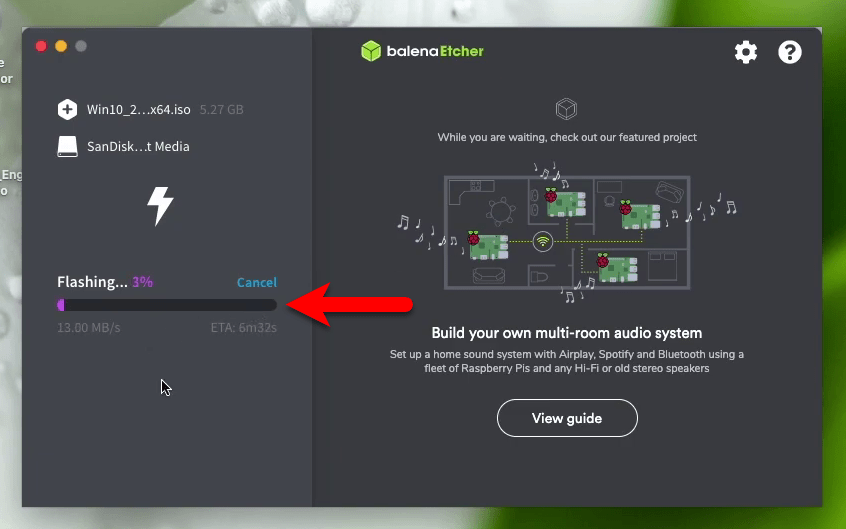
Click on continue option, select the destination, when you reached the last window click on the “Flash” option. Now the application will start copying the Windows 10 ISO file to the USB drive.
#Step 3. Configure BIOS Settings
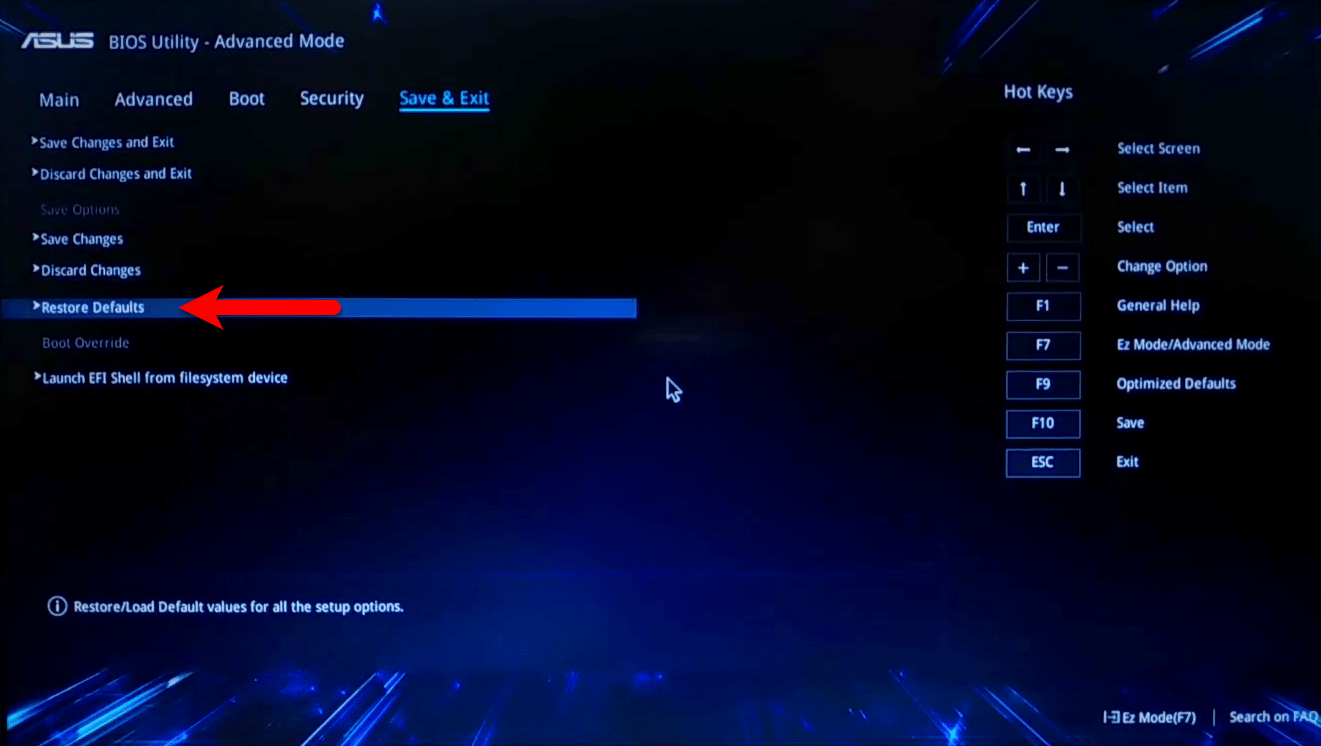
For dual-booting you need configure some basic BIOS settings, for that restart your computer and press the delete key to enter the BIOS. Select “Save & Exit” tab and “Restore Defaults” the BIOS.
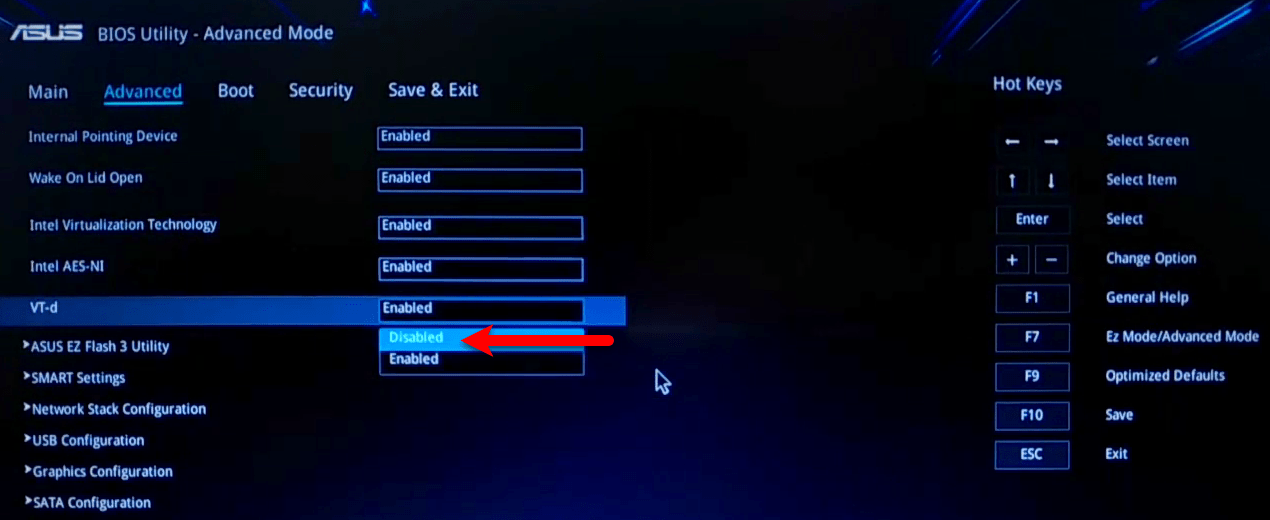
After that, your computer will restart again press the delete key to enter the BIOS settings. Select the “Advanced” tab, select “VT-d” option press enter, and select “Disabled”.
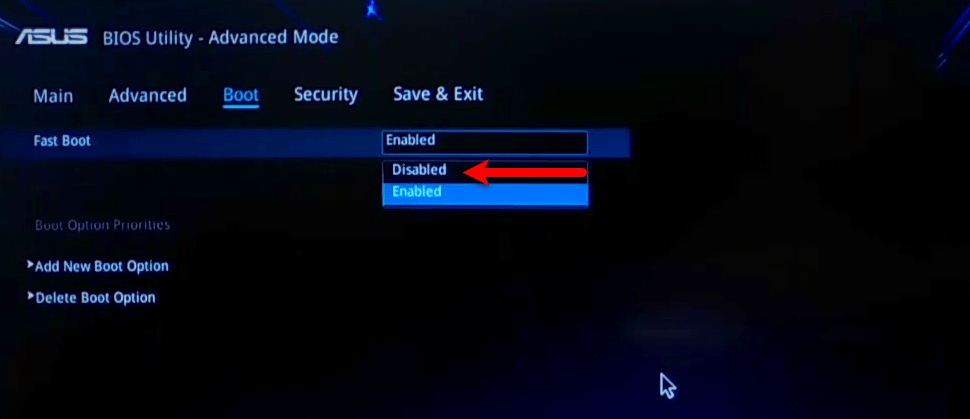
Go to the Boot tab, select “Fast Boot” press enter, and select “Disabled”. When the BIOS settings successfully changed go to the “Save & Exit” tab, select “Save Changes Exit” press enter, and select “Yes”. Automatically, your computer will restart.
#Step4. Install macOS Big Sur
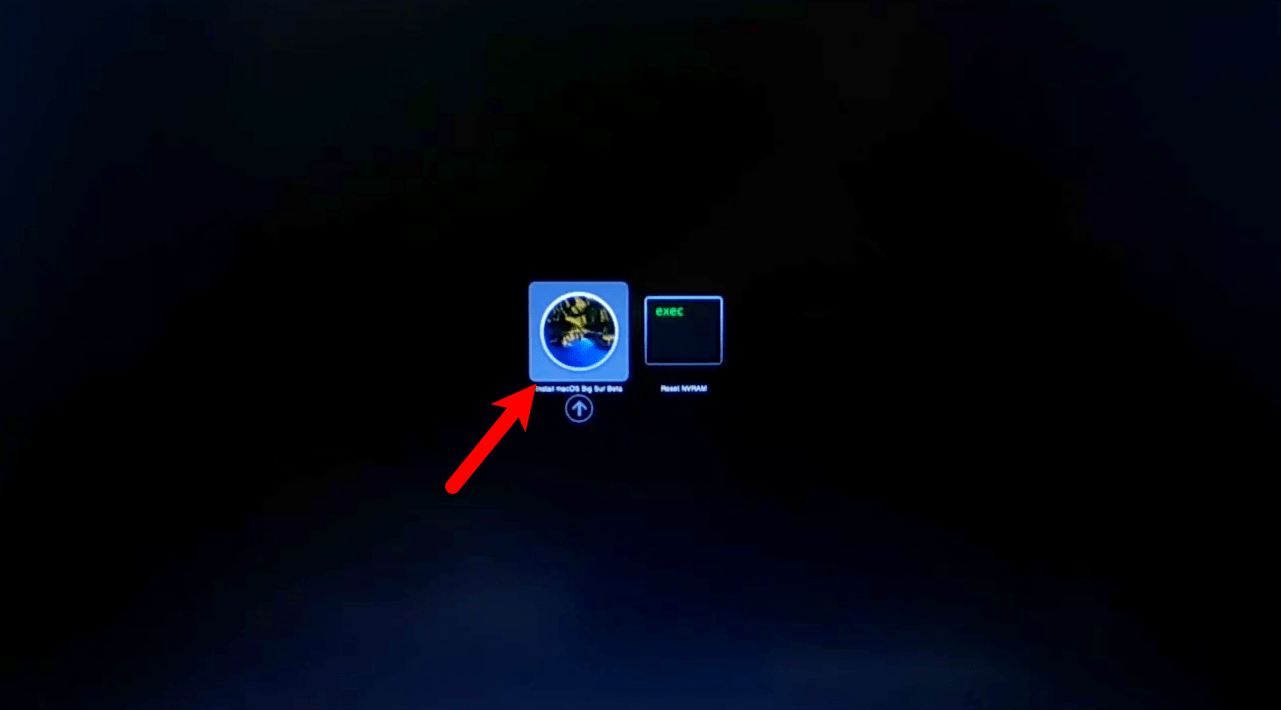
Now we are here to install macOS Big Sur 11.0 on a laptop alongside Windows 10 PC. Everything is covered clearly for installing macOS Big Sur. So, attach the macOS Big Sur Bootable USB drive, and press the boot menu now Boot macOS Big Sur from USB drive.
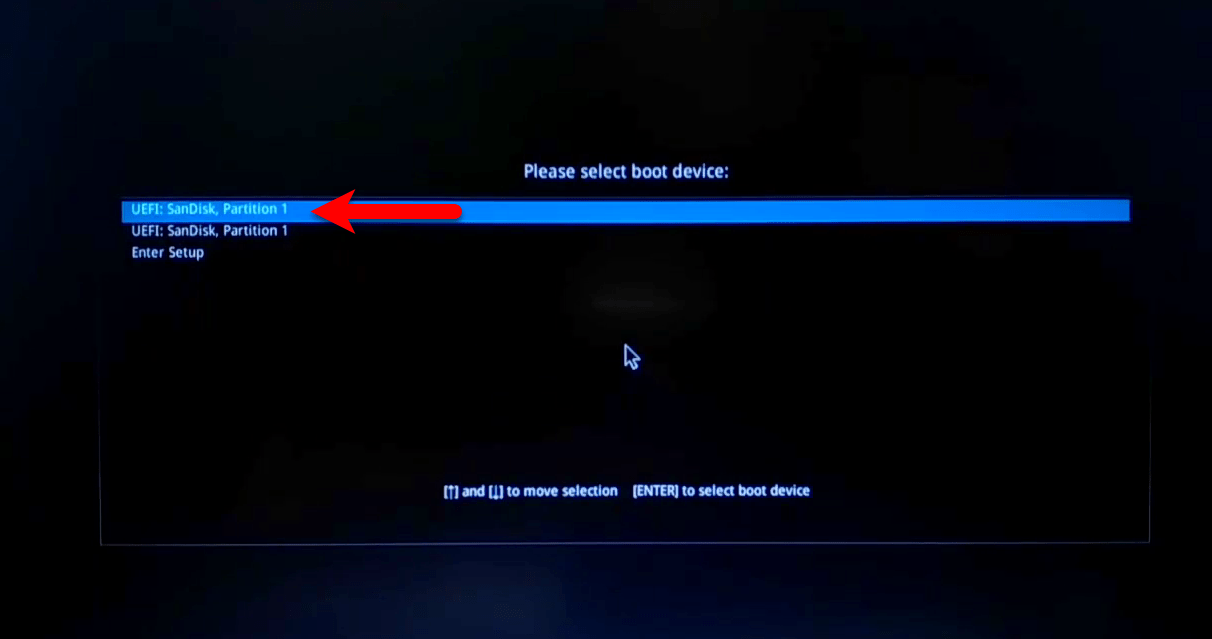
Select macOS Big Sur and press enter to go ahead.
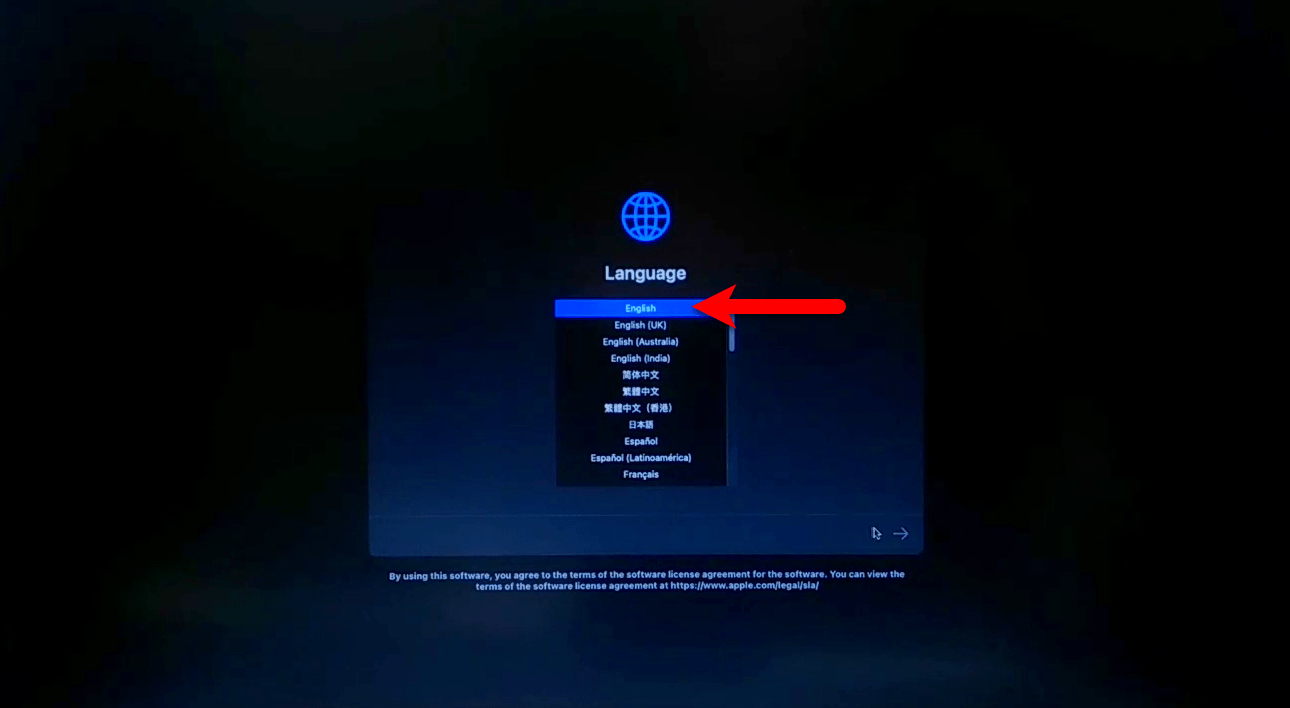
When macOS Big Sur successfully booted at the first screen select your language and press the arrow option.
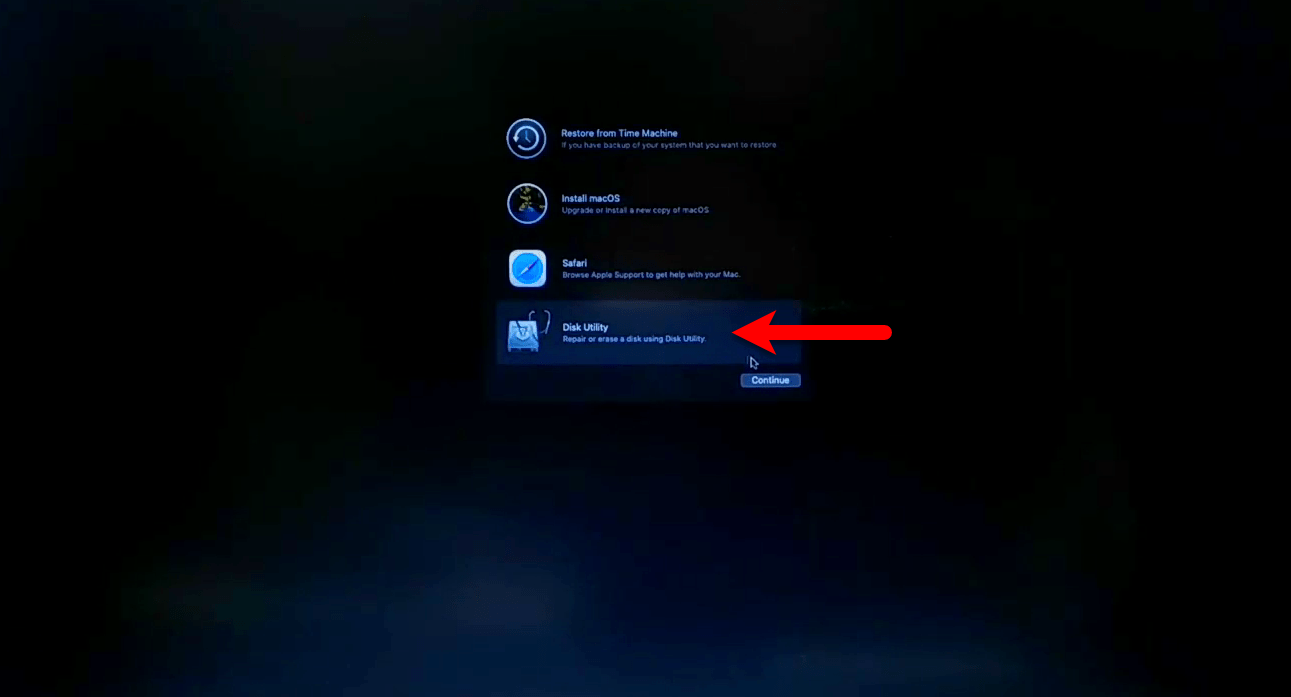
Select the Disk Utility option and click continue.
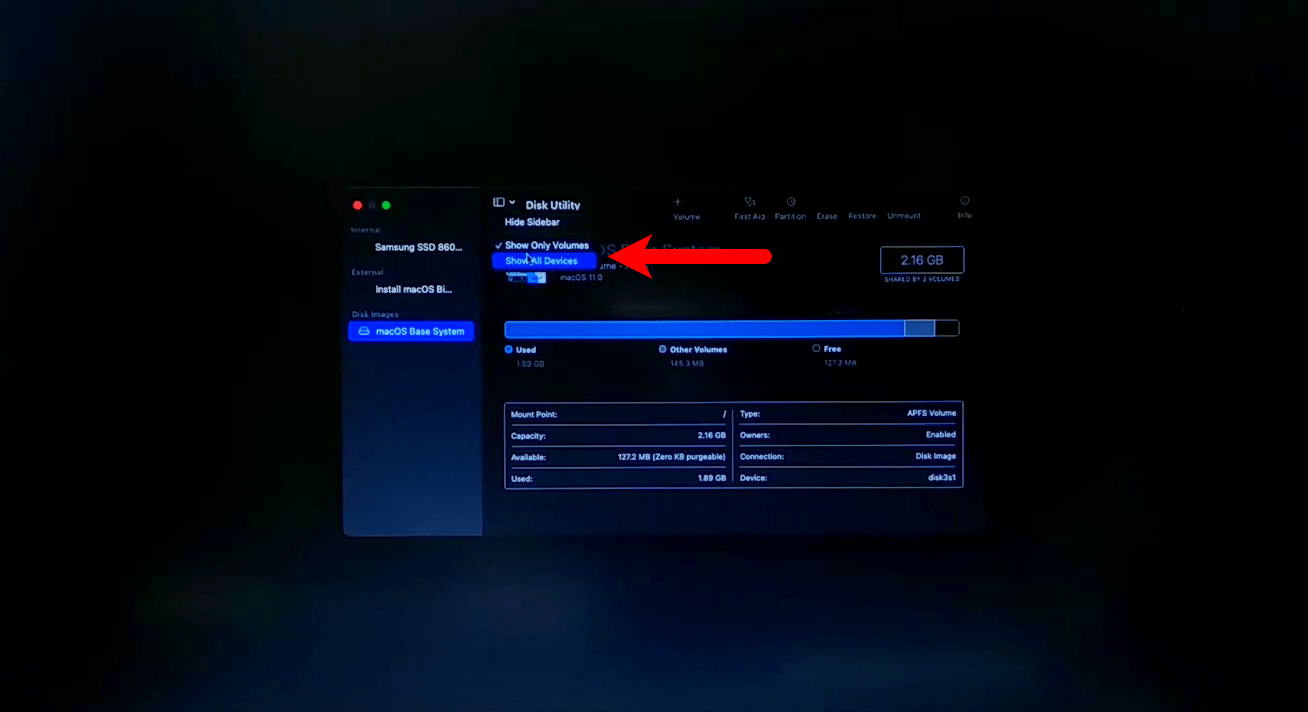
If the drives are hidden in the Utility window, click on the “View” option and select “Show All Devices” to show all the hidden drives.
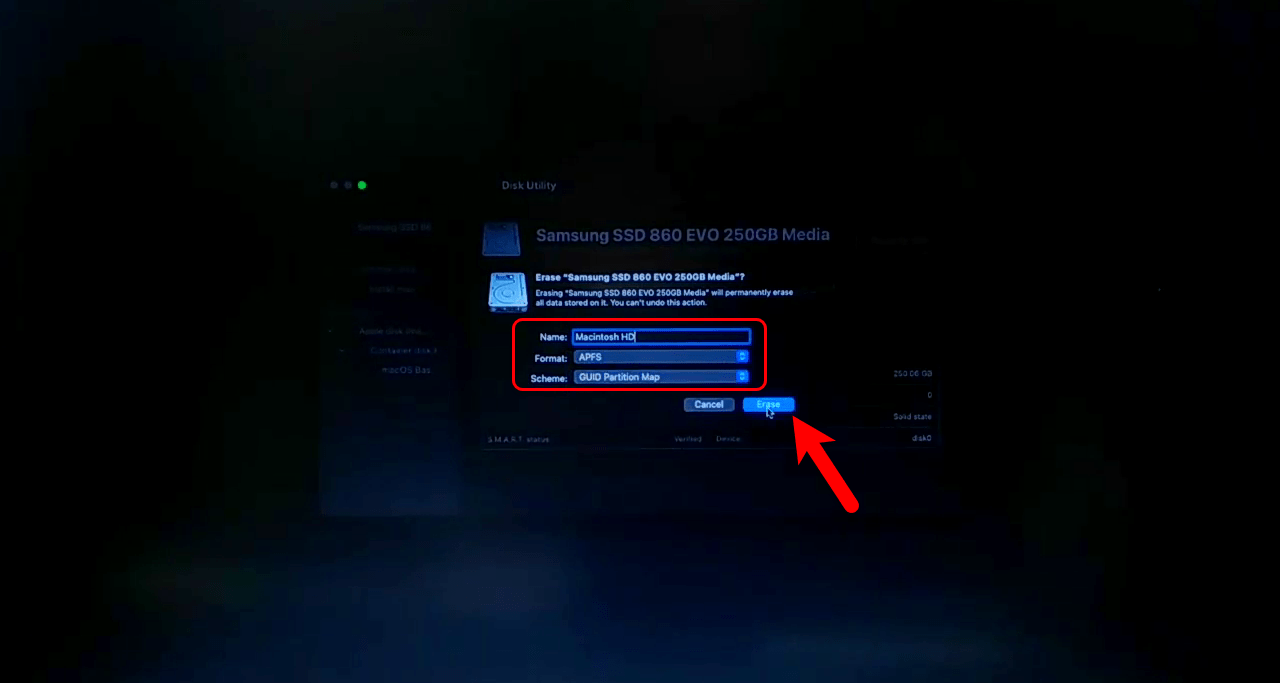
Select the drive where you want to install macOS Big Sur, then click on “Erase” and format the disk with the below setting.
- Name: Macintosh HD
- Format: APFS
- Scheme: GUID Partition Map
When the disk formatted close disk utility, select “Install macOS” and click continue.

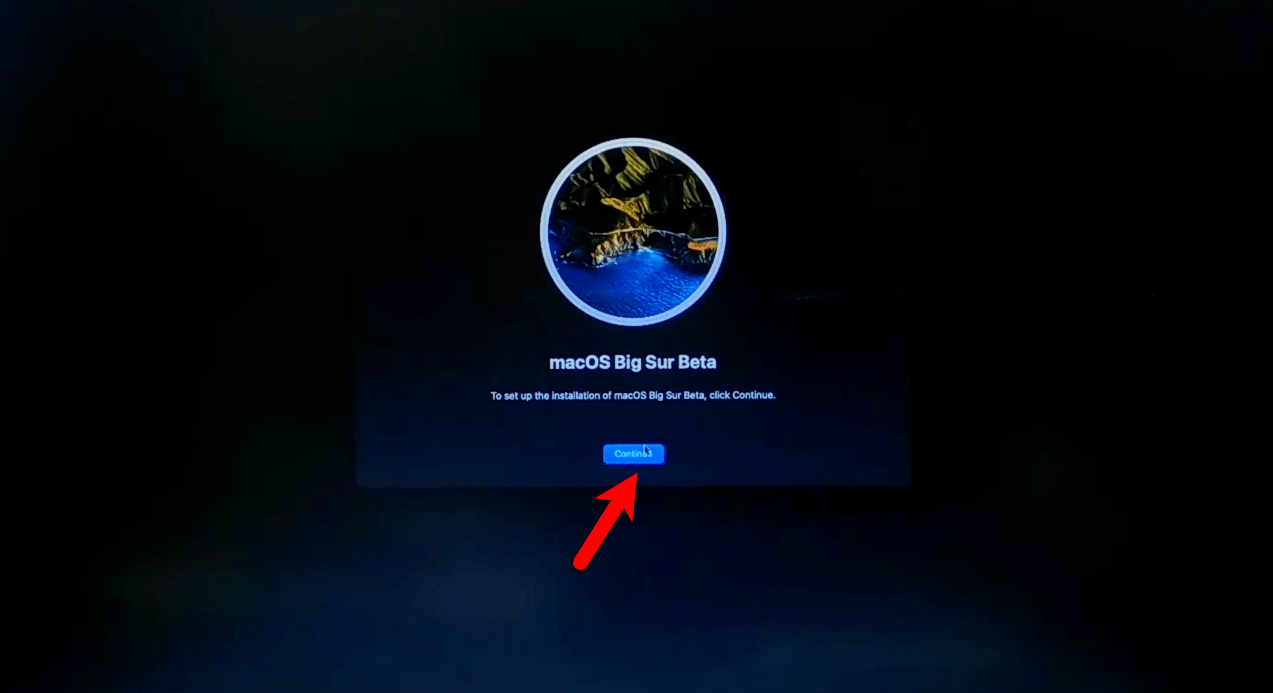
To set up with macOS Big Sur installation, click continue.
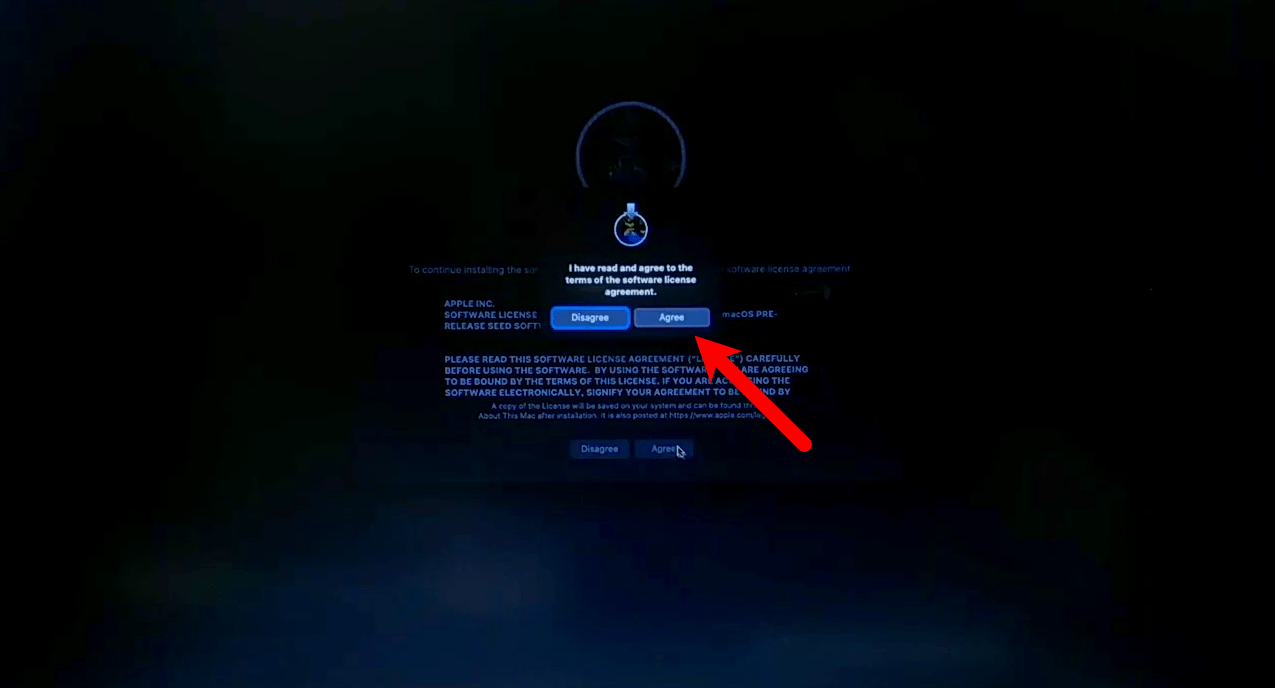
Agree with the terms and conditions of macOS Big Sur.
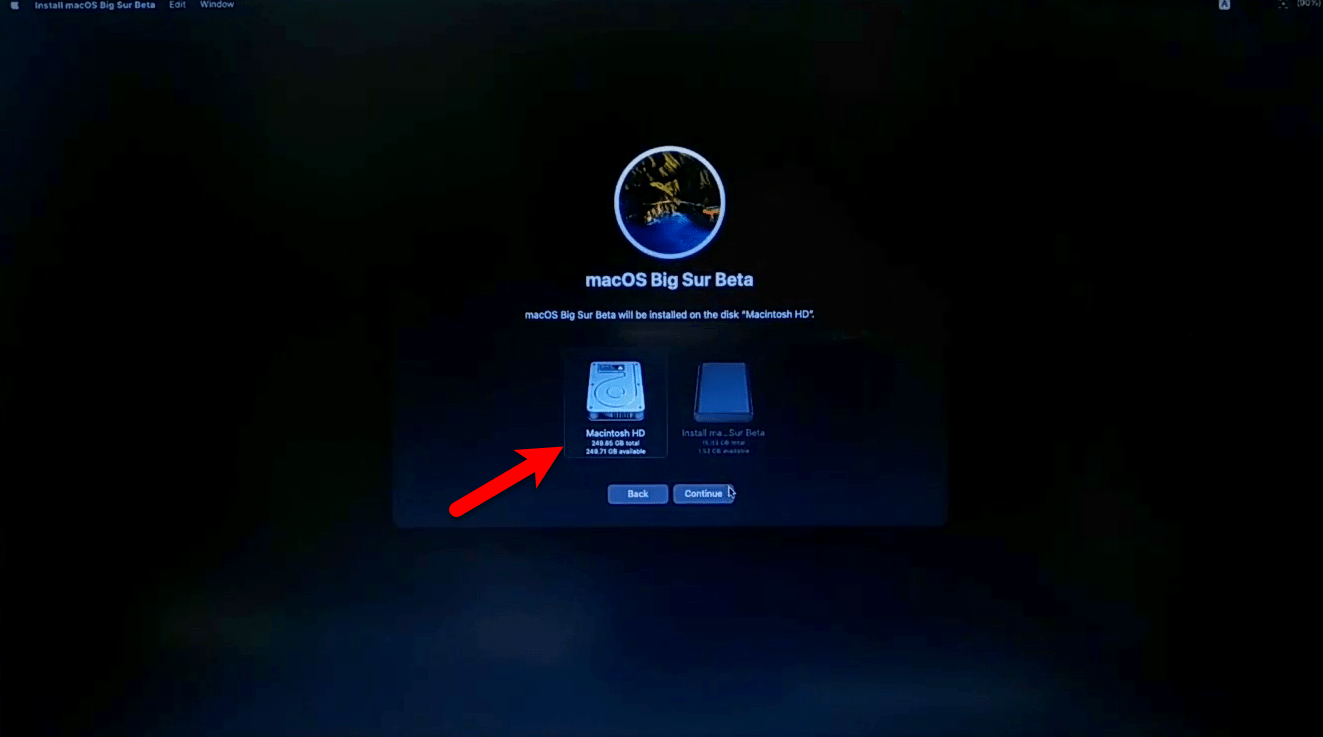
Select the drive where you want to install macOS Big Sur and click on Install.
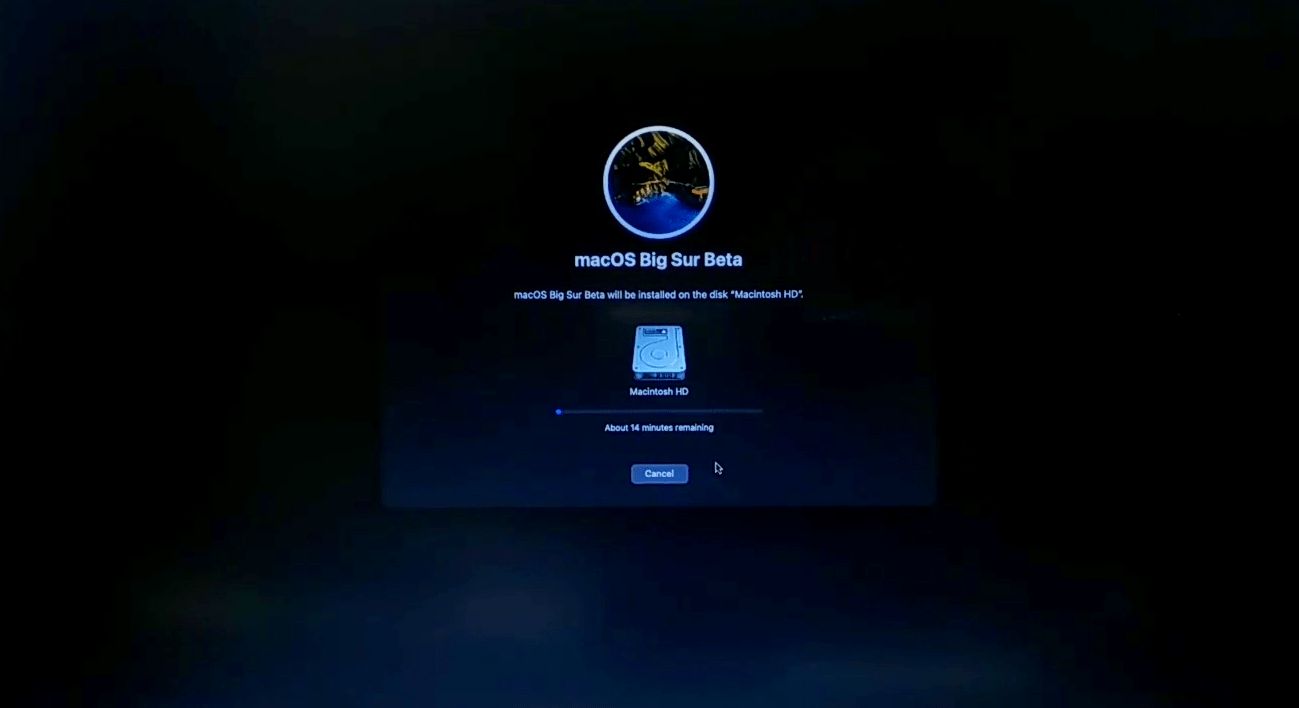
Now the installation begins to start, wait for it until it should be completed. When the installation completed automatically your computer will restart and continue the next step of installation. While the installation completed complete with basic settings of macOS Big Sur.
#Step5. Shrink Volume for Windows 10
When macOS Big Sur successfully installed on your PC, open OpenCore Configurator mount the EFI partition of system drive. When the EFI mounted copy and paste the EFI files to the EFI folder of the system drive and restart your computer.
To shrink volume for Windows 10, head over to Go>Utilites and open Disk Utility. Then click on “View” and “Show All Devices” select the primary disk and click on “Partition” again click on “Add Volume”.
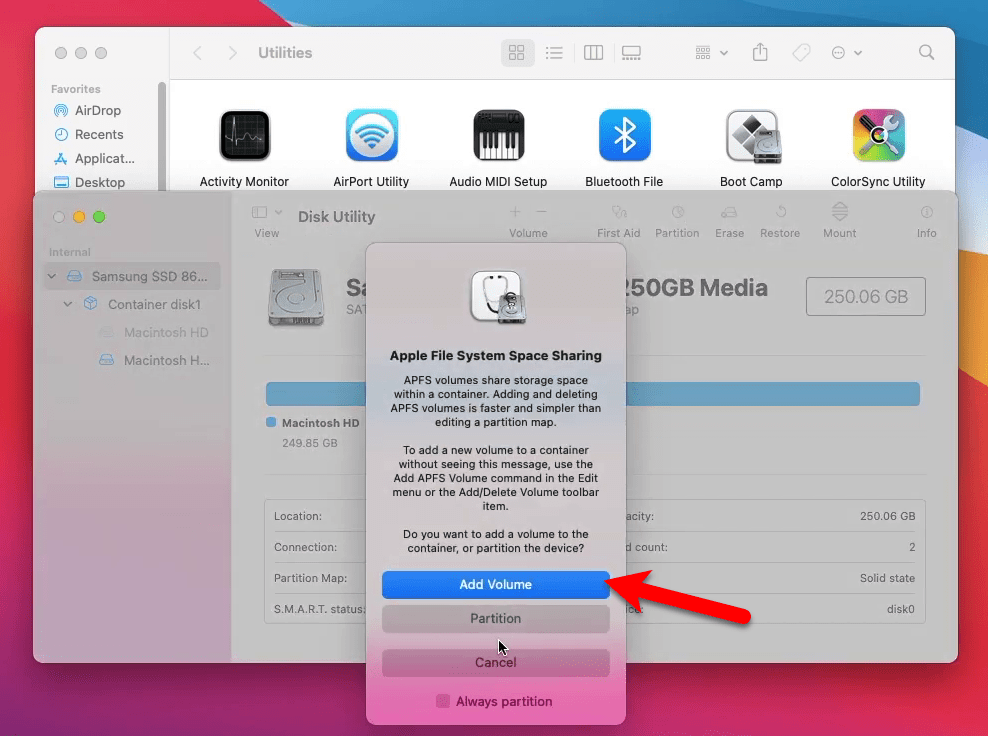
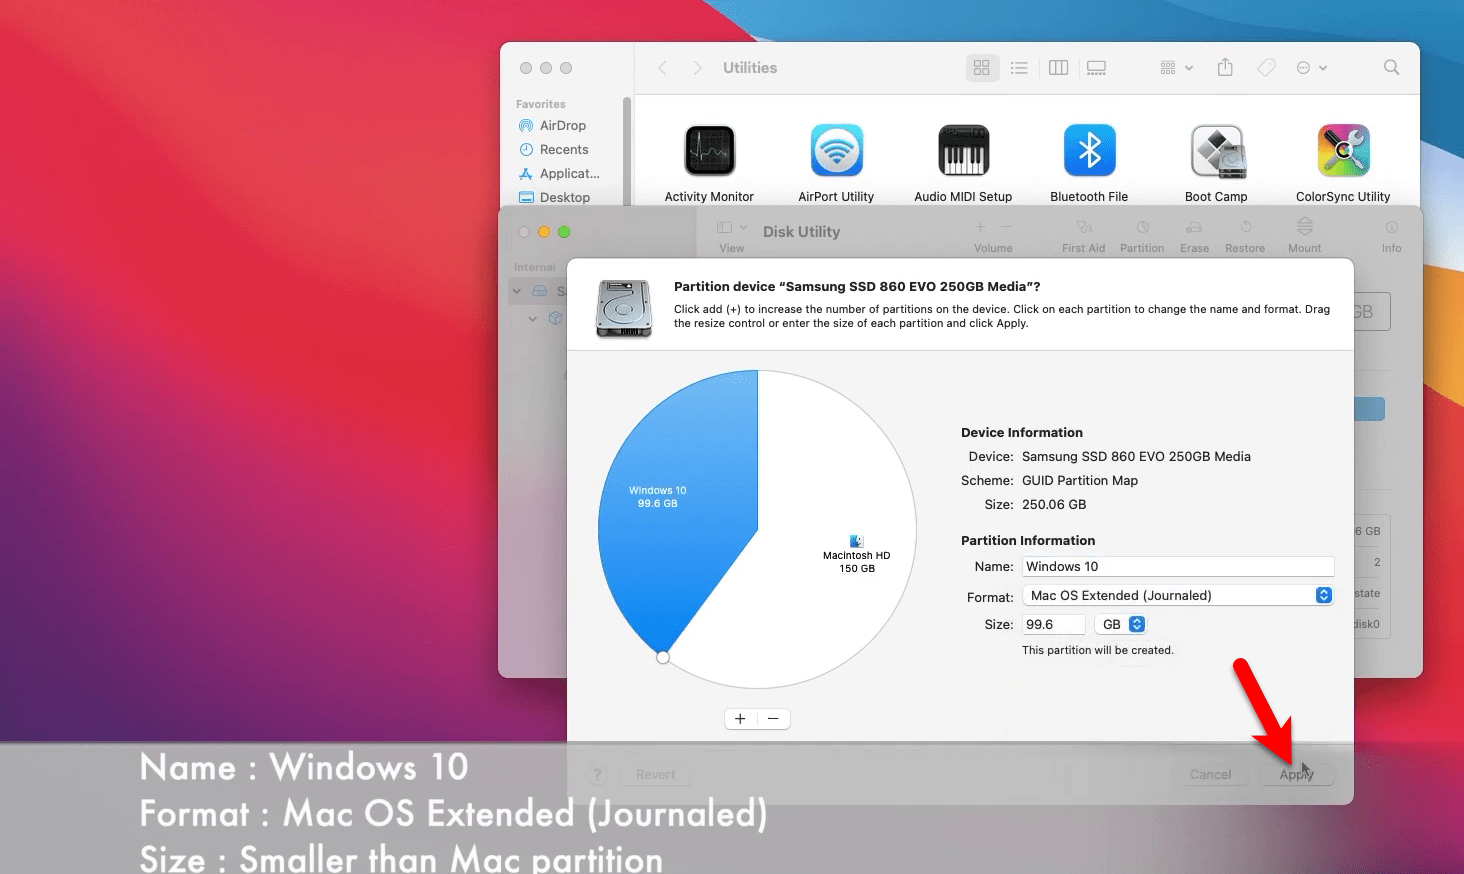
Now specify the disk setting with the below settings.
- Name: Windows 10
- Format: Mac OS Extended (Journaled)
- Size: Small than Mac Partition
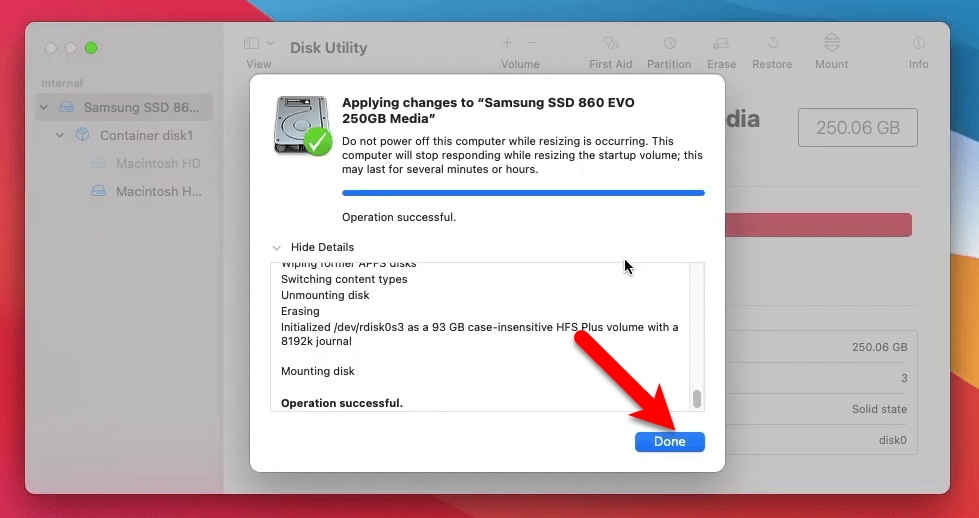
- Click Apply to shrink volume
Now wait to shrink volume for Windows 10, when the volume created click Done.
#Step6. Install Windows 10
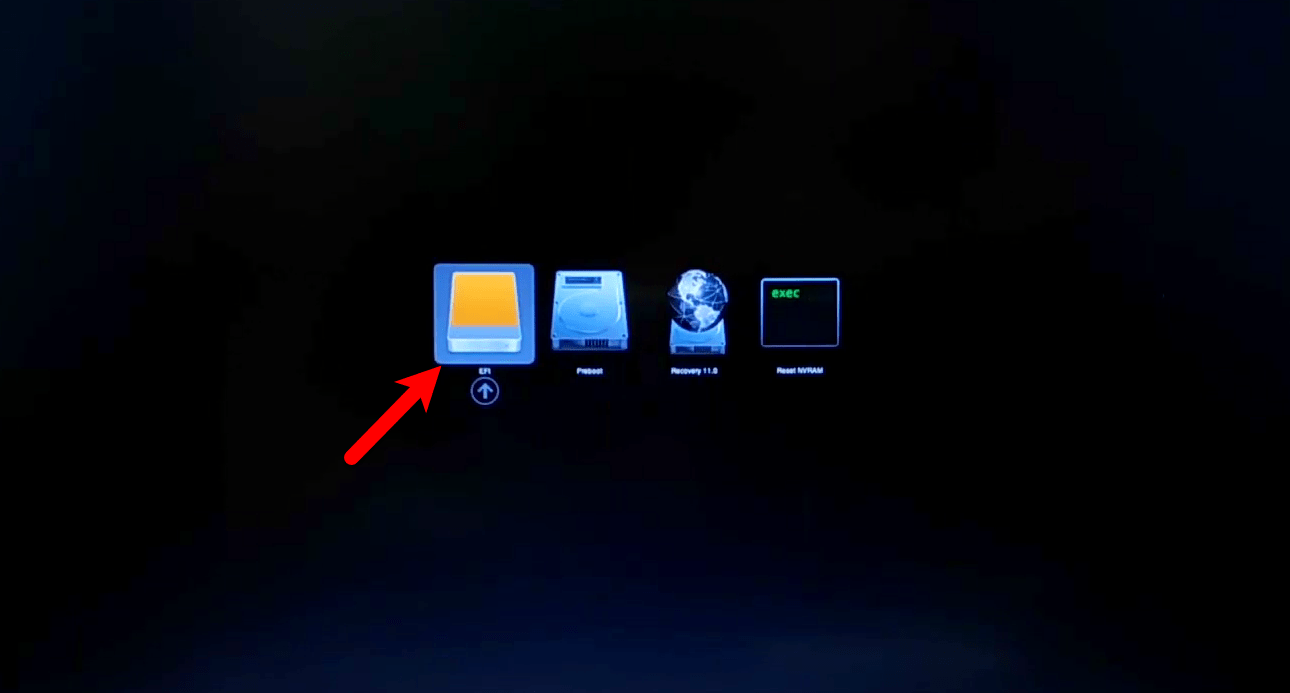
When the volume shrank for Windows 10, attach the Bootable USB drive of Windows 10 and restart your PC. When the press restarted press and hold the boot menu key. Select the “EFI” option and press enter.
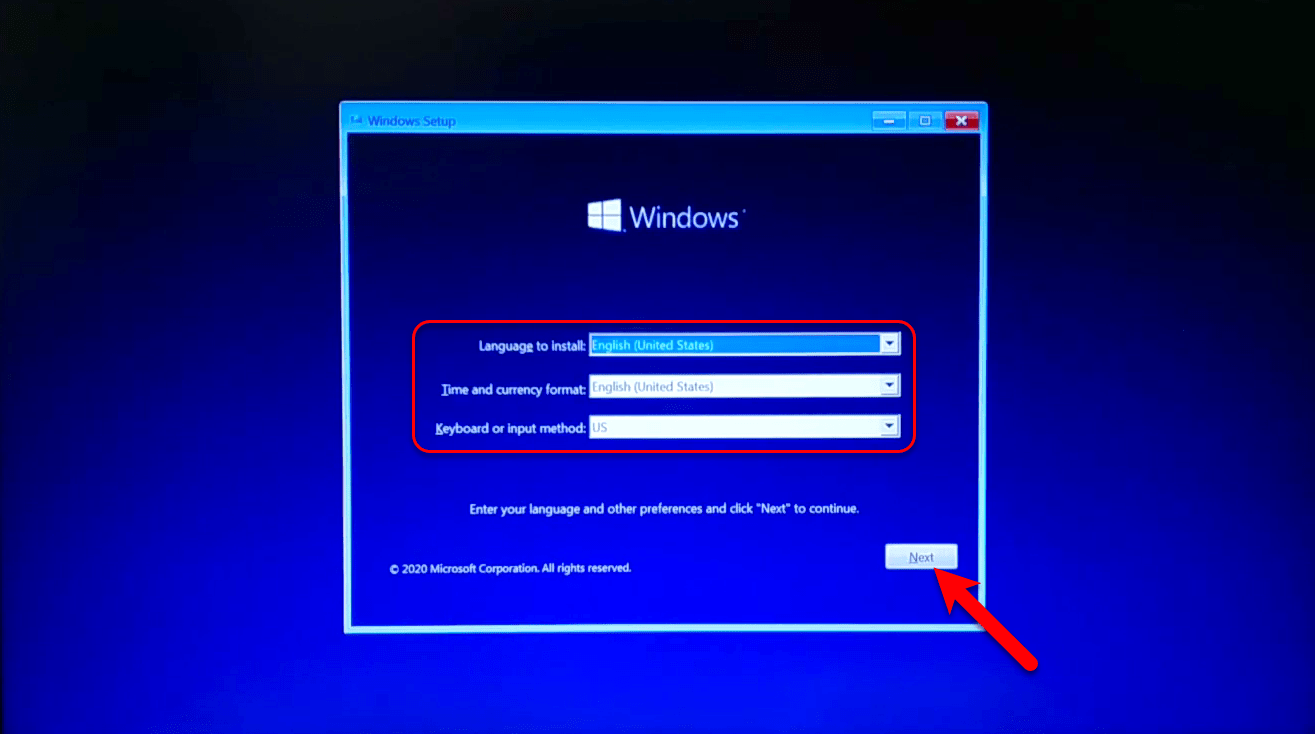
Once Windows 10 boot to the installation, select your language to install, time and currency format, Keyboard or input method, and click next.
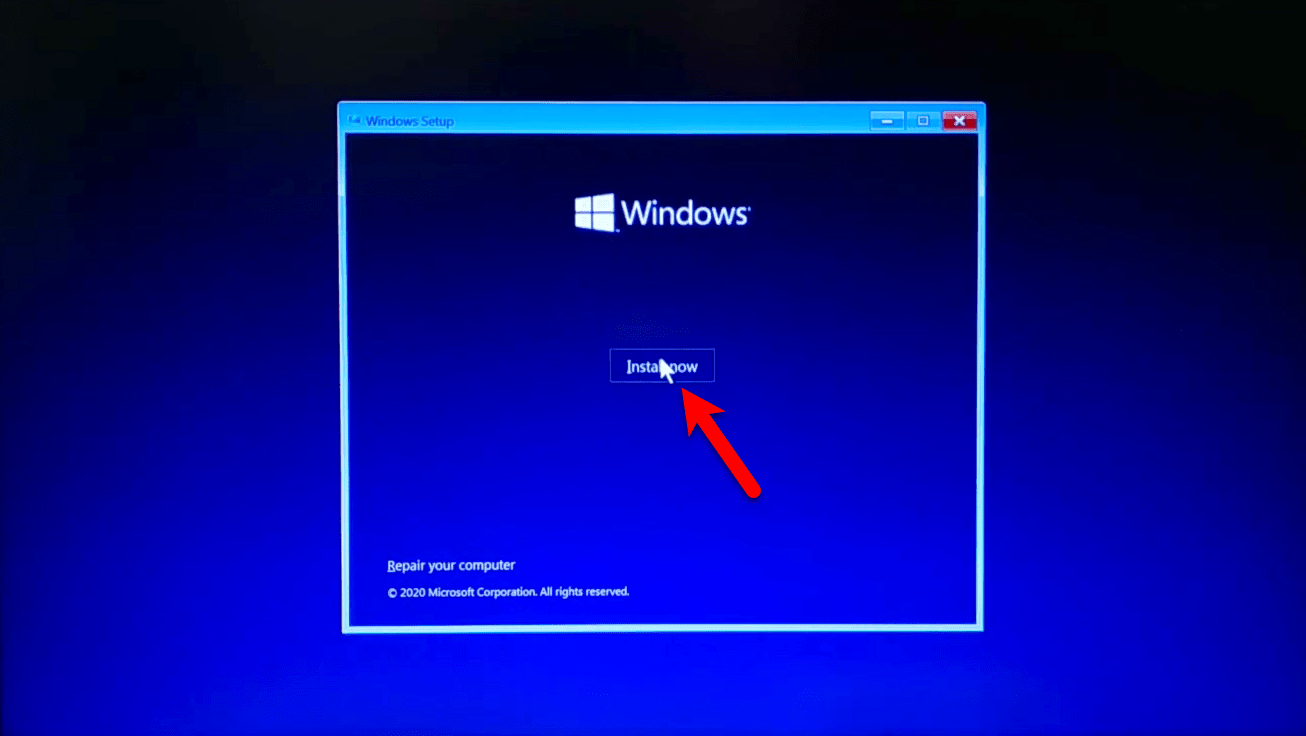
In this window click on Install option.
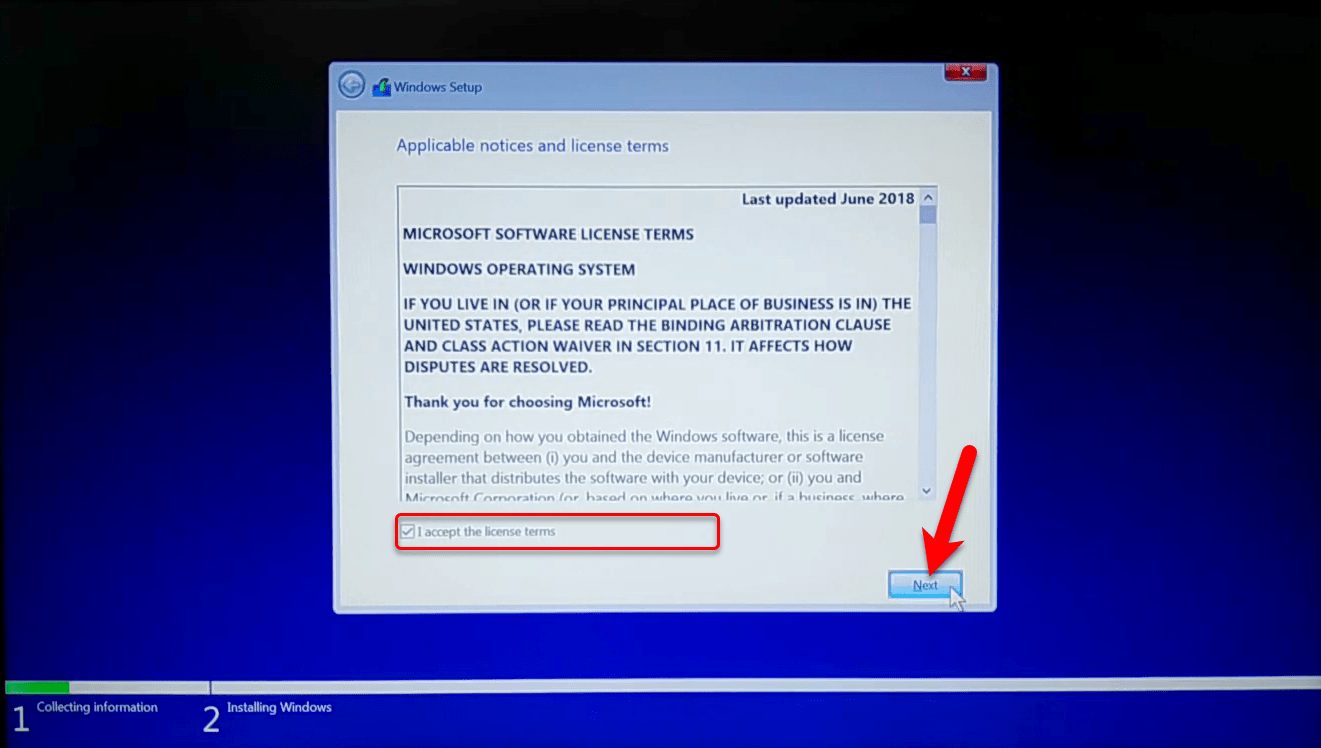
Check the box of “I accept the license terms” and click next.
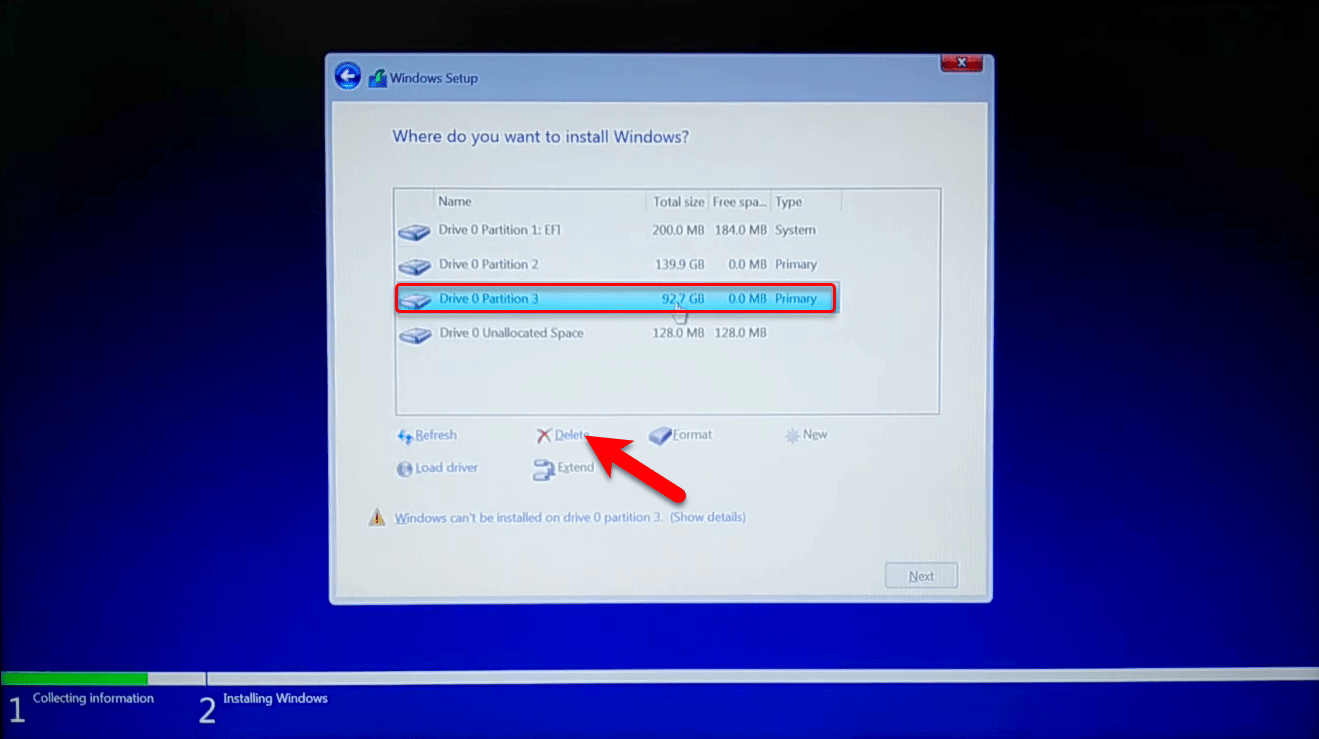
Now be careful to do not delete the EFI partition as macOS, select the EFI partition which you shrink for Windows 10 and click Delete option.
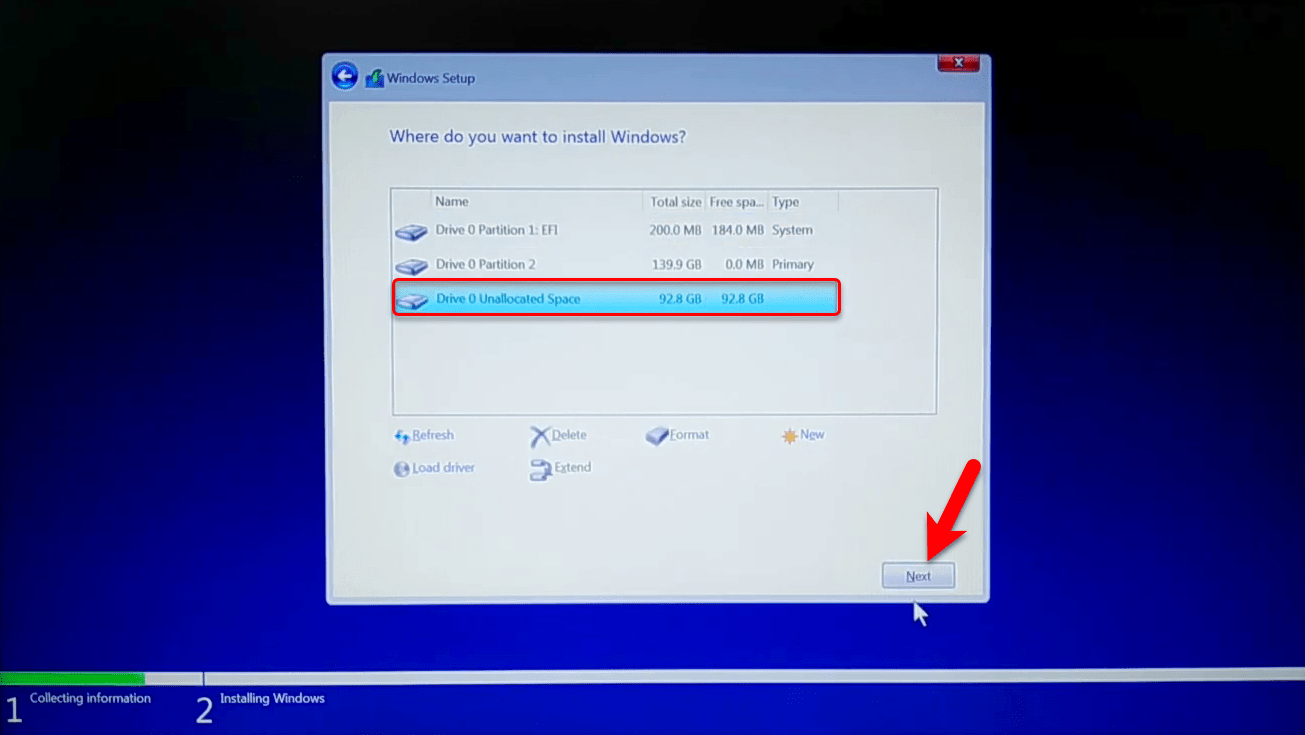
Now select the unallocated drive and click next.
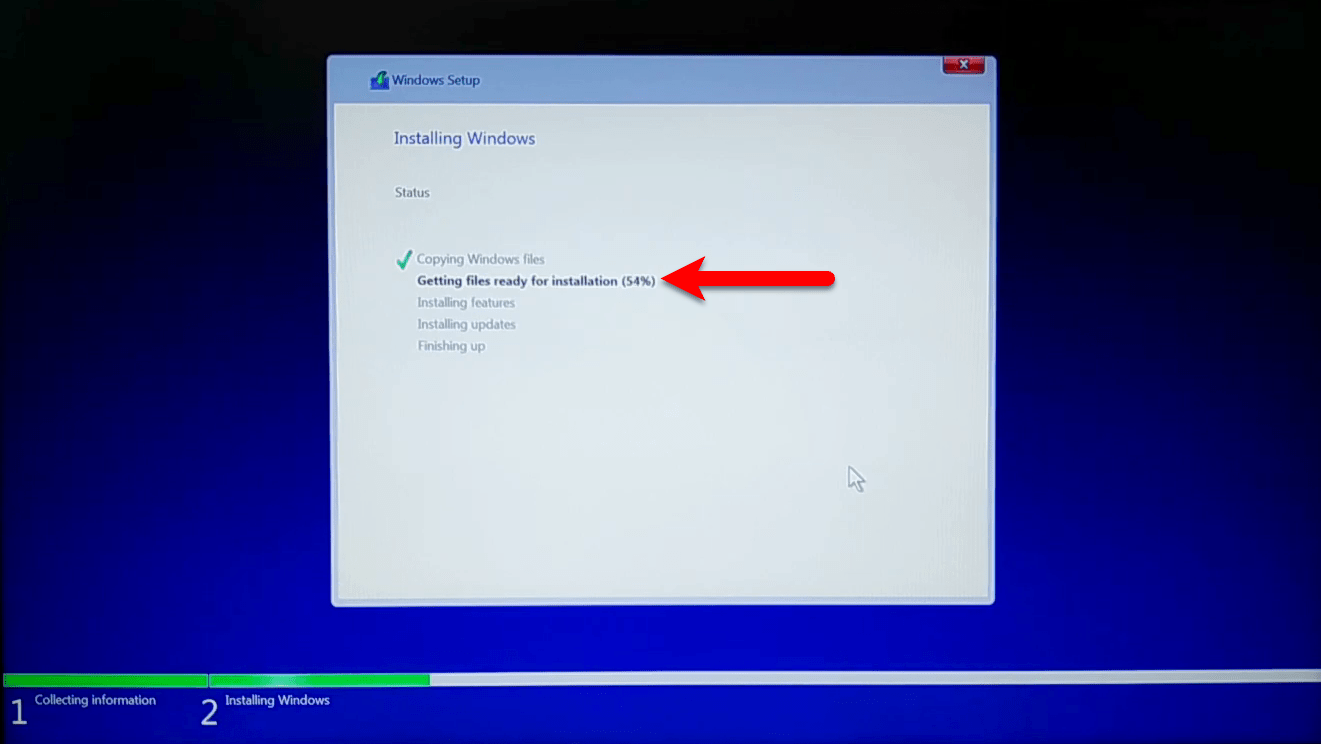
Now it will start installing Windows 10, this process will take some time. Once the installation completed automatically your computer will restart.
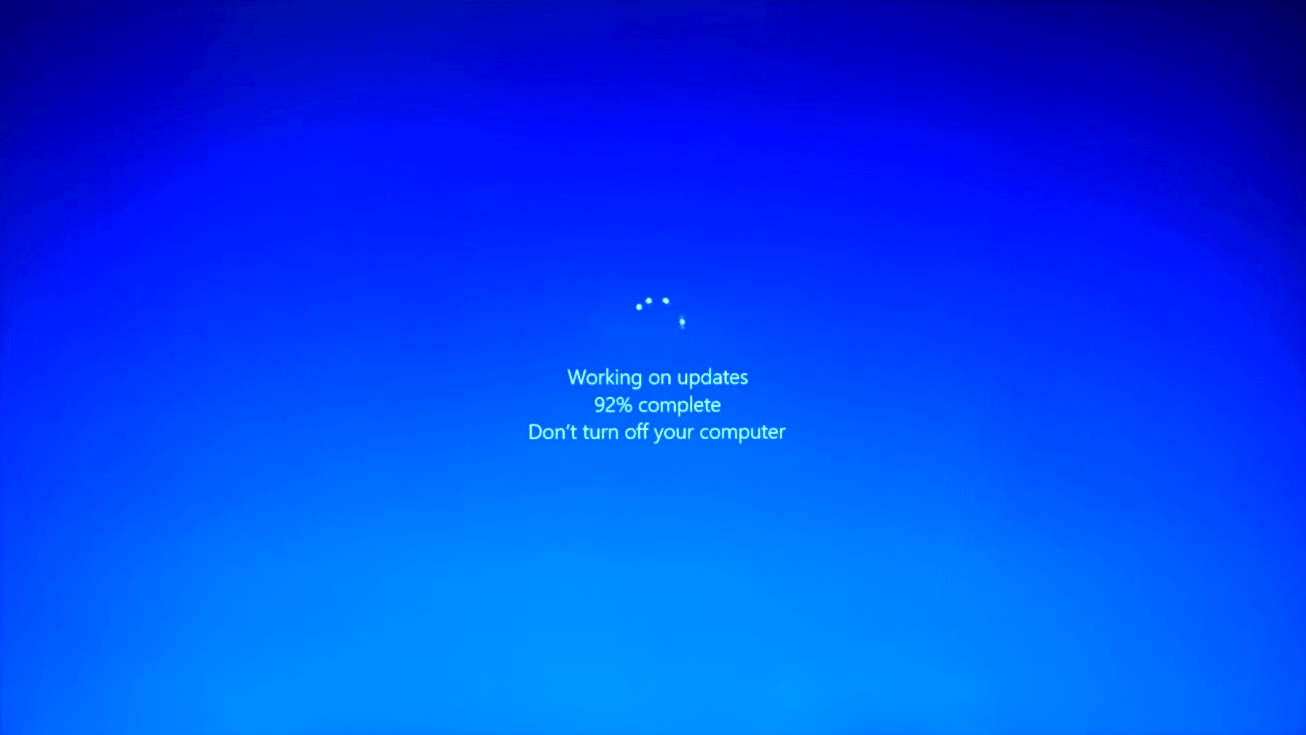
Once your computer restarted complete the basic settings of Windows 10. When you completed logged in to Windows, navigate to Windows start menu click on the “Gear” setting icon. Then click on the “Update & Security” option and check for Windows 10 update. Also, don’t forget that Windows 10 update process will take some time, during updating your PC will restart several times.
Successfully macOS Big Sur 11.0 is being dual-booted with Windows 10 on Laptop. Furthermore, if you faced any kind of problem-related to this article, don’t forget to share your problem using the below comment section.