
macOS Big Sur 11 with a new redesigned UI interface, Control Center, is pretty interesting to install on your Macs or Hackintosh PC. With new redesigned curved round edges macOS Big Sur 11 looks pretty attractive. Overhaul, macOS Big Sur announced one of the biggest releases of Apple operating system for Mac computers. And macOS Big Sur 11 is the first operating system by Apple Inc that supports Intel-based processors. Usually, Apple wanted to release macOS Catalina with this feature but finally released macOS Big Sur 11 with new +85 features and a new version.
macOS Big Sur 11 with the fastest Safari browser ever in the history of Apple operating system for Macintosh computers looks great. On the other hand, lots of changes to the Message interface App, and other several Apps. macOS Big Sur 11 is available in Beta software update, it means there is a big chance for developers to test macOS Big Sur on their PCs.
However, after installing macOS Big Sur on PC-Hackintosh PCs most of the users faced the “EFI” file installation. Due to that, we have decided to show you through this guide how to create OpenCore EFI for macOS Big Sur.
Related:
What is EFI File System?
The EFI (Extensible Firmware Interface) system partition or ESP is a partition on a data storage device (Usually a hard disk drive or solid-state drive) that is used by computers adhering to the Unified Extensible Firmware Interface (UEFI)
What is OpenCore?
OpenCore is an alternative bootloader to CloverEFI to Chameleon. It is not only for Hackintosh and can be used on real Macs for purposes that require an emulated EFI. It also aims to have the ability to boot Windows and Linux without the need for using different acpi tables. It has a clean codebase and aims to stay close to how a real mac Bootloader functions. Kext injection has been greatly improved.
Create OpenCore EFI for macOS Big Sur
For the purpose of creating OpenCore EFI for macOS Big Sur you will require “OC Gen X Pro” “OC Builder” “OpenCore Configurator” “SSdts” and “Dsdts” according to your system and laptop, also the latest version of Xcode which you can get it from Mac App Store.
Before getting started to Create OpenCore EFI for macOS Big Sur, you have to download the required files from down below links.
- Download OC Gen X Pro (GitHub)
- Download OC Builder (GitHub)
- Download OpenCore Configurator (GitHub)
- Download EFI file (GitHub)
Note: The OC Gen X Pro will generate obsolete EFI which can not be used for macOS Big Sur 11. So the only purpose of using OC Gen X is that it creates good Config.plist and Fukex as well.
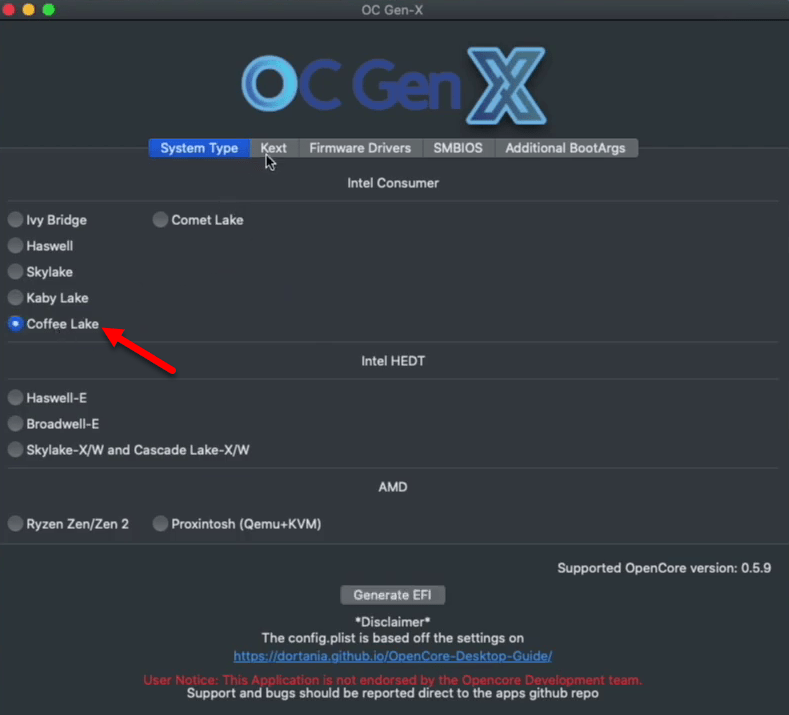
- Download the required files and at the first step open the OC Gen X Pro for creating Config.plist. When OC Gen X opened, at the welcome window on the “System Type” tab, you can select the accordance with your system processor’s and codename and in my case, it’s a coffee lake.
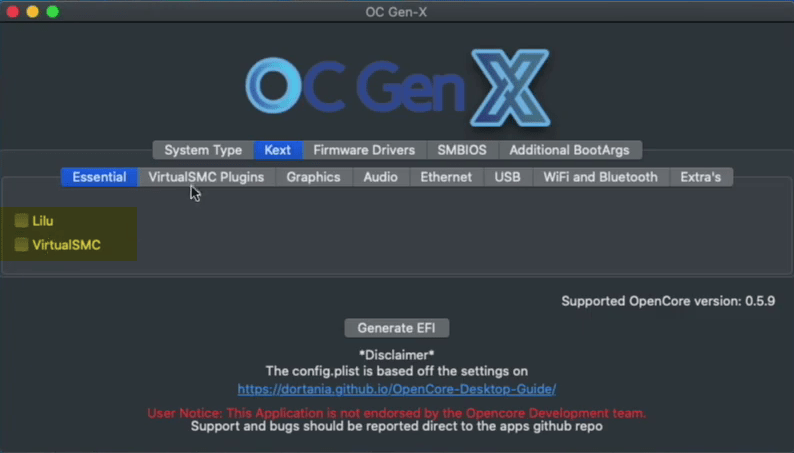
2. Select the “Kext” tab click on the “Essential” tab and deselect the “Lilu, VirtualSMC” option.
3. Select “USB” tab and deselect the “USBInjectAll”

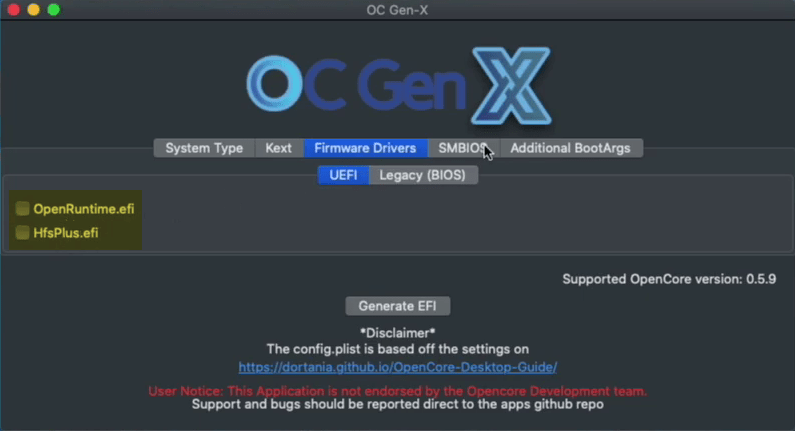
4. Select “Firmware Drivers” tab, and from the “UEFI” tab, deselect the “OpenRuntime.EFI” “HFsPlus.EFI” options.
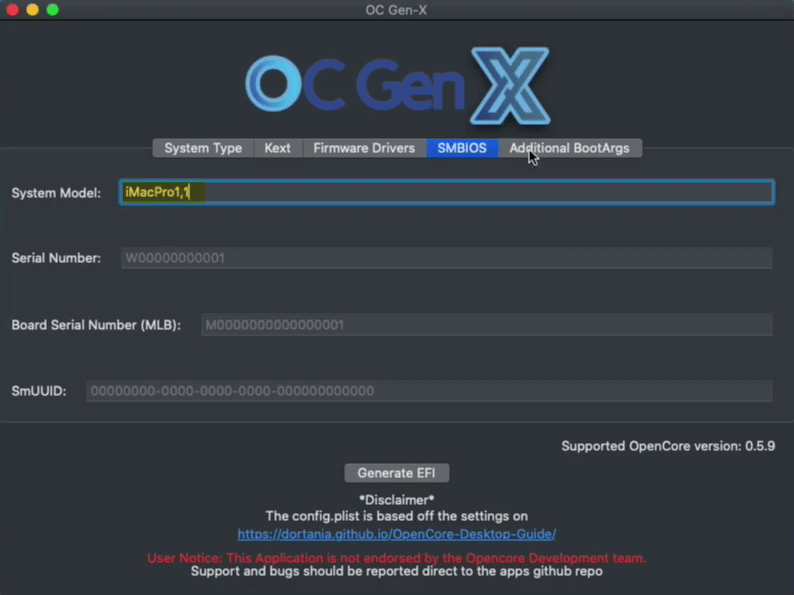
5. Select the “SMBIOS” tab and add the sm bios to the system model and in my case, it’s “iMacPro1,1”.
6. Select “Additional BootArgs” tab, and add bootargs like “-v alcid=11”.
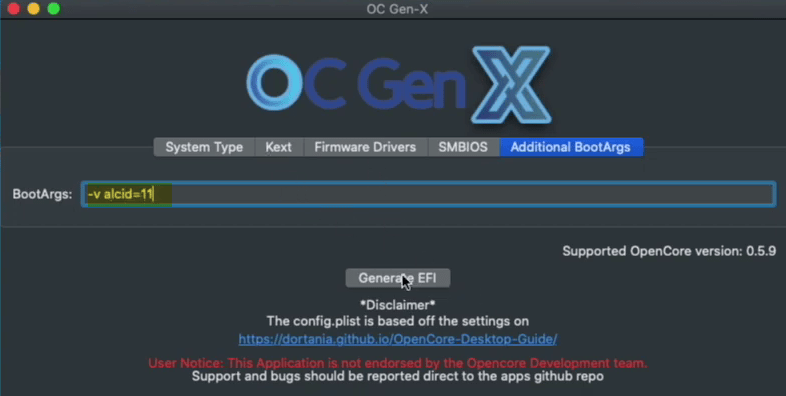
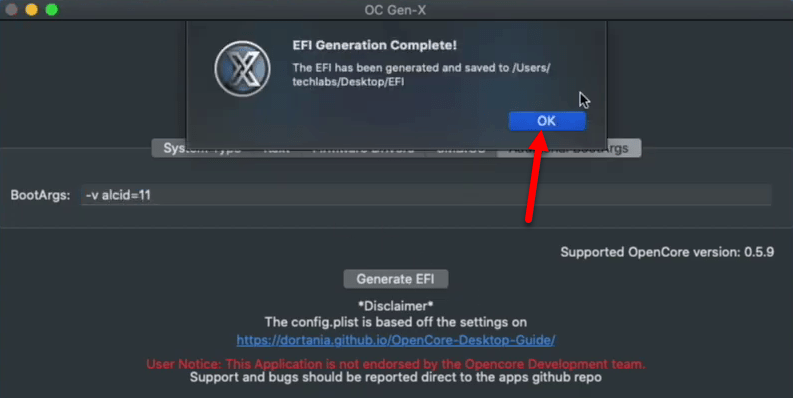
7. Once every settings performed clearly click on the “Generate EFI” option to create the “EFI” file. Once the EFI generated the “EFI” folder will appear on your desktop. When the EFI created close the OC Gen X Pro application.
8. Now open the EFI folder copy the config.plist and USB kext from kext folder to your desktop and delete the EFI folder from the desktop.
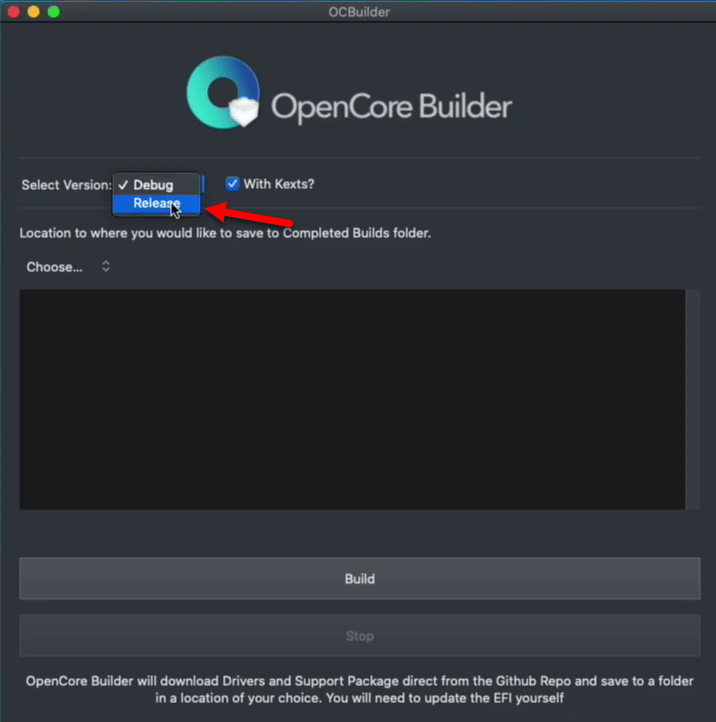
9. When that’s done open the “OpenCore Builder”, once it opened from version select “Release”.
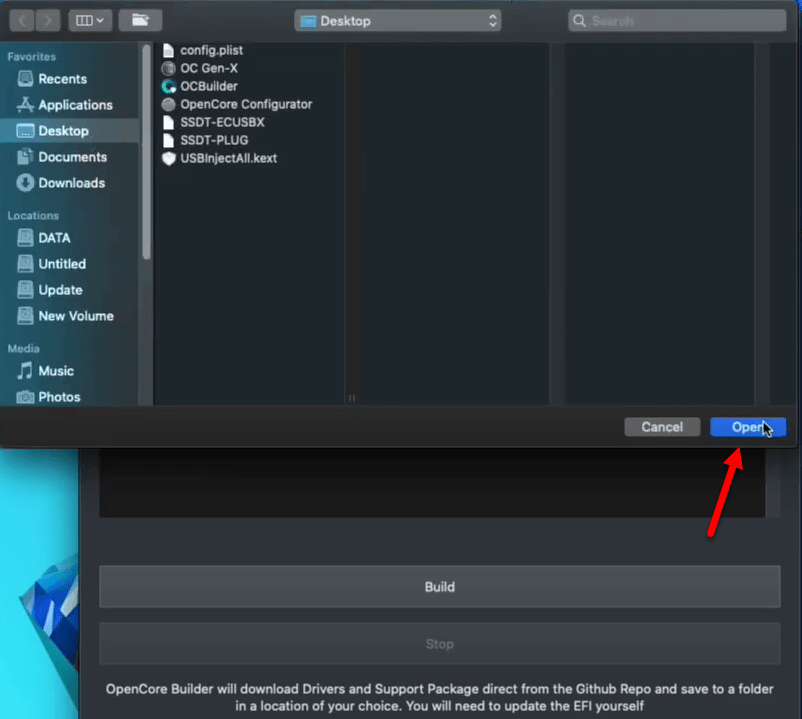
10. Select the location where you want to save the complete Builds folder, for specifying the location click on “Choose”.
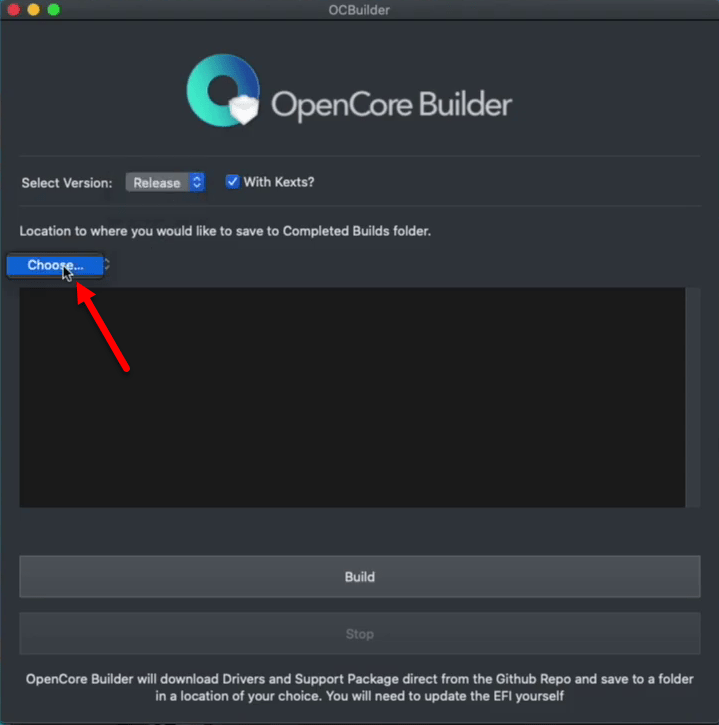
11. For the best location desktop is perfect, click on the “Open” option.
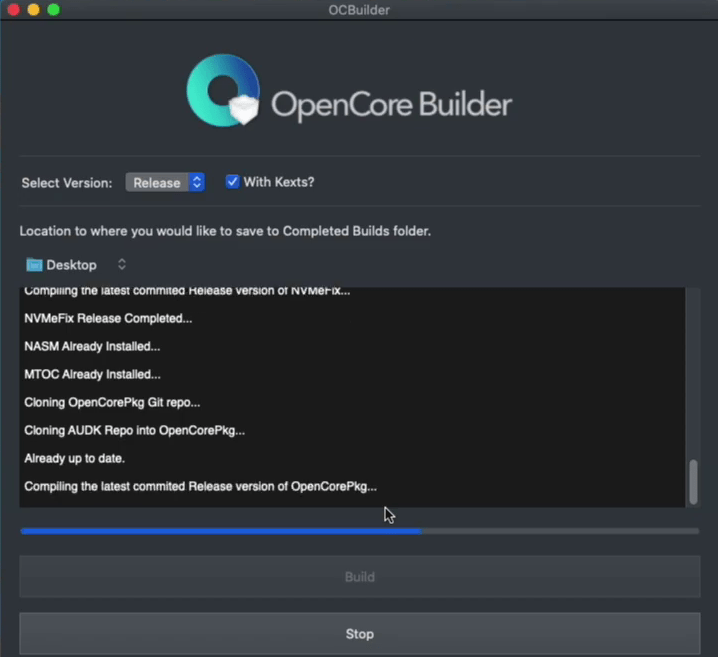
12. Once everything is cleared, click on the “Build” option to start building. Remember you must be connected to the internet to download the files from GitHub. Also, the process of building the file will take some time.
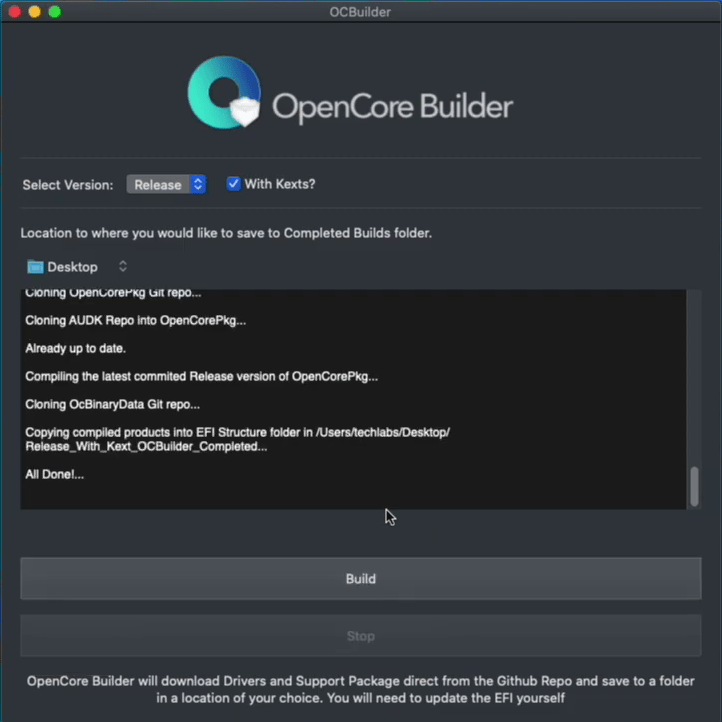
13. Once the file built you will see the all is done text at the end, close the OpenCore Builder.
- Done
- Now open the file from the desktop, and copy the “EFI” folder to the desktop and delete the folder and empty the trash.
- Open the EFI folder, open the OC folder, and copy the config.plist from desktop and paste it into OC folder.
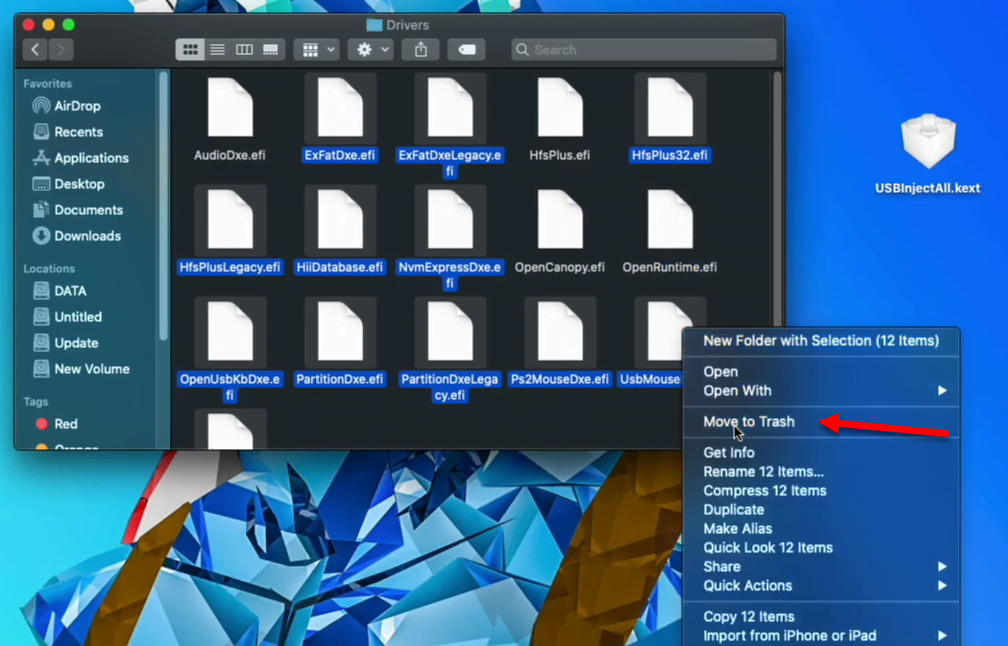
- Open the driver folder, keep the necessary drivers and delete the rest of them. Go back open Kext folder again keep the necessary drivers and delete the rest. And also the USBKext from desktop to Kext folder.
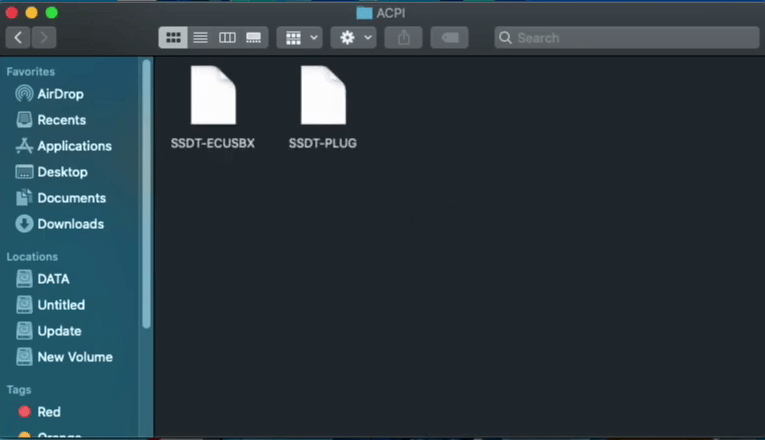
14. Now open the ACPI folder then copy and paste the “SSD-T and SSDT-PlUF” from desktop to ACPI folder.
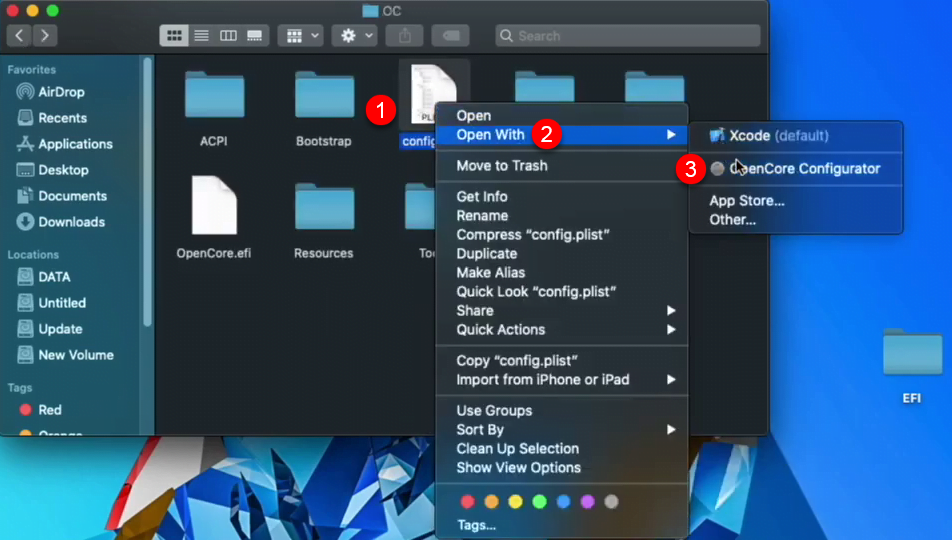
15. Over ahead to config.plist file and open with OpenCore Configurator
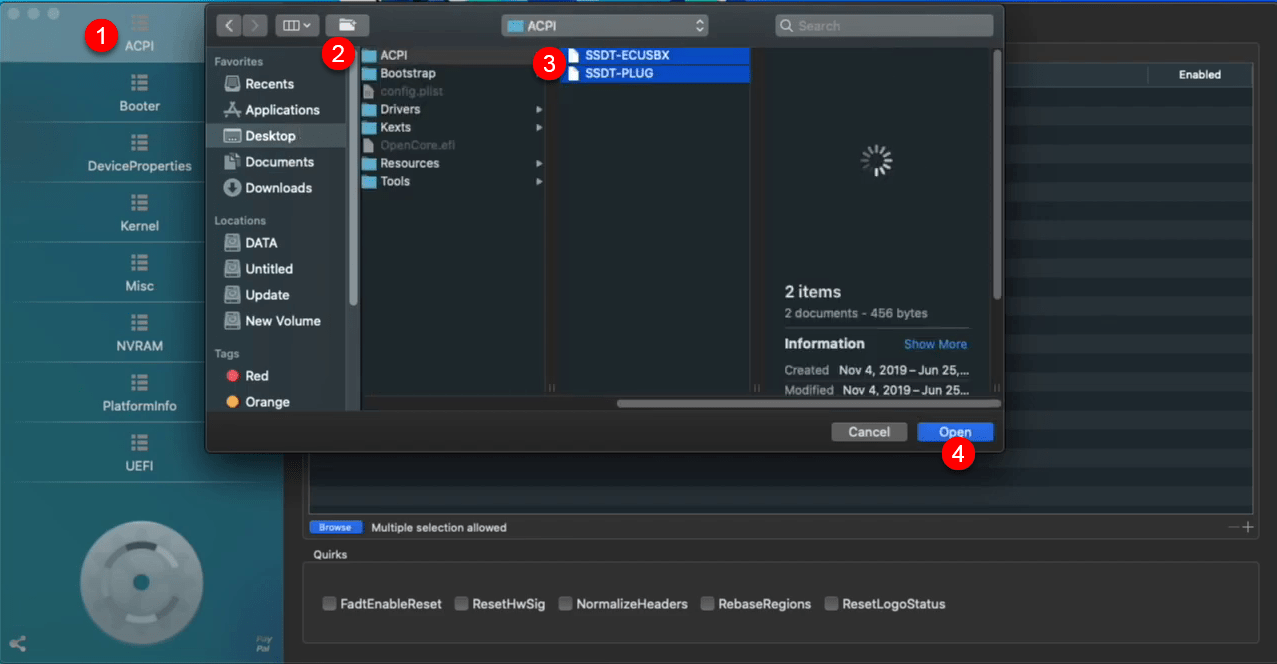
16. Once the OpenCore Configurator opened in the “ACPI” tab, click on the Browse option. Then select the “DSDTS and SSDTS” file and click on open.
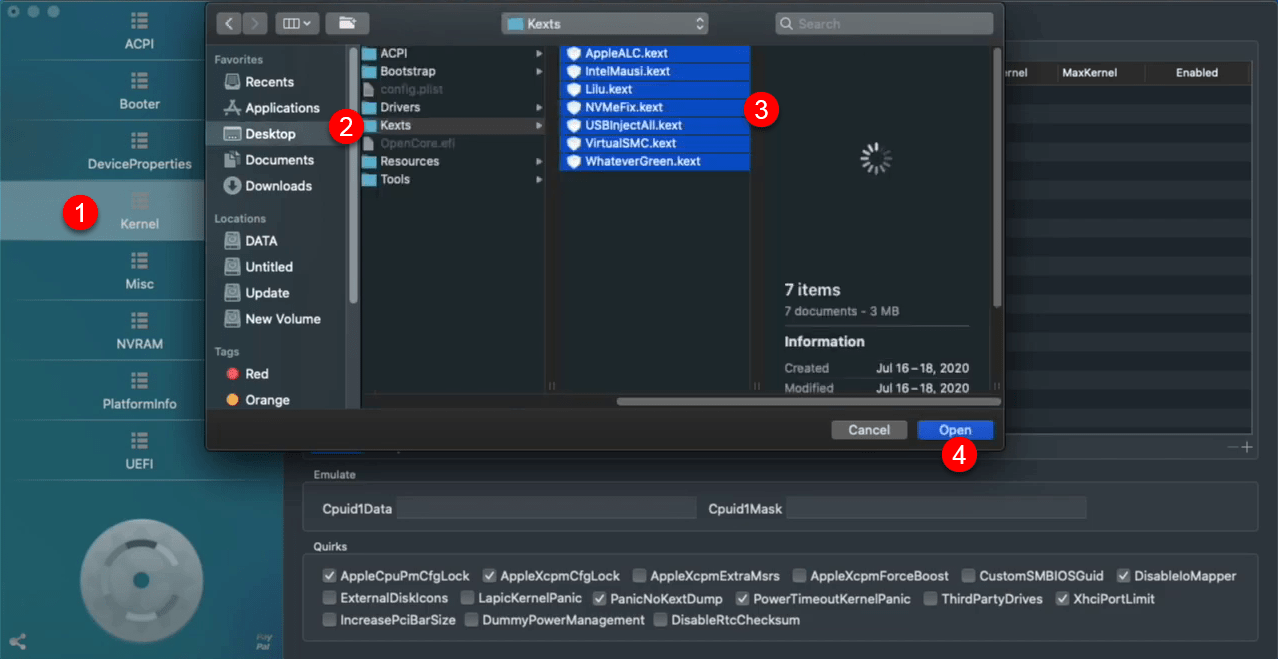
17. Now go to the “Kernel” tab and remove the previous Kext.
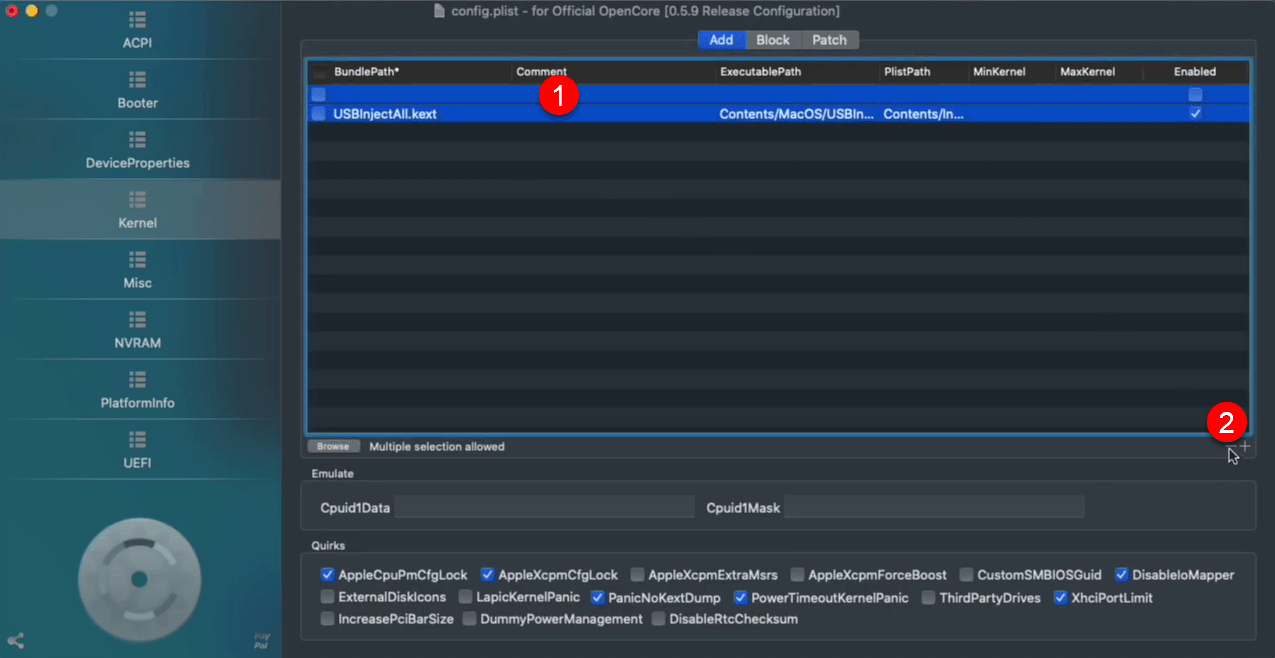
18. Now click on the “Browse” option for adding the new Kext file. Select the Kext files from the EFI folder and click Open.
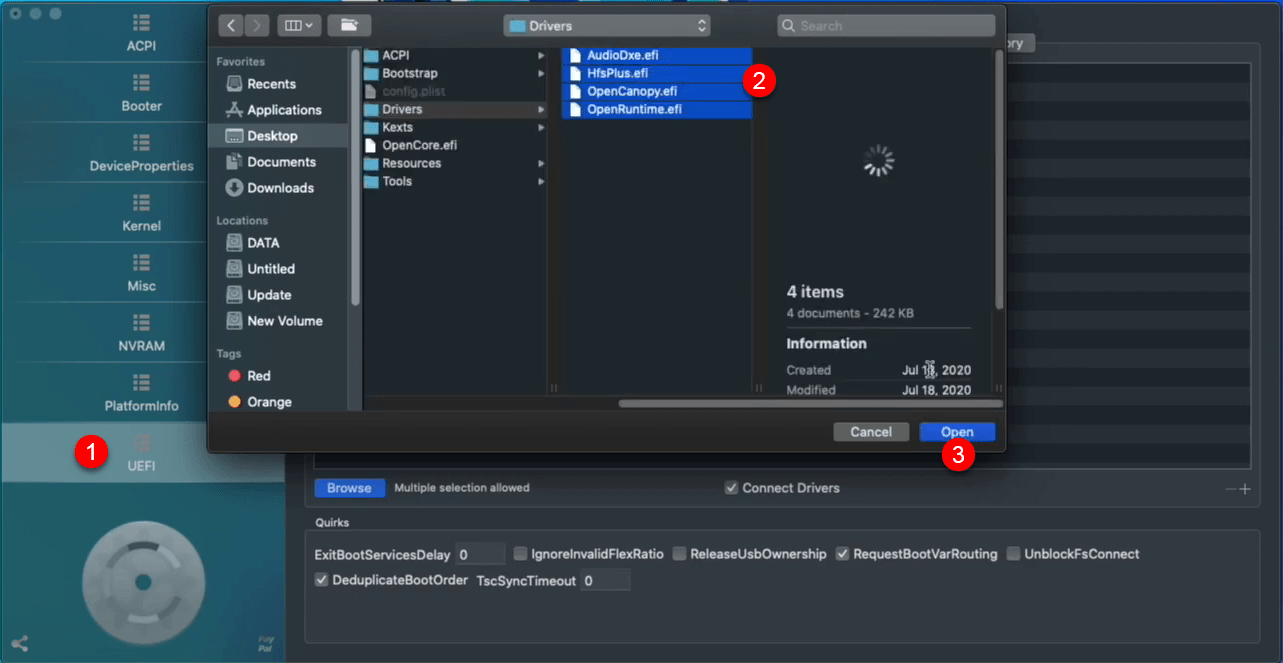
19. Over ahead, to the “UEFI” tab, click on the “Drivers” tab, then click on the Browse option. And add the drivers by browsing the EFI folder. After adding the driver you will see that opencancopy.EFI driver which is responsible for loading the GUI Bootloader. But it will not be activated unless you change the picker mode to external from the miscellaneous tab.
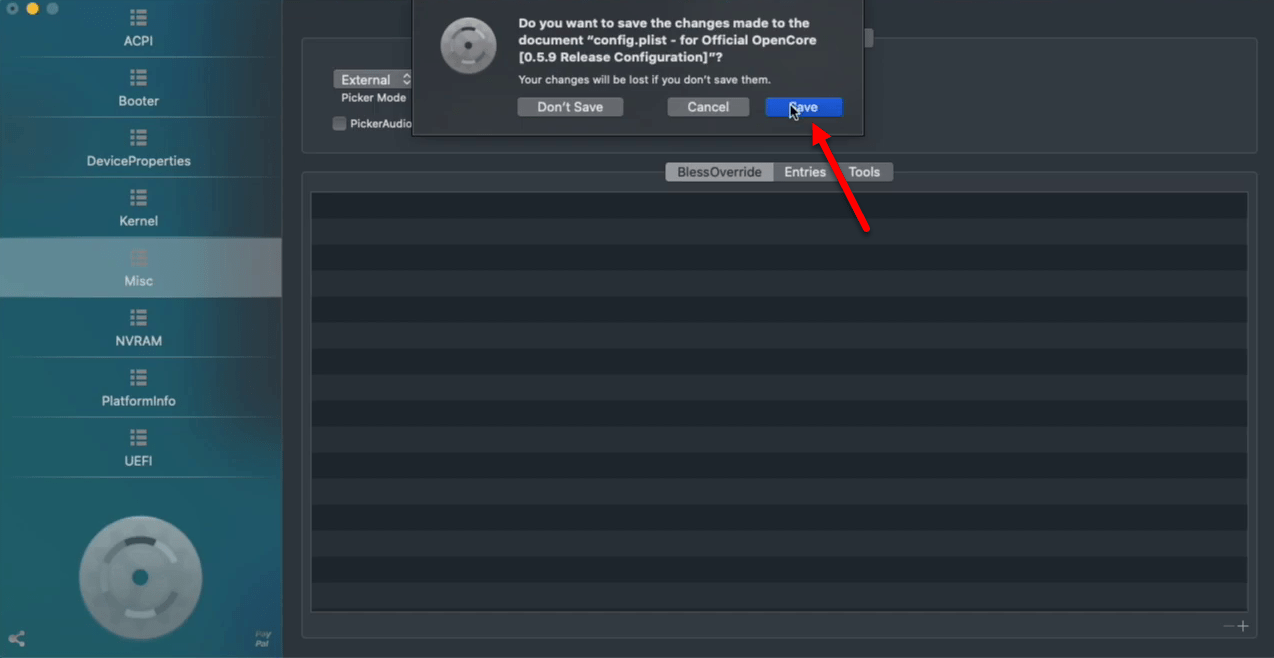
20. When the drivers added, close the “OpenCore Configurator” and click on the “Save” option.
Hope you enjoyed creating an EFI file for macOS Big Sur if you faced any kind of problem feel free to share with us below down comment section.
Related:
13. Once the file built you will see the all is done text at the end, close the OpenCore Builder.
– Now open the file from the desktop, and copy the “EFI” folder to the desktop and delete the folder and empty the trash.
WHAAAATTTT?????
– “Now open the file from the desktop” – what file? and why opening it?
– “copy the “EFI” folder to the desktop and delete the folder and empty the trash.” – Delete which folder?
The only one thing i can imagine what you you probably wanted us to do is: Open the EFI drive and backup the inclosed EFI-Folder to your desktop. After backing up the EFI folder delete this folder from the EFI drive and empty the trash.
Sorry, i am totally confused at this point.
Sorry, I didn’t mention the EFI file, manually you have to download the EFI file in order to create an OpenCore EFI file for your system.
Also, check out the EFI file download links is updated in the download links section.
14. Now open the ACPI folder then copy and paste the “SSD-T and SSDT-PlUF” from desktop to ACPI folder
where did those came from? you never mentioned those files in the earlier steps…
The files is availablr at the begining of article.