The keynote in Worldwide Developer Conference 2020 was the release of macOS Big Sur of 11.0 version. This annual meet held by Apple has multiple significance in the Digital World and the prime one is the beta version of Big Sur that supports the ARM technology. If you want to access the complete features of Big Sur on multiple Mac machines, then the ideal platform is the bootable one. The method can be accomplished only in a few clicks and for your solace, the detailed step by step guidance is provided below.
Key Requirements for Installing Big Sur on Mac
Before moving ahead, you must be familiar with the system configuration that will support Big Sur and the list of required specifications on Mac are listed below.
- MacBook 2015 and later
- MacBook mini 2014 and later
- MacBook Air 2013 and later
- MacBook Pro 2013 and later
- Mac Pro 2013 and later
Overall, you can see that Big Sur will support to Mac model above 2013 and if you have a Mac device below 2013, then you won’t be able to install Big Sur on your device.
To install macOS Big Sur on your Mac via bootable USB, you must have a Mac device model above 2013. Moreover, you will need one USB and dmg file of the OS. If you possess all such goods, then it will be easier for you to accomplish the task.
Download Big Sur DMG File
To use Big Sur on your Mac, you will have to create a bootable USB and for that, you will need to download the dmg file of Big Sur. After getting the dmg file of Big Sur, you can create a bootable USB. So, let’s begin the journey via the halt process.
Creating bootable macOS Big Sur USB
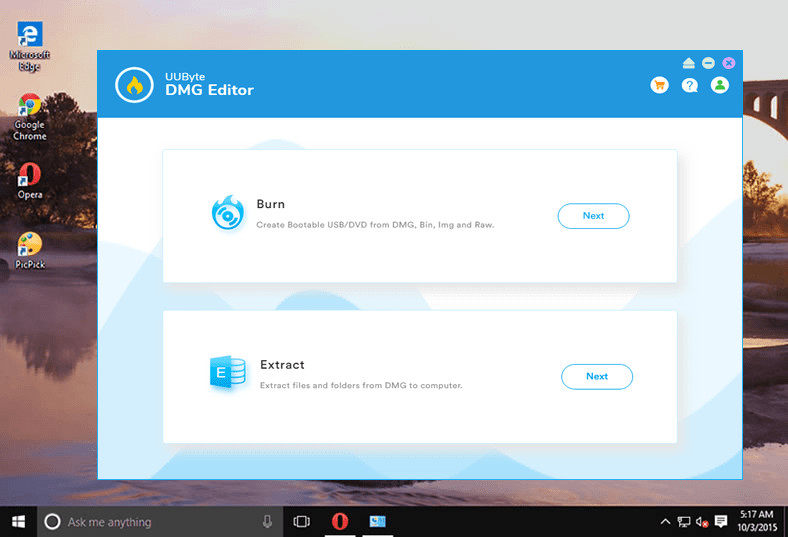
This method is the easiest one to install the OS on a Mac device. There are several tools available in the market that can perform the task, but the best one is UUByte DMG Editor, as it has ample features and gives the result in no time. Moreover, the interface is very simple that helps the users to perform the task smoothly.
Quick Glance of UUByte DMG Editor
UUByte DMG Editor is an advanced disk management tool that burns the image file to USB. It is quite a reliable tool that can burn all the disk image files. So, you can easily create a bootable USB of macOS Big Sur using UUByte DMG Editor. The top features of UUByte DMG Editor are listed below.
- Smooth interface and offer instant results.
- It can burn DMG to USB in no time.
- It enables the users to view the dmg content in Windows OS.
- It performs multiple tasks with the dmg files that include, extraction, editing, and creating dmg files.
These were some of the features of UUByte DMG Editor. Now, get ready to create bootable macOS Big Sur on USB through this tool. The method is very simple and all you need to follow the steps listed below: –
- To start the process, you need to download and install UUByte DMG Editor on your computer. and the official link for the same is listed below.
https://www.uubyte.com/dmg-editor.html
- Once the installation process is done, launch the application and insert your USB drive on your Mac.
- On the home page of UUByte DMG Editor, you will get two options, Burn and Extract, click on the former one, i.e. Burn.
- Now, click on the Browse button and then upload the Big Sur dmg file. Also ensure to check whether the USB is detected by the tool or not, if not then remove USB and insert it again on Mac.
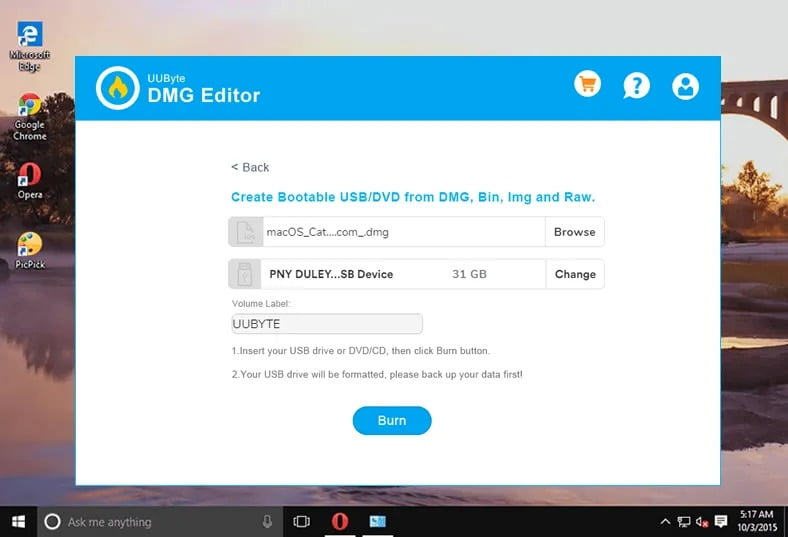
- In the section of Volume Label, name the USB drive and you can keep any name such as macOS Big Sur. After completing the above steps, click on the Burn button.
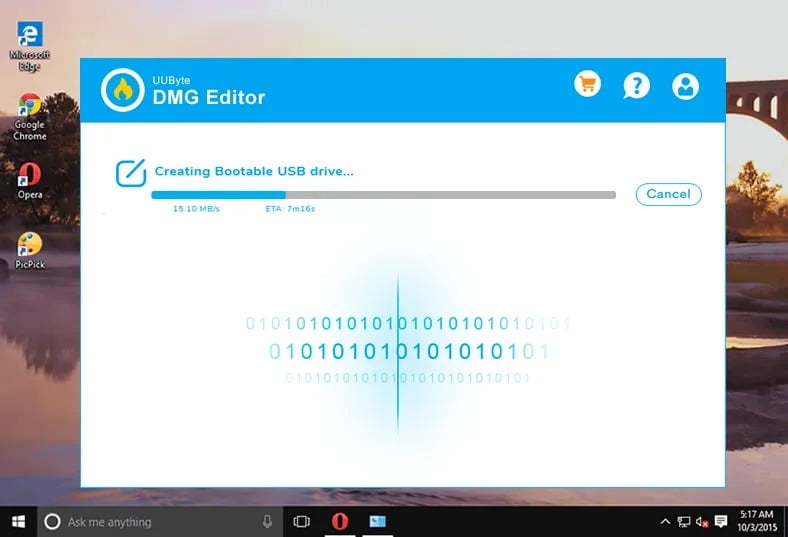
- The tool will format the USB drive and will burn the dmg file to USB and the entire process will take less than 15 minutes. Once the process is completed, you will get the successful message on your Mac screen.

Boot Mac from USB
As your bootable USB is ready and now you can start the operation. In this part, you will have to go through the multiple phases such as changing the boot order, selection of drive, and many more. So, let’s go through each of them one by one.
To perform a clean installation of OS on Mac, you need to make some changes in the BIOS settings and the steps for the same are listed below.
- Restart your Mac and make sure to press the Delete key to enter the BIOS settings.
- In the BIOS settings, you will get a few options at the top of the menu bar, click on the Save & Exit icon.
- Now, select Load Optimized Defaults and further click on the Yes button to go with the default options.
- Save the settings and then restart your Mac.
Install macOS Big Sur from USB Drive
After making changes in the BIOS Settings, insert bootable USB on Mac and then hit the Boot menu key so that you can select the USB drive. After selecting the primary boot order as USB, press the Enter key to start the booting process.
- Now, select the language you prefer to use and further click on the forward arrow.
- Thereafter, macOS Big Sur recovery utilities will appear on the Mac screen and you need to select Disk Utility.
- In the Disk Utility section, you will get the view icon, click on it and further click on Show All Devices. This feature will help you to navigate the drive where you want to install the OS.
- Select the drive and click on the Erase button to wipe out all the stored data on the drive.
- Now, check the parameters such as name, format, and schemes. The format must be APFS & the schemes must be the GUID Partition Map. After confirming everything, click on the Erase button.
- Thereafter, you will get the Install macOS icon, select the same, and click on the Continue button.
- Soon, you will be directed to the Terms and Conditions page, read the same carefully, and further click on the Continue button. Now, choose the drive where you want to install Big Sur.
- After selecting the drive, click on the Install button. Now, wait for a while as the process will take some time. Once the installation completed, your Mac will restart and it will ask for the language, select the preferred one and click on the Continue button.
Install Drivers on Freshly Installed Big Sur
You have almost done the task and the left part is the installation of drivers. So, to do this you will need the OpenCore Configuration setup. If you have in the USB, then insert the same on your Mac, and on the off chance, if you don’t have, then get it from your friend who is using the Mac.
- Launch OpenCore Configuration from the USB drive
- Now, copy the EFI folder that is present in the EFI partition of USB and paste the same on the system drive.
- After doing the task, restart your Mac.
- Step 4: Now, check the Wi-Fi, Bluetooth, Sounds of Mac.
- Step 5: That’s it; you have successfully installed macOS Big Sur on your Mac using bootable USB.
Conclusion
This was all about the way to install Big Sur on Mac. In this method, bootable USB played a significant role especially UUByte DMG Editor as it minimized most of the tasks and thus helped you to easily create the bootable USB from the macOS DMG file.
Related: