Currently macOS Big Sur 11.0 is the trending operating system for Macintosh computers, which Apple Inc successfully released at the WWDC2020 event on 22nd June. With its release date, Apple nominated lots of handy features that needed for an actual Mac operating system. Finally, we tested macOS Big Sur 11.0 Beta 4 version on our Mac computers, and now it’s pretty stable than the first Beta version. Now you can update your Macintosh personal computers, to the latest version of macOS Big Sur update. Because all each and everything is highlighted by the developers and now some of the critical issues, bugs are being fixed by Apple developers.
On the other hand, we have done the macOS Big Sur installation on the virtualization platforms, such as VMware Workstation, VirtualBox. For being sure about the issues, bugs, firstly we need to install it on the virtualization platforms, for testing its latest features. Such as, some of the users tested macOS Big Sur on Virtual Machine and they have been encountered by an issue. Most of them reported that after the installation successfully completed, after 5 seconds automatically macOS Big Sur get shut down. And this the same most of the users faced this issues on their primary Mac. And now there are no worries because macOS Big Sur Beta 4 version update is out now. You can test it now on your Mac without any issues or Bugs. Also, the final version of macOS Big Sur is nearly to be out later this year in September.
However, many times we have mentioned in our article that macOS Big Sur is the first Apple operating system that can support Intel-Based Processors. As we have tested macOS Big Sur on Asus Laptop with full of guide. Also, successfully installed macOS Big Sur on PC-Hackintosh without any issues. Don’t forget that macOS Big Sur can be installed on VMware on AMD with AMD Processor too. If you have a PC with an AMD processor then easily you can install it.
Related:
Don’t forget to check that macOS Big Sur can support the below down Macs & MacBooks computers, if you have the below down computers with recommended specifications then you can install macOS Big Sur on it.
- MacBook: Early 2015 or newer
- MacBook Air: Mid 2013 or newer
- MacBook Pro: Late 2013 or newer
- Mac Mini: Late 2014 or newer
- iMac: Mid 2014 or newer
- iMac Pro
- Mac Pro: Late 2013 or newer
- Developer Transition Kit (2020)
However, through this post, I wanted to explore how to Dual Boot macOS Big Sur with Windows 10 on PC-Hackintosh. As you know that Windows 10 is the product of Microsoft and it’s being one of the most successful operating systems for Intel computers after releasing Windows 8.1. Currently, Windows 10 is pre-installed over billions of computers. Microsoft doesn’t have the plane to upgrade Windows 10 to any other version of Windows. Because Windows 10 version is being successful for everyone, that they are running on their computers. And now Microsoft bringing changes to its update, one of the most latest updates of Windows 10 was released some few weeks ago as Windows 2004 version. Usually, there isn’t changes to the interface look of Windows, but they have added some nice features to apps and look of Windows.
- Latest Cortana update
- Search Home
- KaoMoji
- Virtual Desktops
- Automatically open Apps
- Bluetooth Pairing
- New tablet experience for tow-in one convertible PCs
Dual Boot macOS Big Sur with Windows 10 on PC-Hackintosh
Before dual-booting macOS Big Sur with Windows 10 you need to read the below down guide that what you need to do.
- Download Required Files
- Create macOS Big Sur Bootable USB Drive
- Create macOS Big Sur EFI files USB flash Drie
- Install macOS Big Sur on PC-Hackintosh
- Install all the fixes files
- Create a partition for Windows 10 on macOS Big Sur
- Install Windows 10 alongside macOS Big Sur
- Install Windows 10 update
Download Required Files
The required files may contain the commands for creating Bootable USB Drive, OpenCore Configurator, Windows 10 ISO file, BalenaEtcher software for creating Windows 10 USB flash drive on macOS Big Sur.
- Download Commands
- Download OpenCore Configurator
- Download macOS Big Sur installer file
- Download Windows 10 ISO file
- Download BalenaEtcher
- Download EFI Files
For creating Bootable USB Drive for macOS Big Sur follow the below links.
- How to Create macOS Big Sur Bootable USB Drive on Windows & Mac
- How to Create a Bootable macOS Big Sur USB Installer
Mount EFI Partition
- When the Bootable USB Drive created for macOS Big Sur close the terminal and open the OpenCore Configurator. And mount the EFI partition of the USB flash drive.
- Now copy the EFI files and paste it into the USB drive
- Copy OpenCore Configurator and paste it into the Bootable USB flash drive of macOS Big Sur.
Create Windows 10 USB Flash Drive
And the next step is to create a Windows 10 USB flash drive, attach the USB flash drive with a minimum size of 16GB. When the USB drive attached head over to Go>Utilites, open Disk Utility and erase the USB flash drive with the following settings.
- Name: USB
- Format: MS-DOS (FAT)
- Scheme: GUID Partition Map
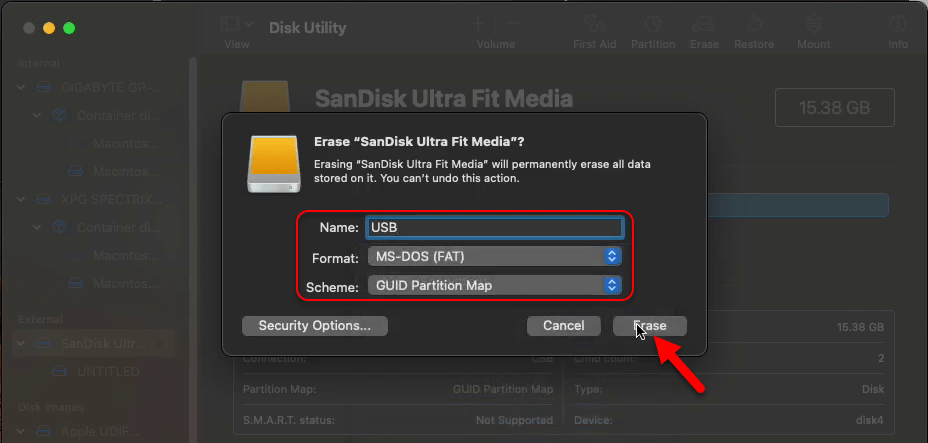
- When the USB flash drive erased click on Done and close the Disk Utility.
- Now go to application launchpad and open BalenEtcher, on the welcome screen click on the “Flash From File” option.
- Select Windows 10 ISO file and click open.
- Here you will face a warning simply click on continue
- Select the destination by clicking on the select target option.
- Select the options which it USB flash drive, then click on Select option.
- Now click on Flash option
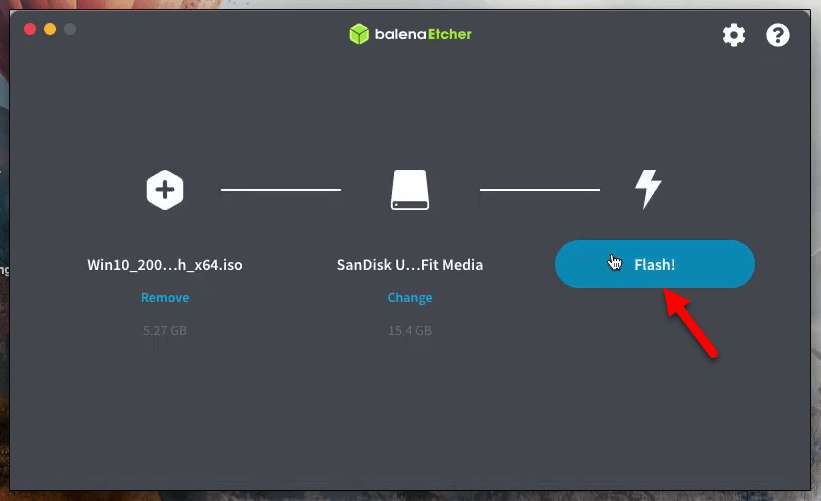
- Here you will be required to enter your username password in order to make changes.
- And now here BalenEtcher is copying Windows 10 ISO image file to the USB flash drive, wait this process may cover some time. When the image copied close the BalenaEtcher.
Edit BIOS Settings
To dual Boot macOS Big Sur with Windows 10 you need to bring a few changes to BIOS settings of your PC. To do that restart your PC and press the delete key to enter the BIOS settings window. From BIOS settings select the “Save & Exit” tab, select “Load optimized Defaults” option then press enter and select “Yes”.
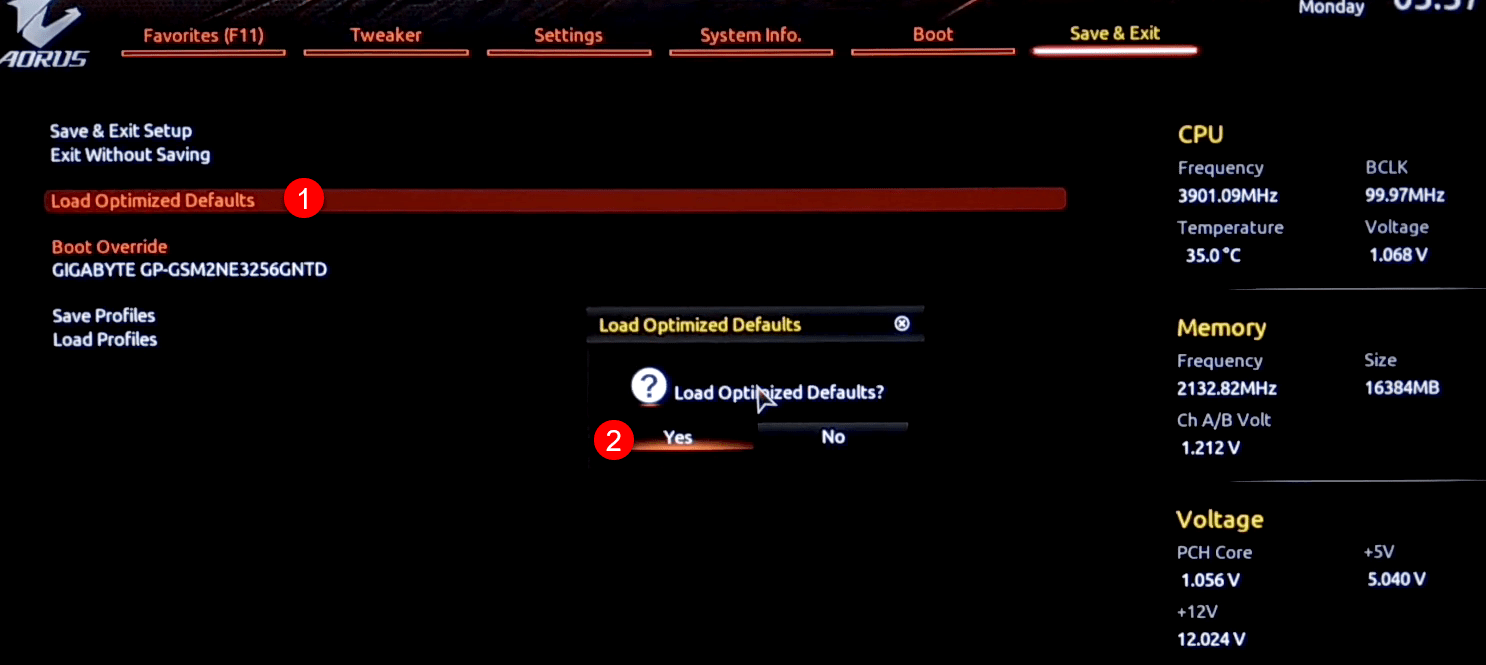
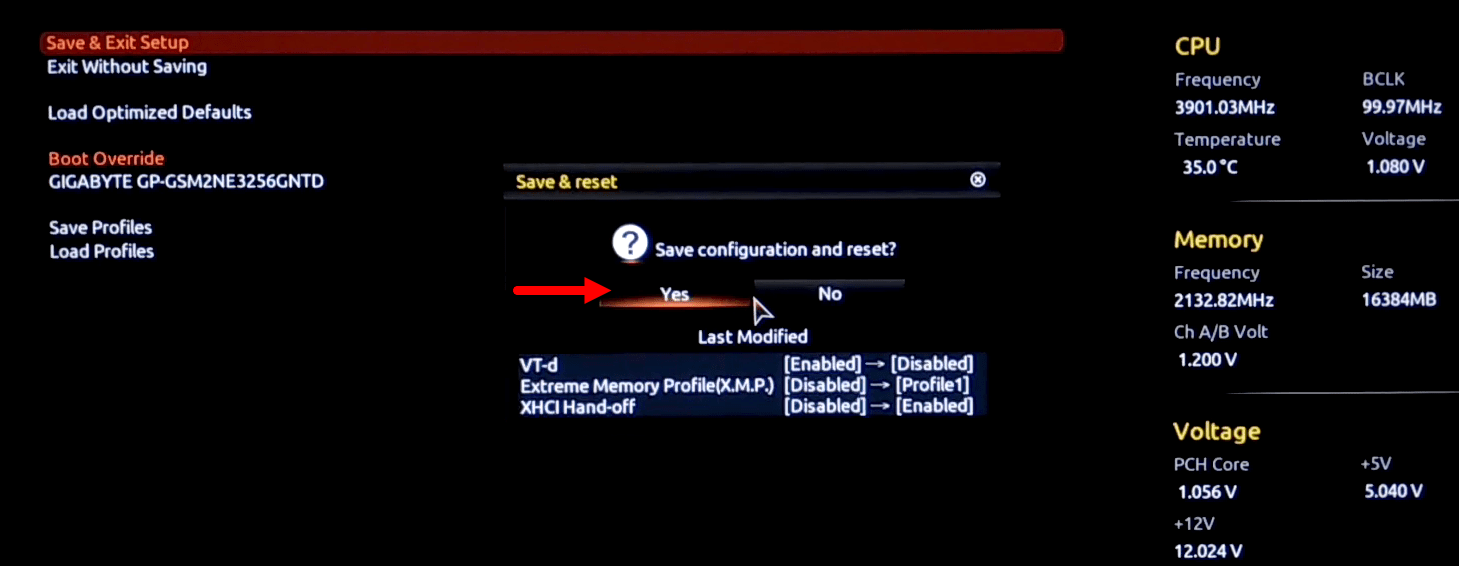
Select “Save & Exit Setup” then press enter and select “Yes”, after that, your PC will restart.

Select the “Tweaker” tab, select the “VT-d” option, then press enter and select the “Enabled” option.
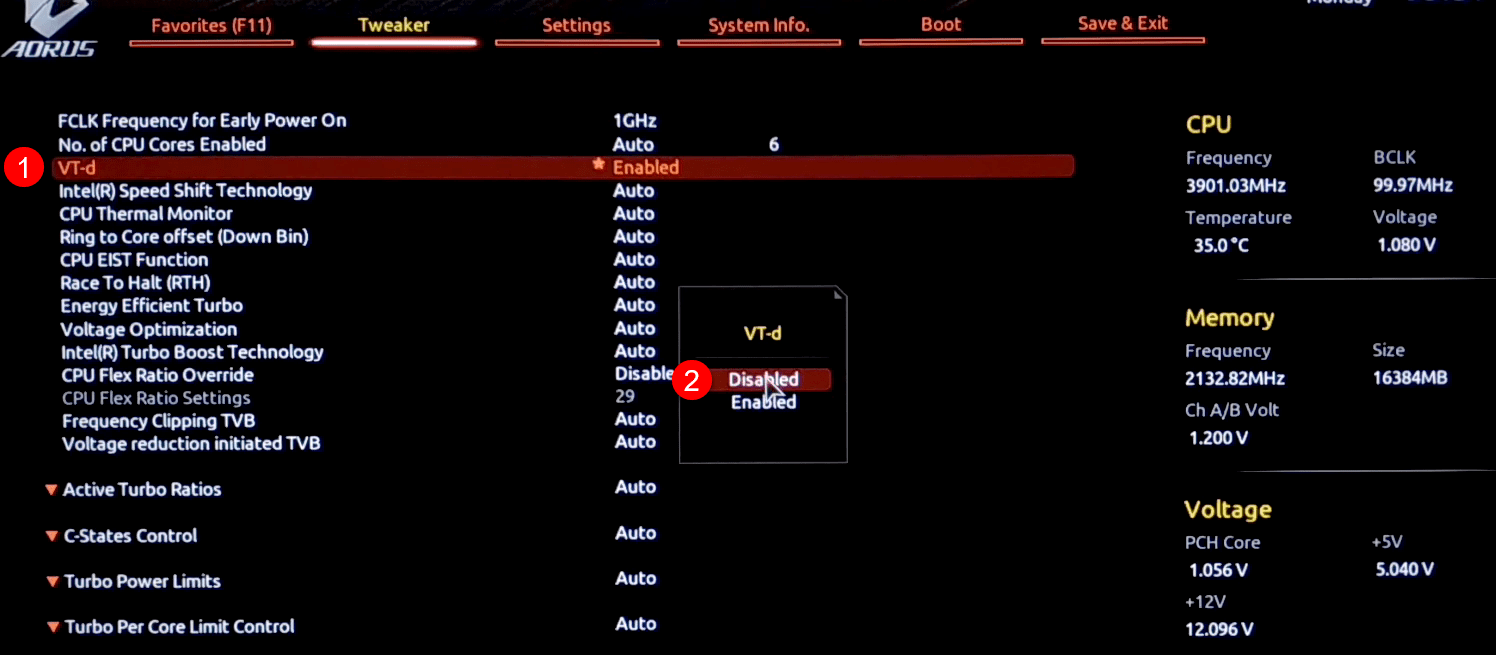
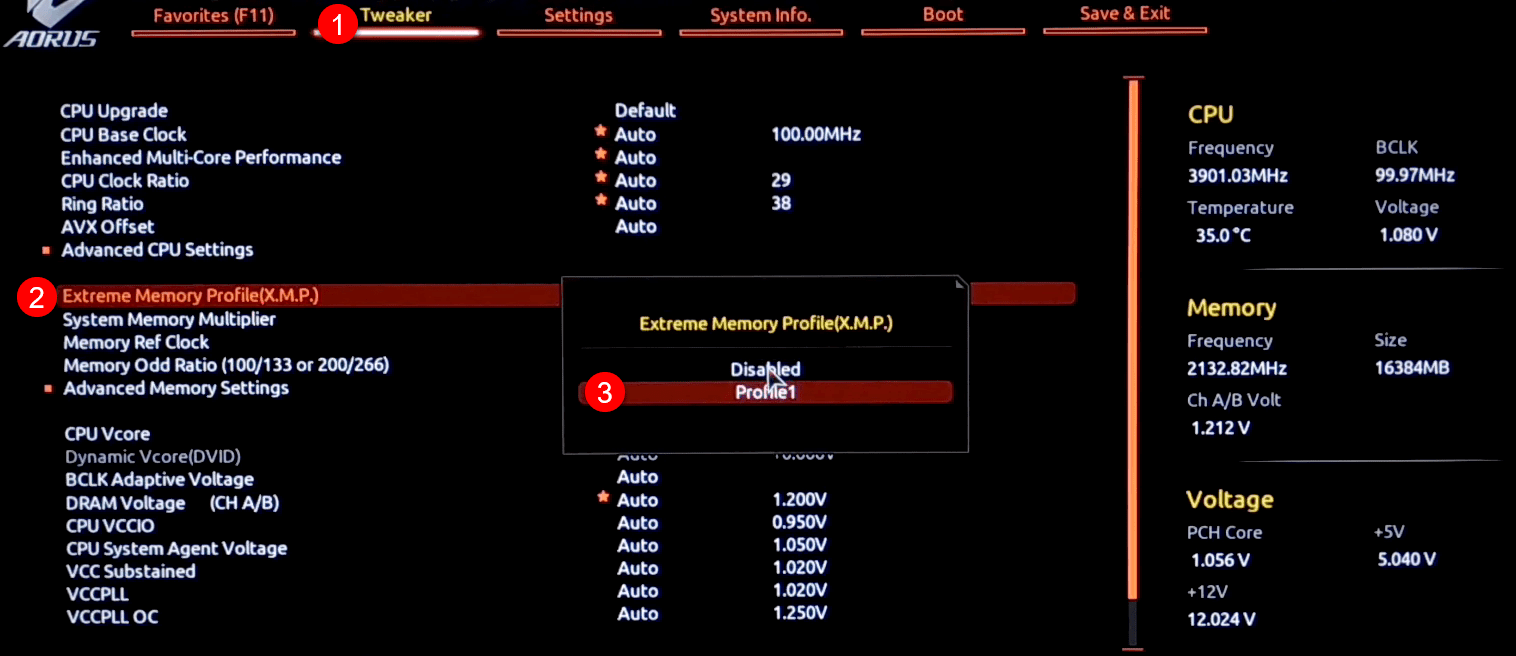
When your PC restarted quickly press the delete key again to enter the BIOS settings window. Now select the “Tweaker” tab, then select “Extreme Memory Profile” then press enter and select “Profile1”.
Now go to the “Settings” tab, select “XHCI Hand-off” option, then press enter and select “Disabled”.
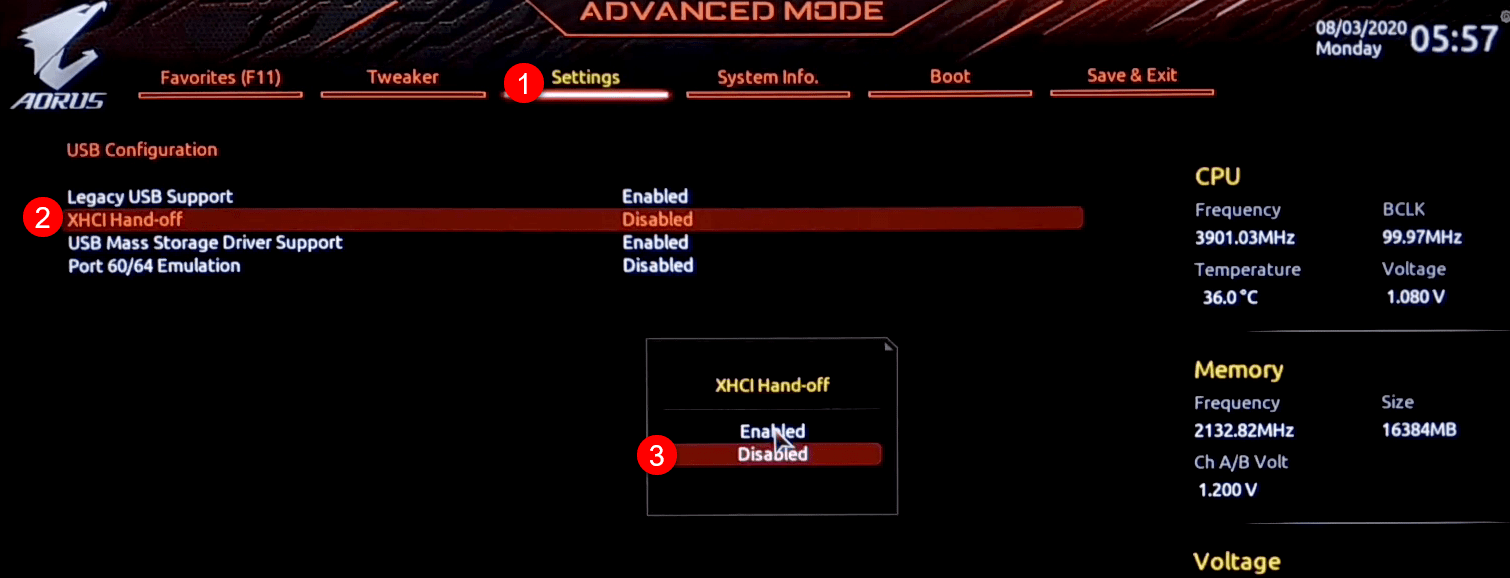
And now go to the “Save & Exit” tab, select the “Save & Exit Setup” option, then press enter and select “Yes” and press enter to restart your PC.
Install macOS Big Sur
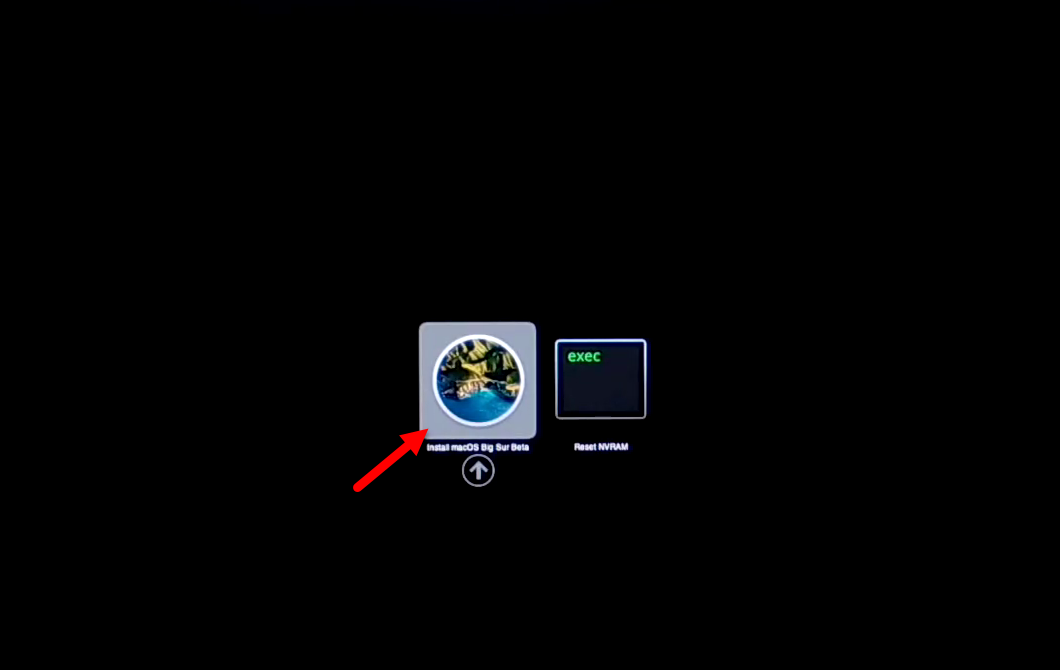
Once the BIOS settings successfully changed attach the macOS Big Sur bootable USB flash drive, and power on your PC and press the Boot menu key then select “Open Core” and press enter to boot.

Here select the drive and press the enter key to go ahead.
- Wait until macOS Big Sur should enter the Recover window.
- Select your language and click on continue.
- Select Disk Utility and click continue.
- Click on View and click on Show all Devices.
- Select your drive and erase that with the following settings.
- Name: macOS Big Sur
- Format: APFS
- Scheme: GUID Partition Map
- Press the erase option to erase the drive
- When the drive erased click on done.
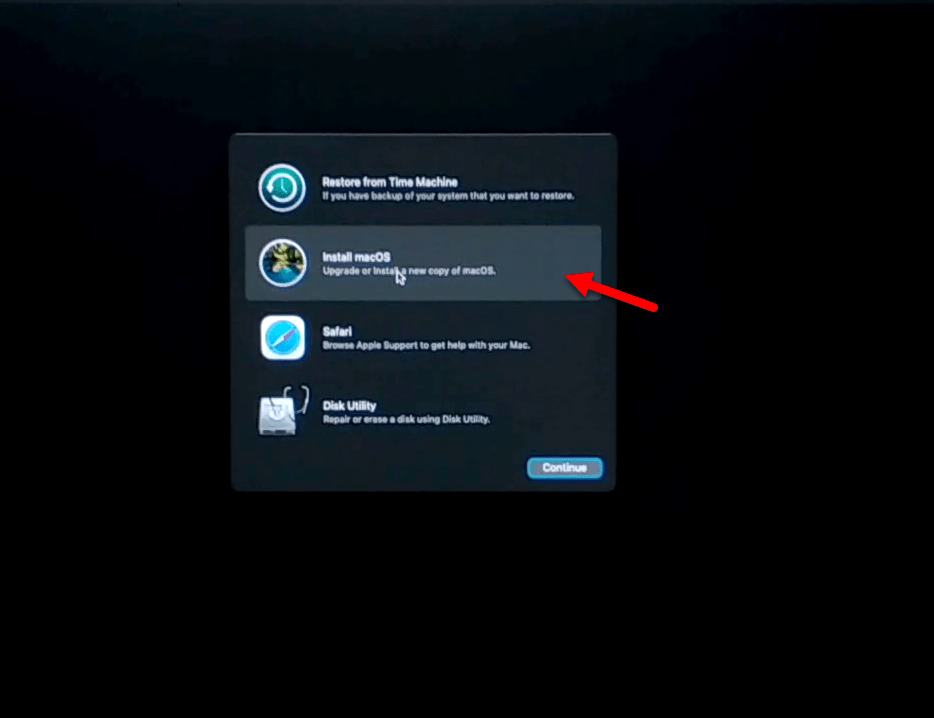
- Close disk utility and select “Install macOS” and click continue.
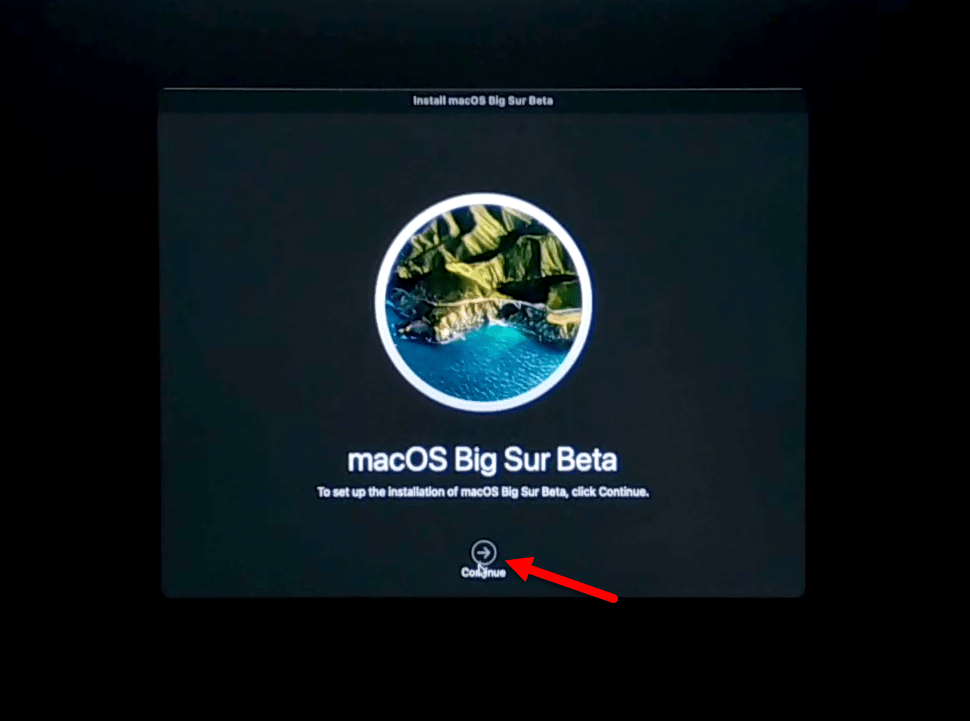
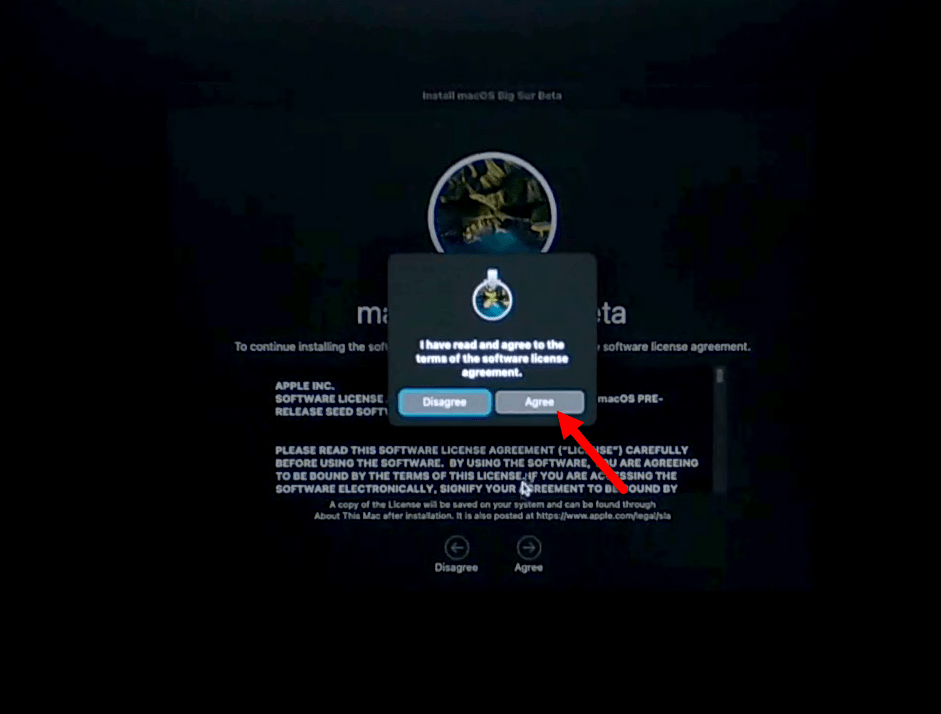
To set up macOS Big Sur installation, click continue.
Agree with the terms and conditions of macOS Big Sur
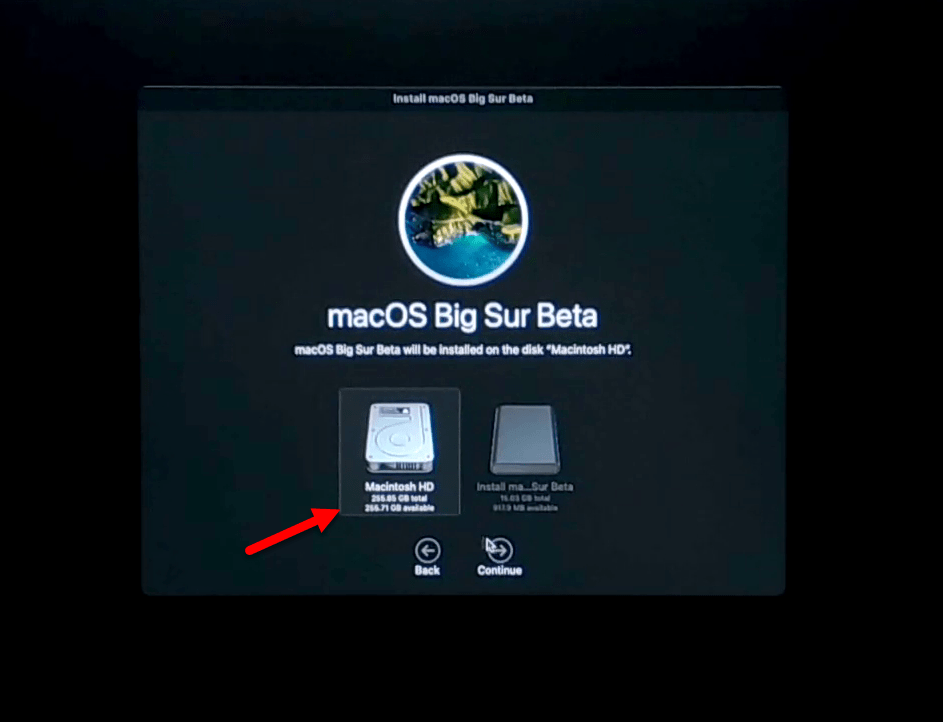
Select the drive have formatted in step 5 and click install.
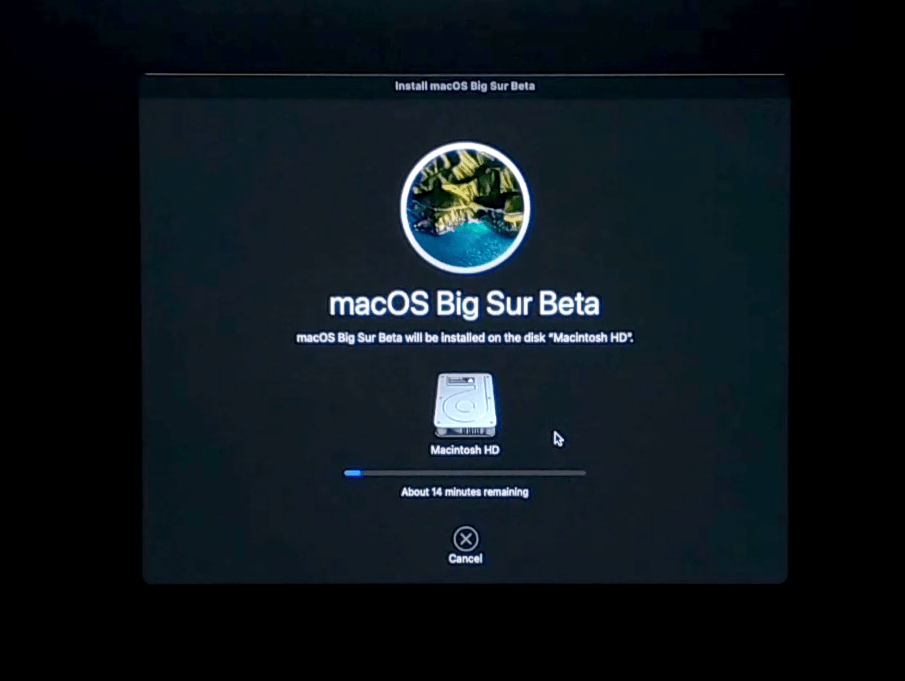
Wait until macOS Big Sur should install on the drive, when the installation completed your PC will restart automatically.
- Once macOS Big Sur installation completed, so complete the basic settings of macOS Big Sur on your PC.
- Attach the USB Flash drive and copy the OpenCore Configurator to your desktop.
- Open the OpenCore Configurator and Mount the EFI partition of USB and System Drive.
- Copy the EFI folder from the EFI partition of USB, and paste it into the EFI partition of the System drive.
- Once the EFI file copied eject the EFI partition of USB & system drive, then restart your PC.
- After coming back to your PC window check each and everything that works properly.
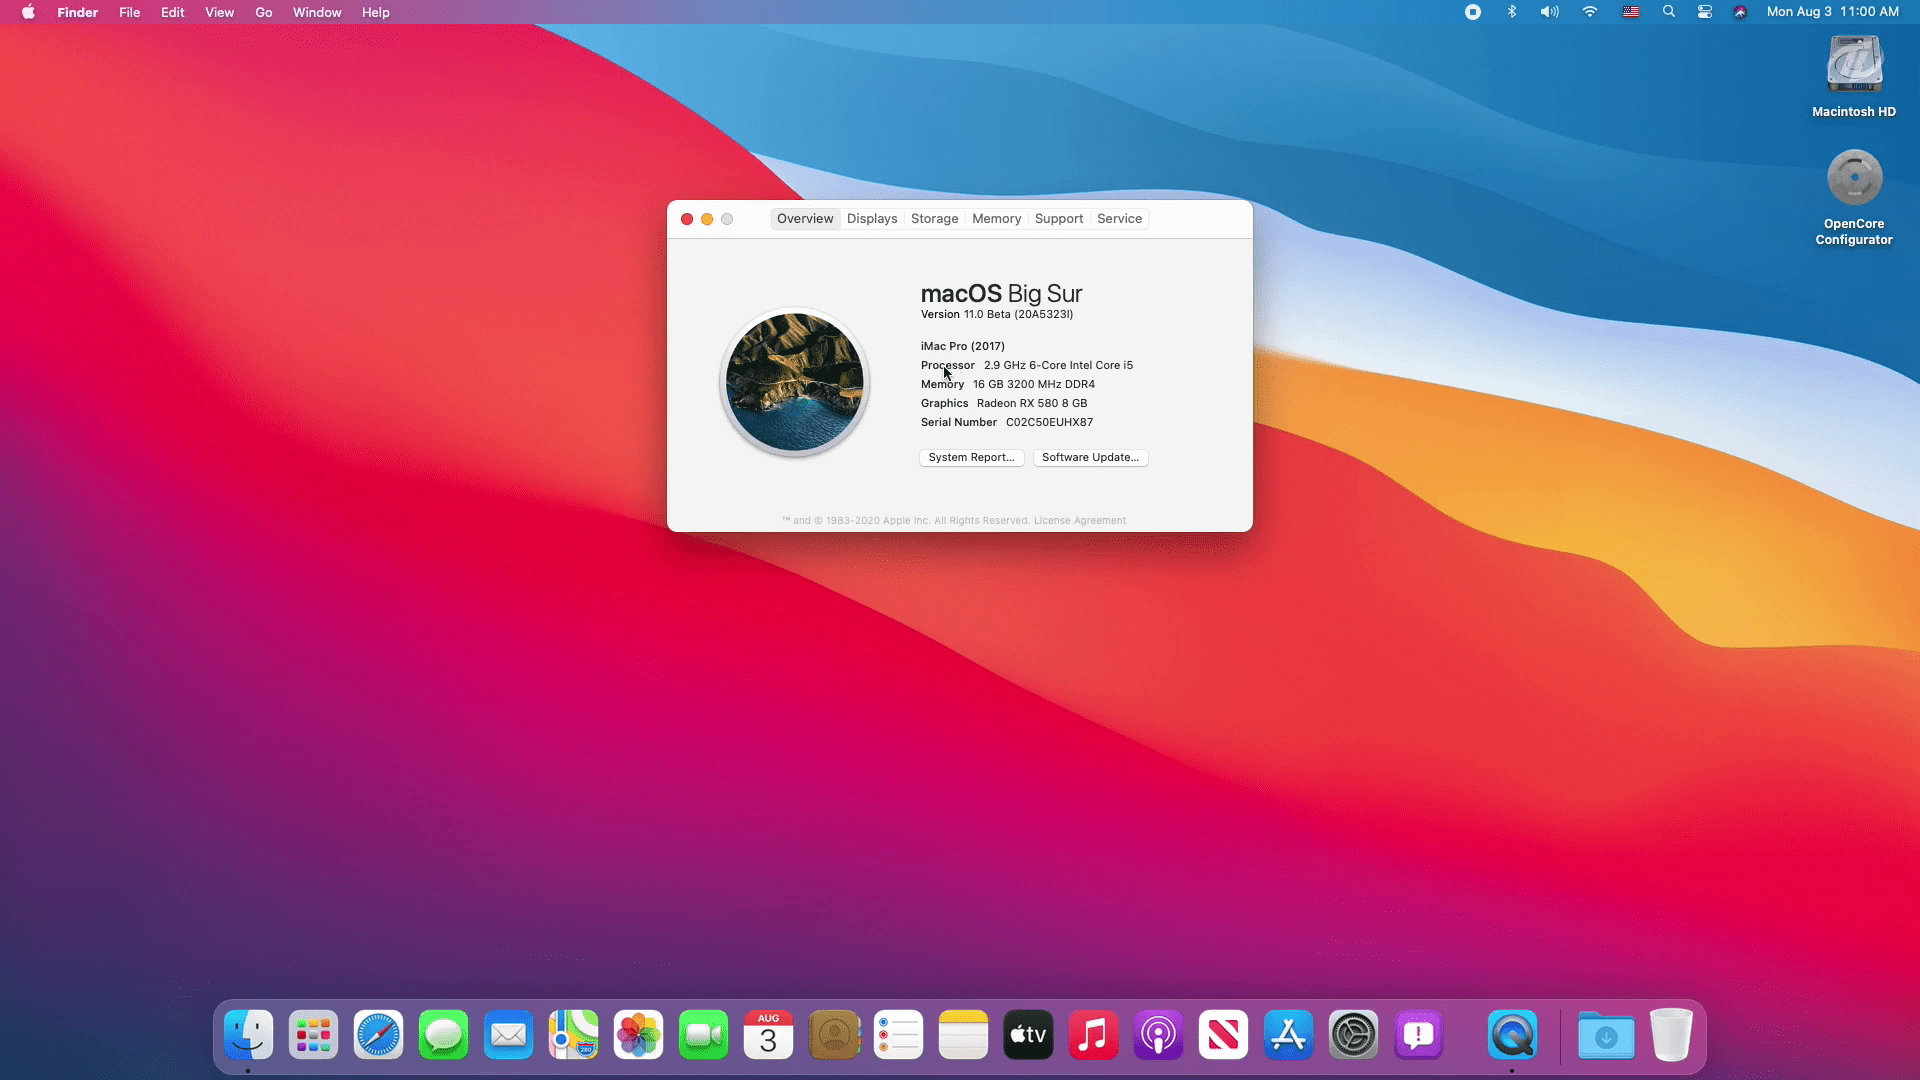
After that, macOS Big Sur successfully installed on your PC check the following settings that work perfectly.
Create Partition for Windows 10 installation
For dual-booting macOS Big Sur with Windows you need to create separate partition. Because you won’t be able to install macOS Big Sur and Windows 10 on the same drive. To create a partition for Windows 10 navigate to Go>Utilites, from Utilities window open Disk Utility.

Now you will see all the drive is highlighted here, to appear the devices click on “View” option, and click on “Show All Devices”.

Select the drive which you want to create the partition for Windows 10 and click on the Erase option. Another screen will pop-up and click on the partition option.
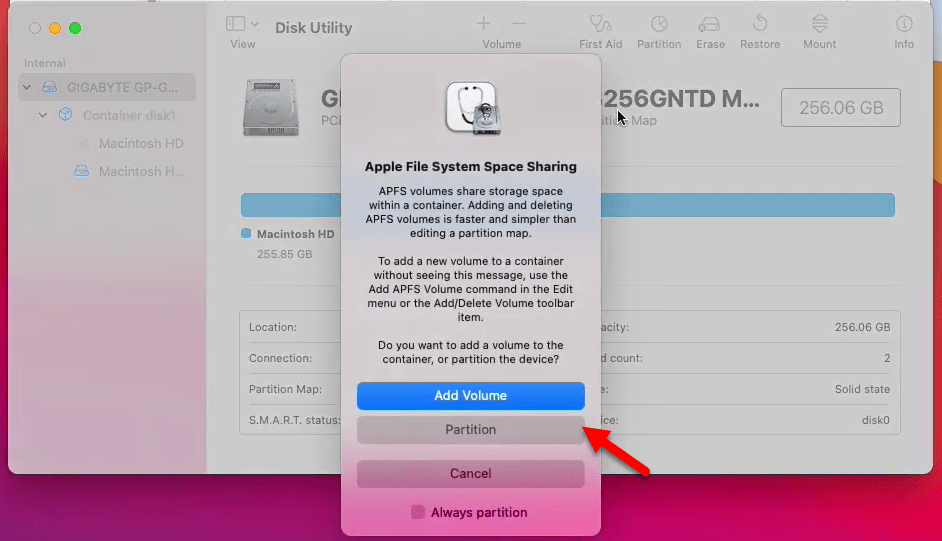
To add another partition click on (+) option.
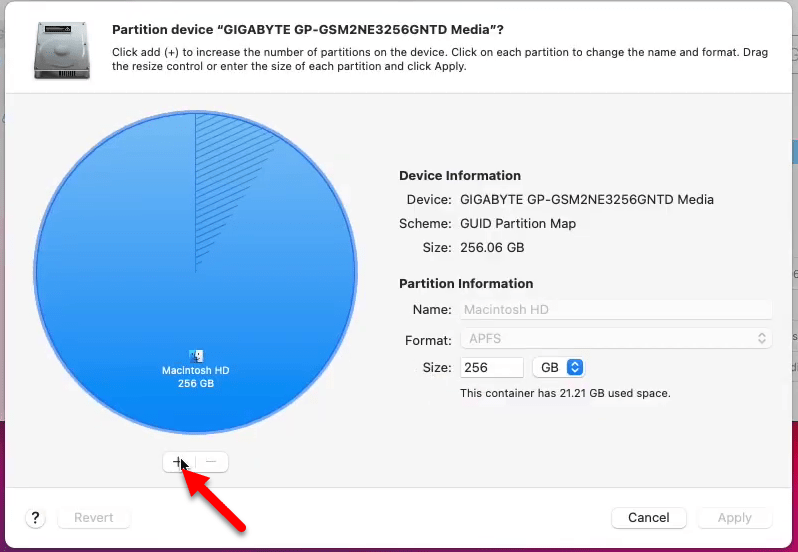
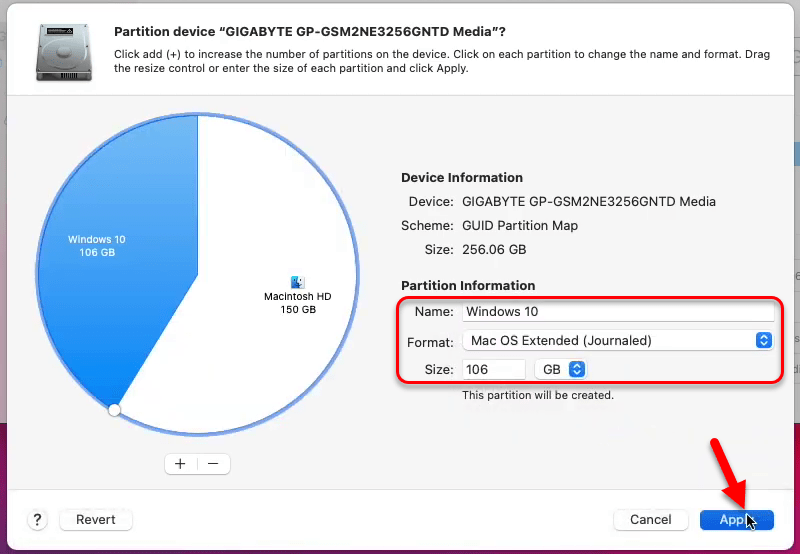
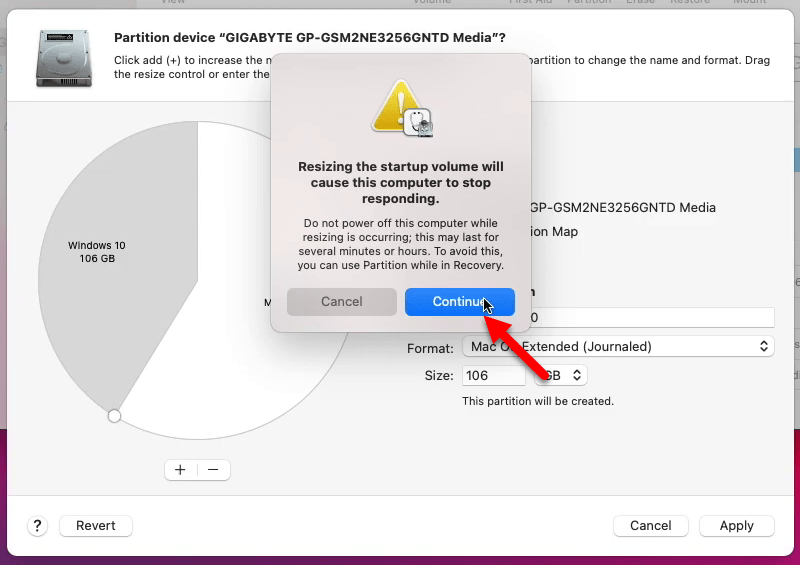
Now to create a partition for Windows 10 you need to give a name for the disk, format, and the size of the disk.
- Name: Windows 10
- Format: Mac OS X Extended (Journaled)
- Size: At least 60GB
- Once that’s done click on Apply option
Now click on partition
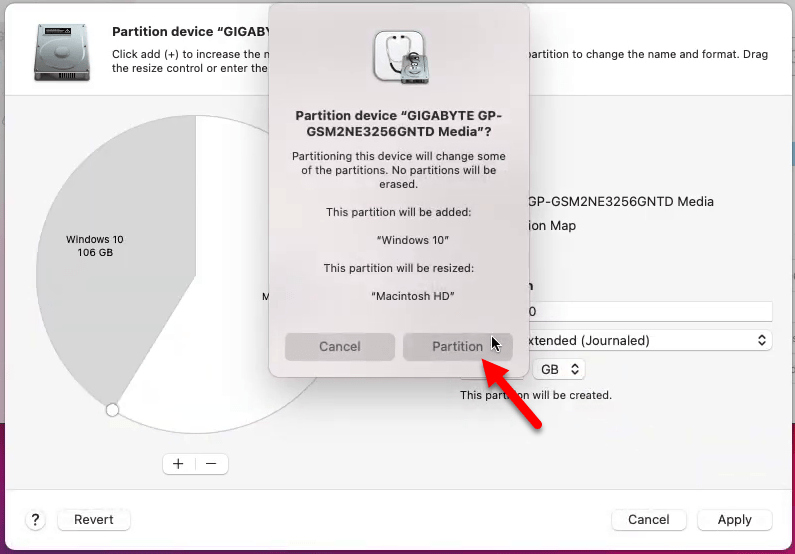
Warning: Do not power off this computer while resizing is occurring, this may last for several or hours. To avoid this you can use partition while in recovery.
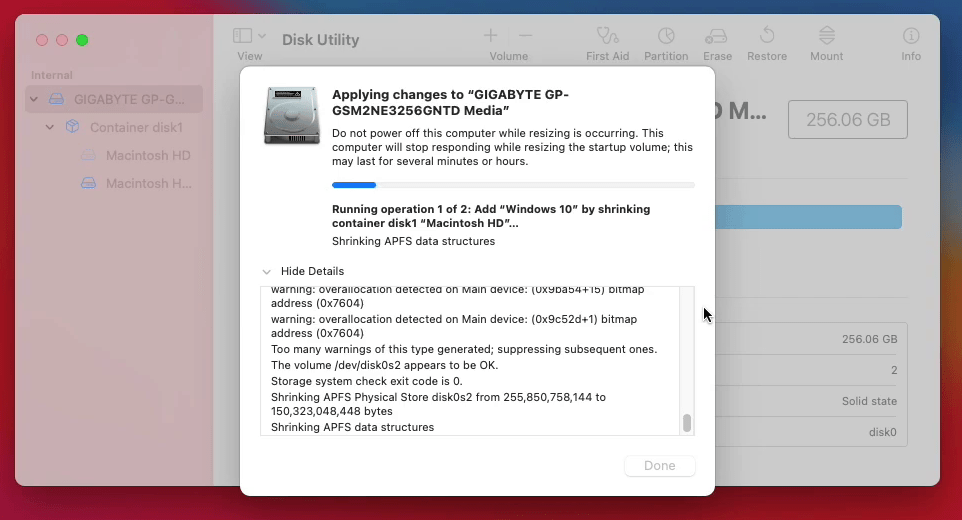
Wait until it should create or shrink partition for Windows 10, this may contain some time. During the partition creation don’t do anything, otherwise, your hard disk will be damaged.
Install Windows 10
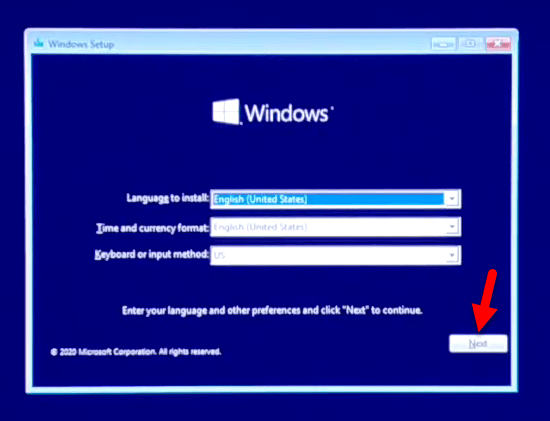
Once the partition created for Windows 10, attach the bootable USB drive of Windows 10 and restart your PC and press the Boot menu key. Select Windows 10 drive and press enter key.
Select your input language, Time and currency method, Keyboard or input method, and click next.
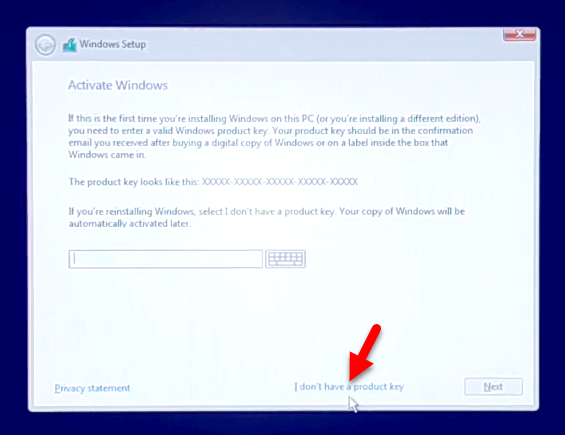
Click on install option, enter the Windows 10 product key, or if you don’t have click on “I don’t have a product key” option.
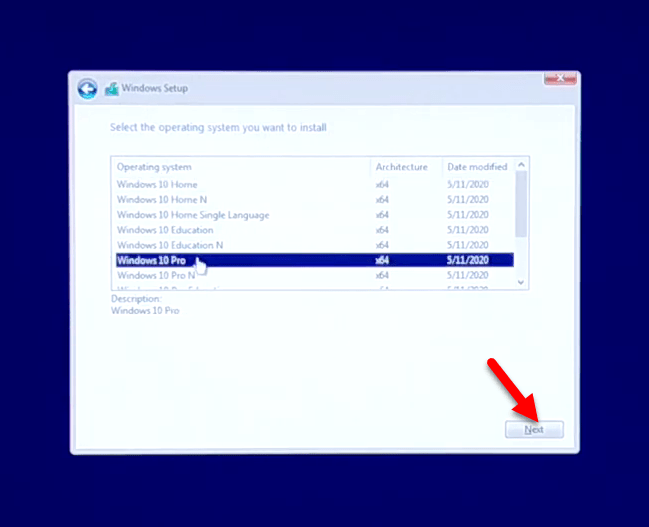
Select your Windows 10 version and click next.
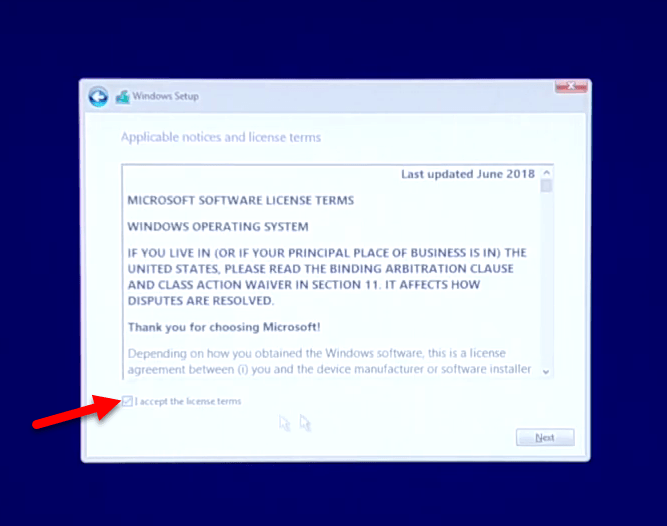
Check the box of “I accept license terms” and click next.
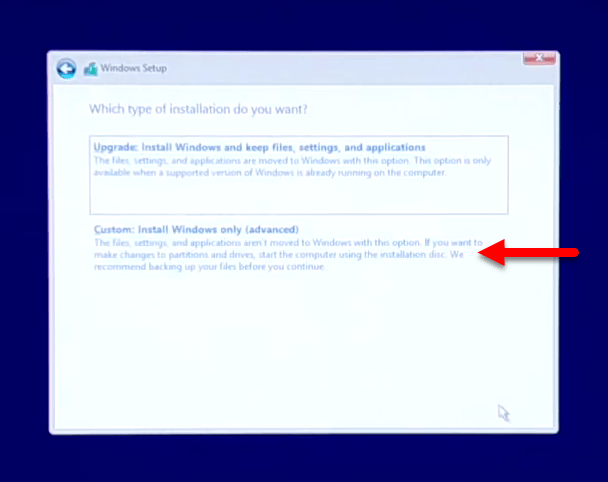
Click on Custom install Windows only (Advanced) option.
Now here be careful do not delete the EFI partition as well as macOS partition. Now delete the created partition for Windows 10 which was allocated previously on macOS. Make sure to delete the partition otherwise you will not be able to proceed.
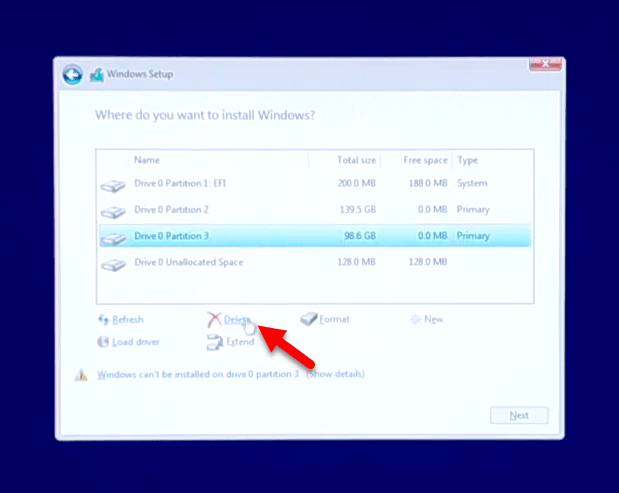
Select the unallocated space and click on next
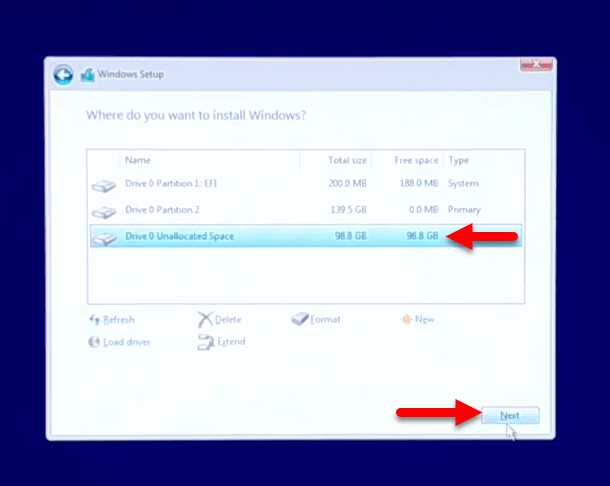
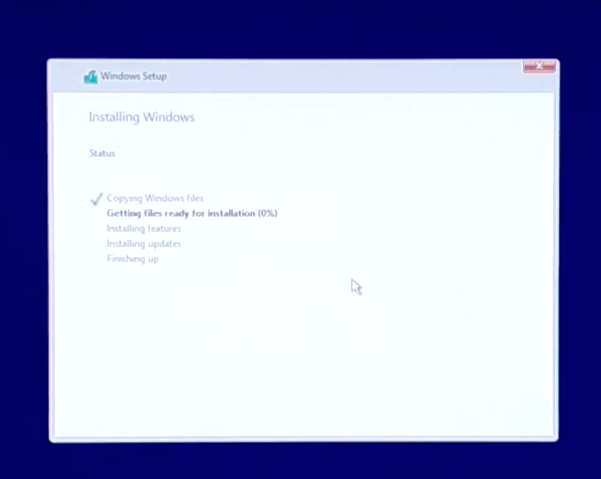
Wait until the Windows 10 successfully should install on your PC, when the installation completed your PC will restart automatically.
Once the installation completed, also complete the basic settings of Windows 10 for your PC. And finally, Windows 10 is being installed.
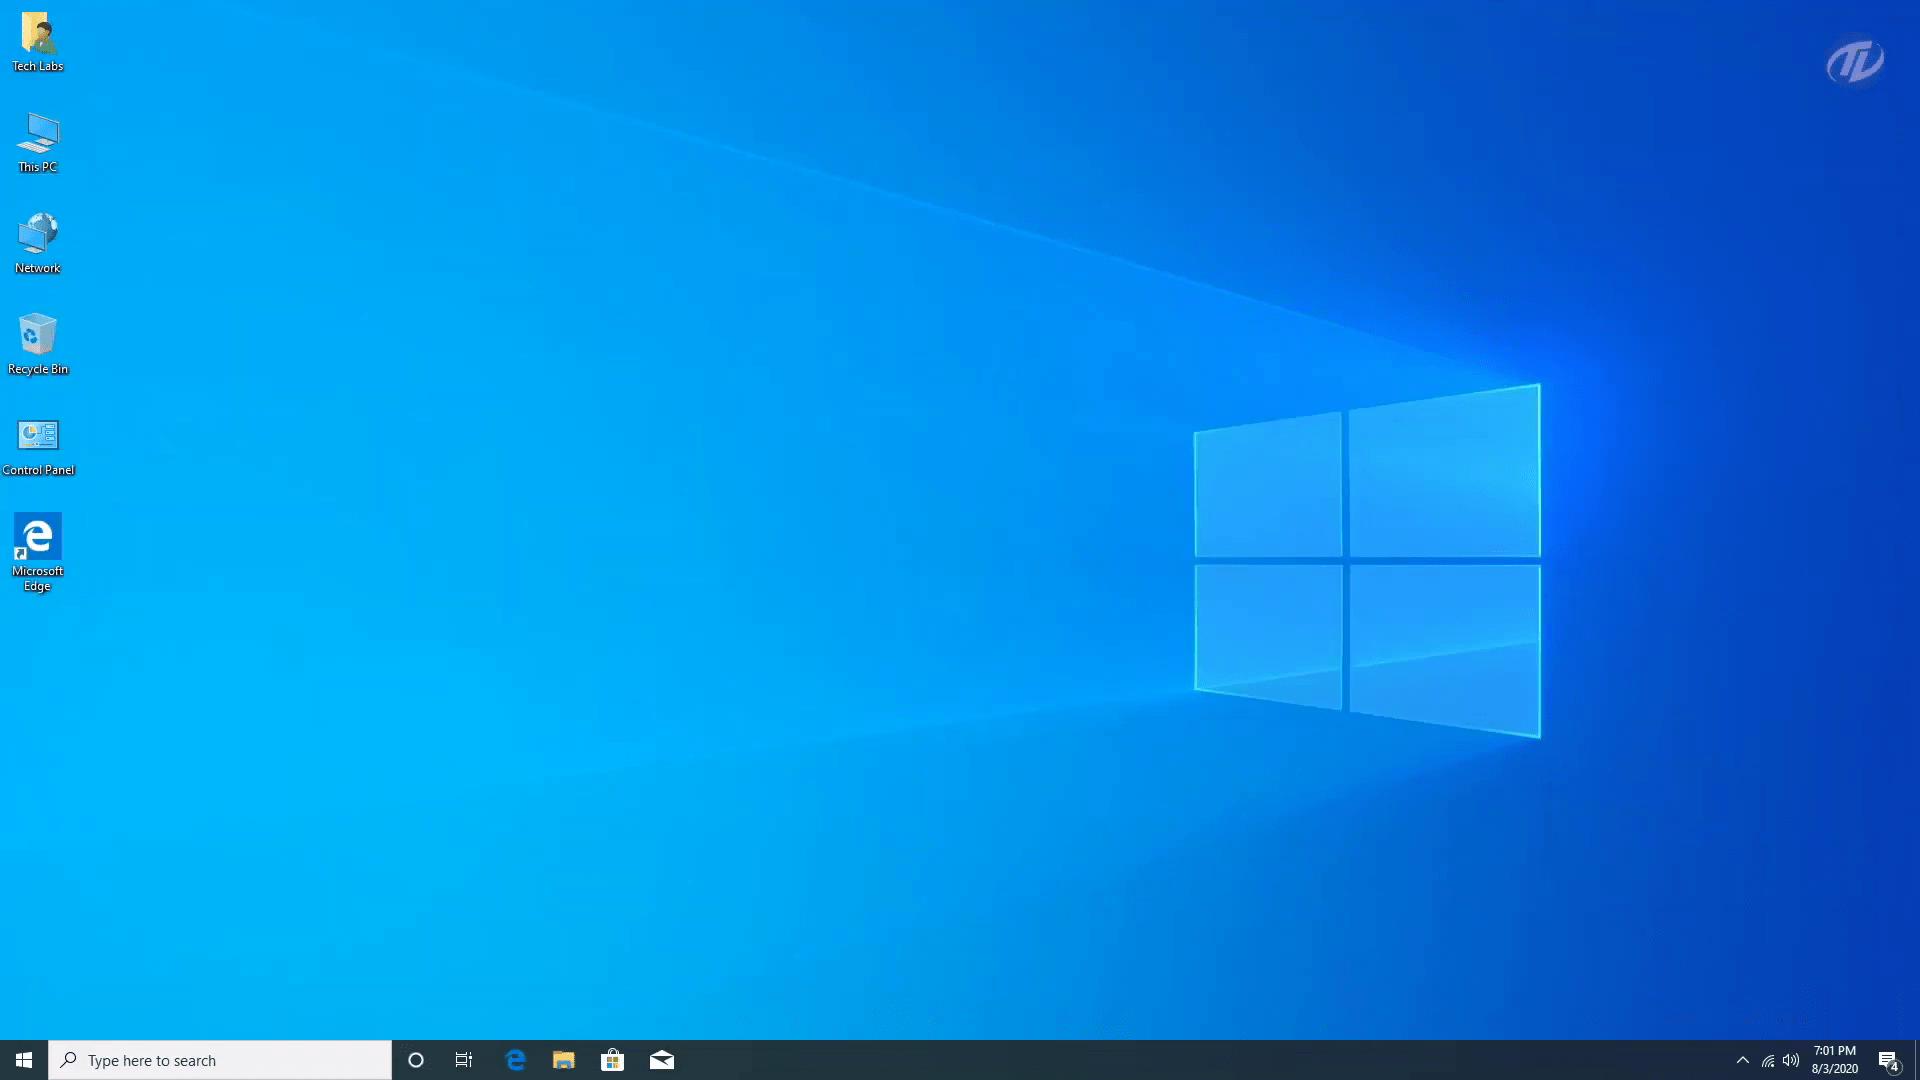
After you logged into Windows 10 navigate to start menu and click on settings>Security and Update. Completly update Windows 10 properly to fix the drivers, such as sound, graphic display, Bluetooth, WiFi, and other things.
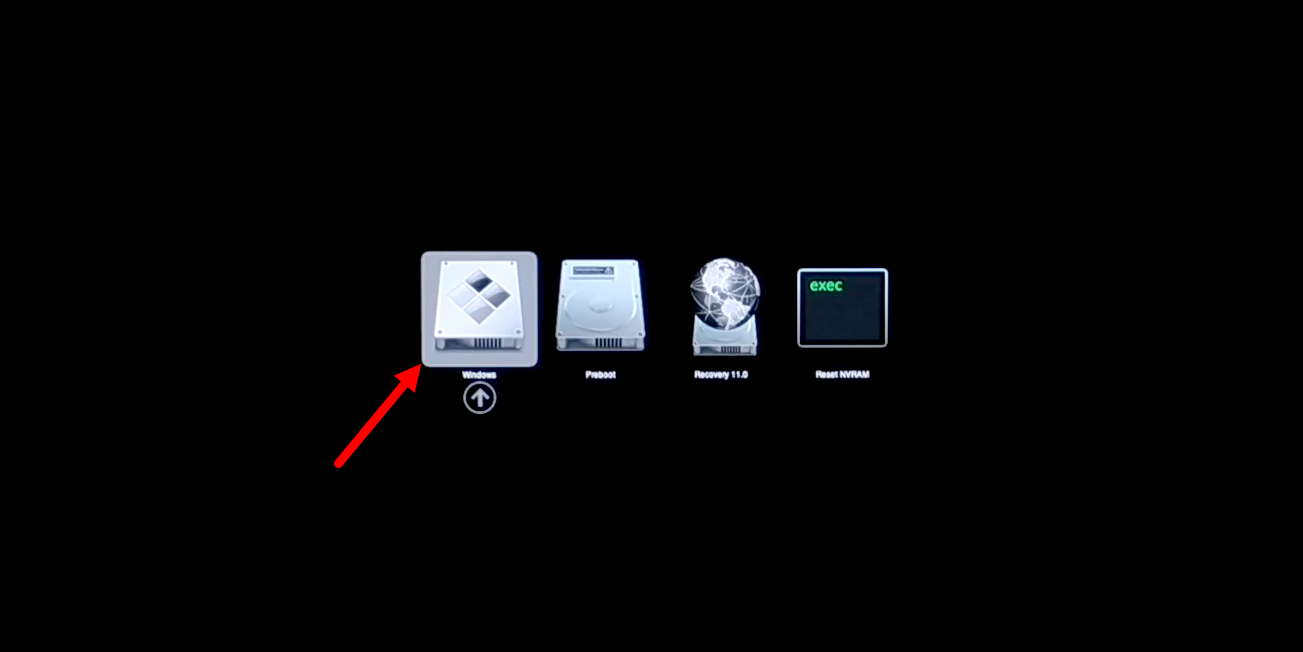
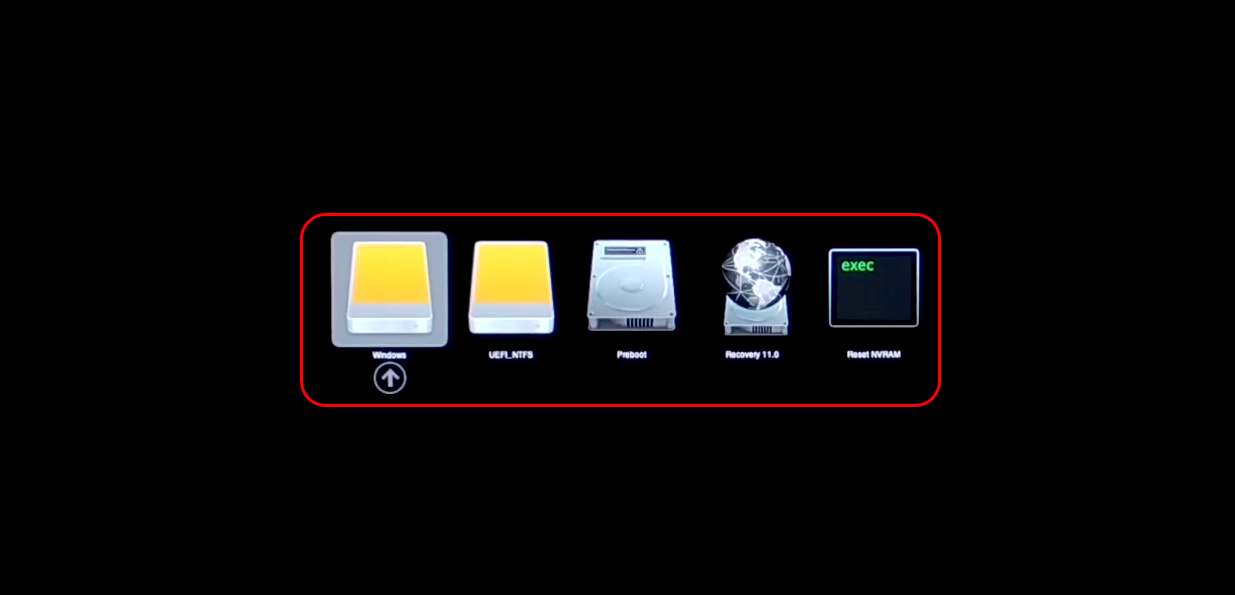
To check that macOS Big Sur 11 and Windows 10 are dual boot now on your PC, restart your PC. And check the startup window, as you here see both macOS Big Sur and Windows 10 is available at the startup screen. Go ahead any enjoy macOS Big Sur and Windows 10 on the one computer.