At WWDC Apple unveiled one of the biggest operating systems called macOS Big Sur. Also, this operating system of Apple called macOS 11.0 Big Sur. This will be the first operating system that runs on Apples upcoming ARM-Based Macs computers and older version of Intel-Based machines. This is the redesigned operating system with new features to complete your experience.
This is the biggest upgrade of macOS Big Sur that comes with Apple’s fastest Safari browser. Apple introduced that the Safari update is since the fastest Safari since 2003. The browser in macOS Big Sur even loads the web pages faster. Upgraded the features in Safari like improved Privacy Features, new look to the interface.
What is PC-Hackintosh? A Hackintosh a portmanteau of hack and Macintosh, is a computer that runs an Apple Macintosh operating system. macOS or OS X on computer hardware not authorized for the purpose by Apple. Hackintosh began as a result of Apple’s 2005 transition to inter processors, away from PowerPC.
Also, you can install macOS Mojave, macOS Catalina 10.15, macOS Big Sur on your Windows PC using the Virtual machines VMware & VirtualBox.
New: How to Install macOS Big Sur on VMware on AMD Processor?
Read the articles:
- How to Install macOS Big Sur on AMD Ryzen System
- How to Install macOS 11 Big Sur on VMware on Windows PC
- How to Install macOS 11 Big Sur on VirtualBox on Windows PC
Install macOS Catalina on VMware & VirtualBox
- How to Install macOS Catalina 10.15 on VMware on Windows PC
- How to Install macOS Catalina 10.15 on VirtualBox on Windows PC
Install macOS Mojave 10.15 on VMware & VirtualBox
- How to Install macOS Mojave 10.14 on VirtualBox on Windows PC
- How to Install macOS Mojave 10.14 on VMware on Windows PC
Install macOS Big Sur 11 on PC-Hackintosh?
It’s not possible to clean install macOS Big Sur on PC-Hackintosh, the only way to install macOS Big Sur on actual Mac and VMware. Therefore, the macOS Big Sur is not a clone to the target disk-like macOS Catalina or macOS Mojave 10.14. You can Boot macOS Big Sur to actual Mac, you need the recovery, and the recovery is not possible at all. For installing macOS Big Sur on actual Mac, you need VMware Fusion, Clover Configurator, EFI files, Commands, and macOS Catalina image files too.
- A Pair of 16GB USB Flash Drive
- One External Hard disk drive
- macOS Big Sur dmg file
Step #1. Install macOS Big Sur on VMware Fusion
First of all, for installing macOS Big Sur on PC-Hackintosh and for taking the recovery image file. You need to install VMware Fusion on your Mac, and install macOS Big Sur on VMware Fusion on your Mac. Check the below link on how to install macOS Big Sur 11 on VMware Fusion on Mac.
Step #2. Take Recovery of macOS Big Sur image via VMware Fusion
You can make the recovery of the macOS Big Sur installer image file or dmg file via VMware Fusion. Or simply you download the dmg file from the below link. This method of recovery is recommended by most of the famous YouTuber’s.
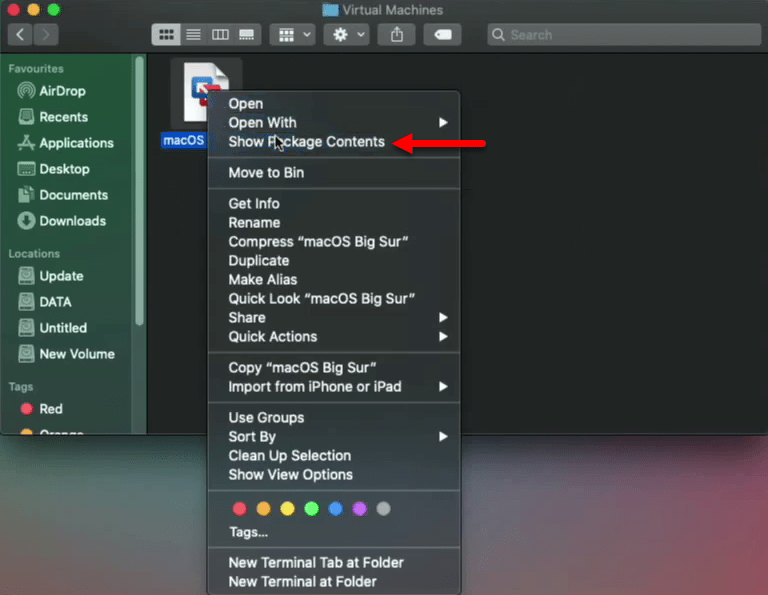
To create the recovery image file of macOS Big Sur you need to modify the VMX file. Open up the file directory of macOS Big Sur installation, open the users, click the location, right-click on macOS Big Sur and click on “Show Package Contents”.
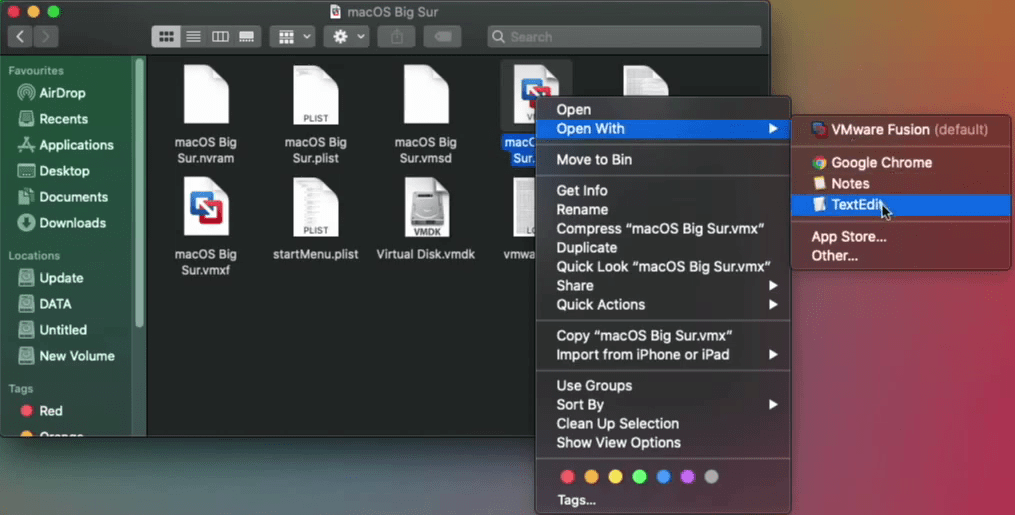
Right-click on “macOS Big Sur.VMX“, open with, Textedit.
While the VMX file opened copy and paste the below commands into terminal and close the terminal.
bios.bootdelay = "1000"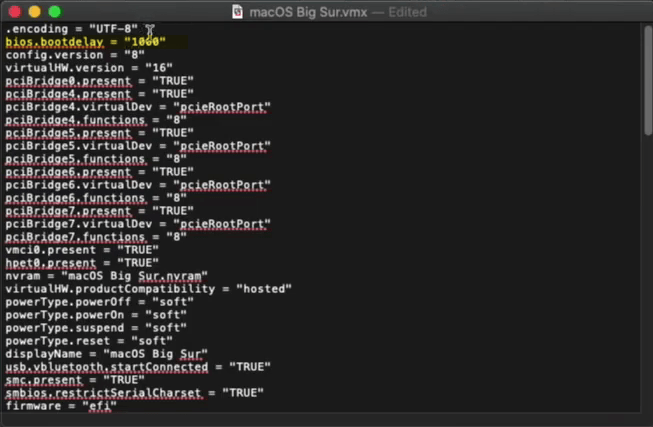
Step #3. Create macOS Big Sur Recovery
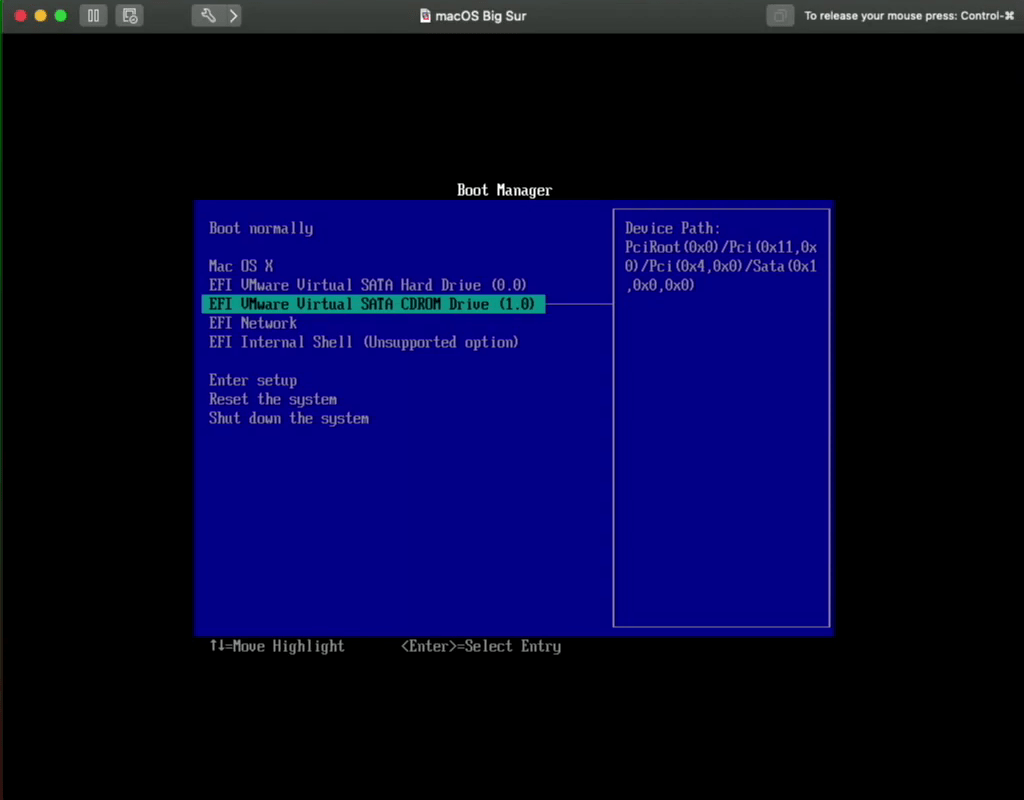
Once you edited the VMX file of macOS Big Sur, then over ahead to VMware Fusion and click the play button. When the macOS Big Sur launched select the third option “EFI VMware Virtual SATA CDROM Drive (1.0)” and press key.
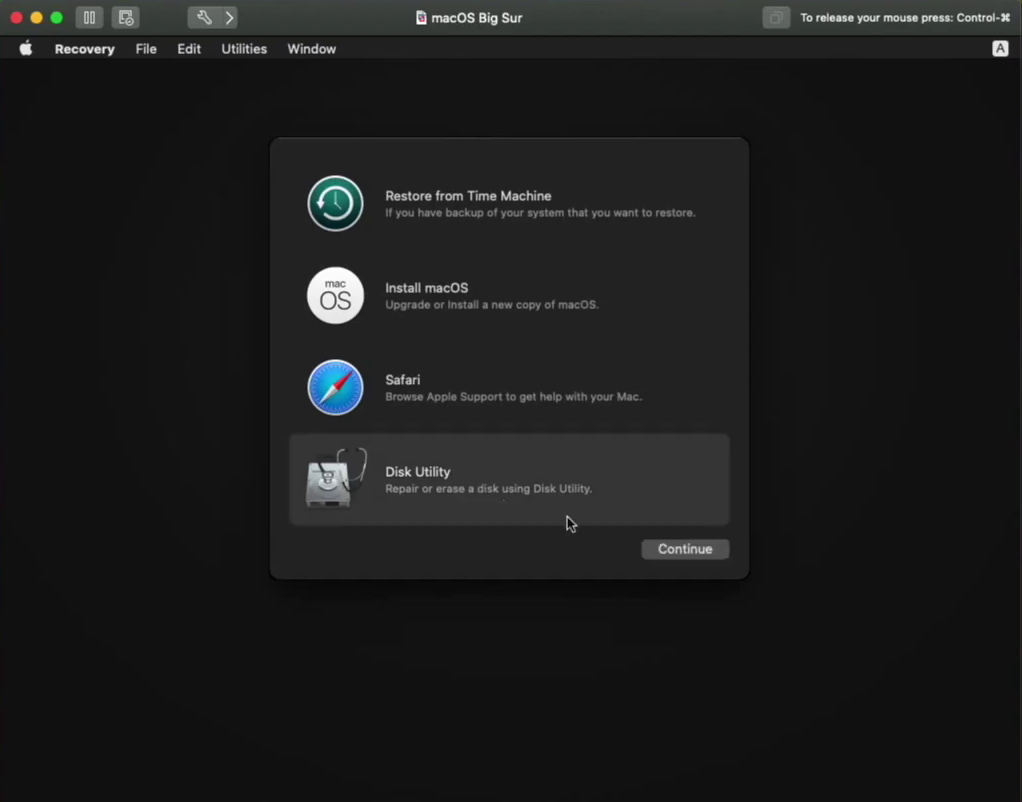
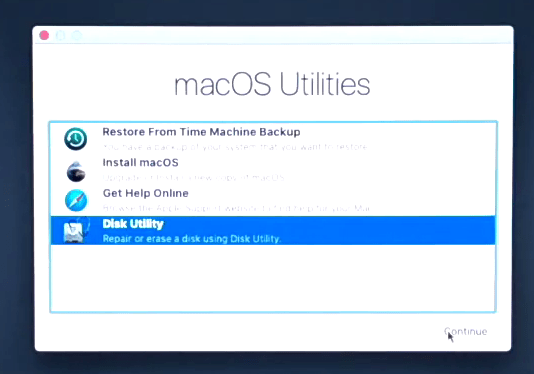
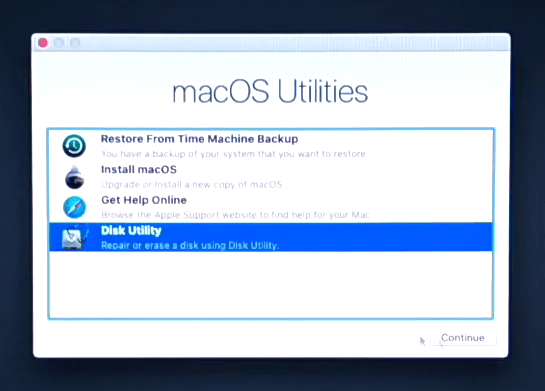
In the Utilities window select “Disk Utility” and click continue.
- Click on the top bar on “View” and select “Show all devices”.
- Now connect your external hard drive, and select “Decide later”.
- Here click on “Connect to the VM”
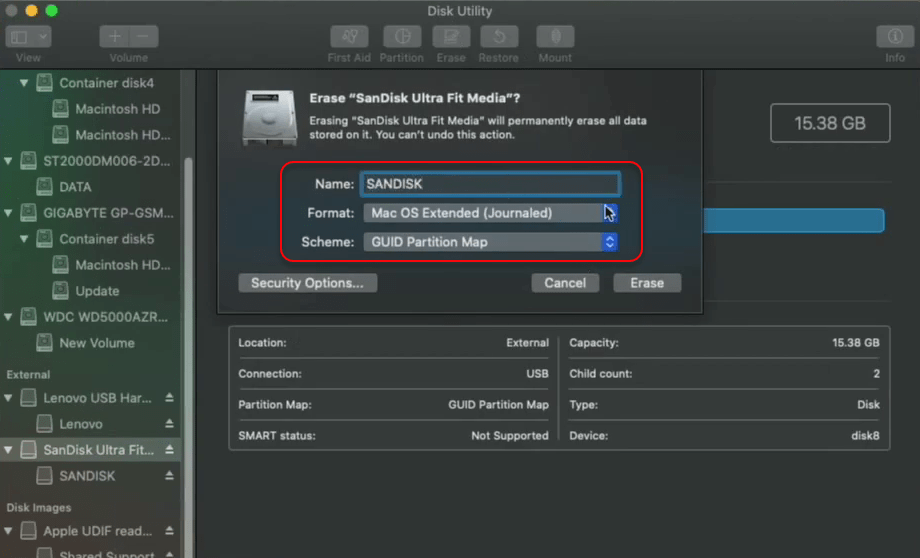
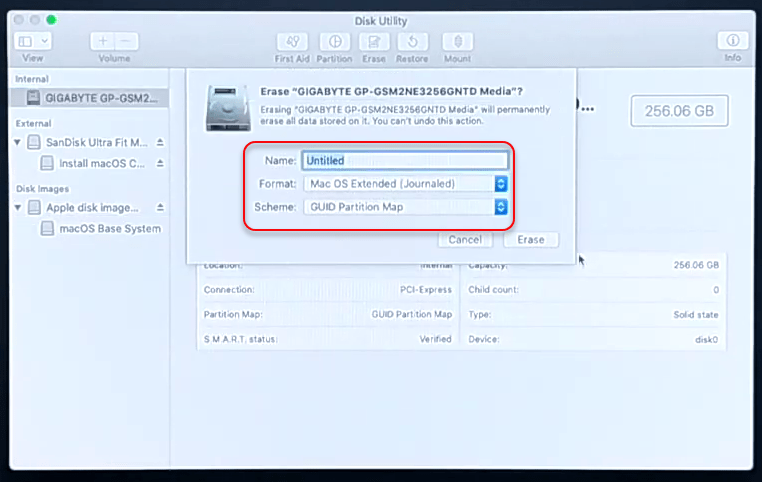
Now select the external drive from the left-handed menu bar, then click on the “Erase” option, an erase the drive with below settings.
- Name: Optional
- Format: Mac OS X Extended (Journaled)
- Scheme: GUID Partition Map
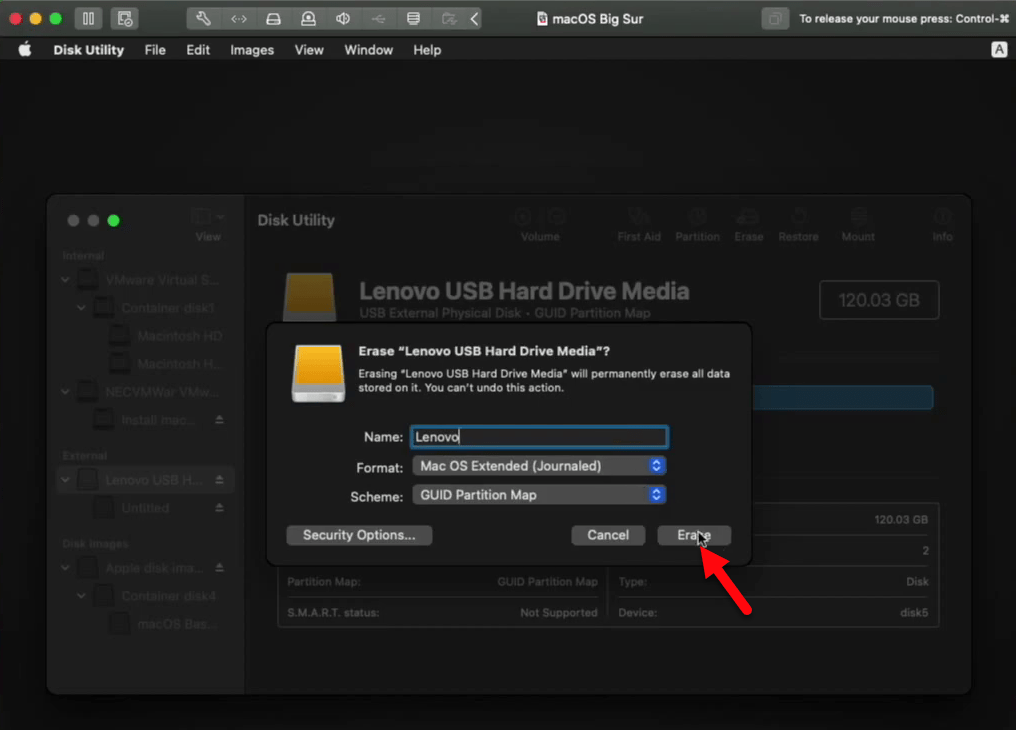
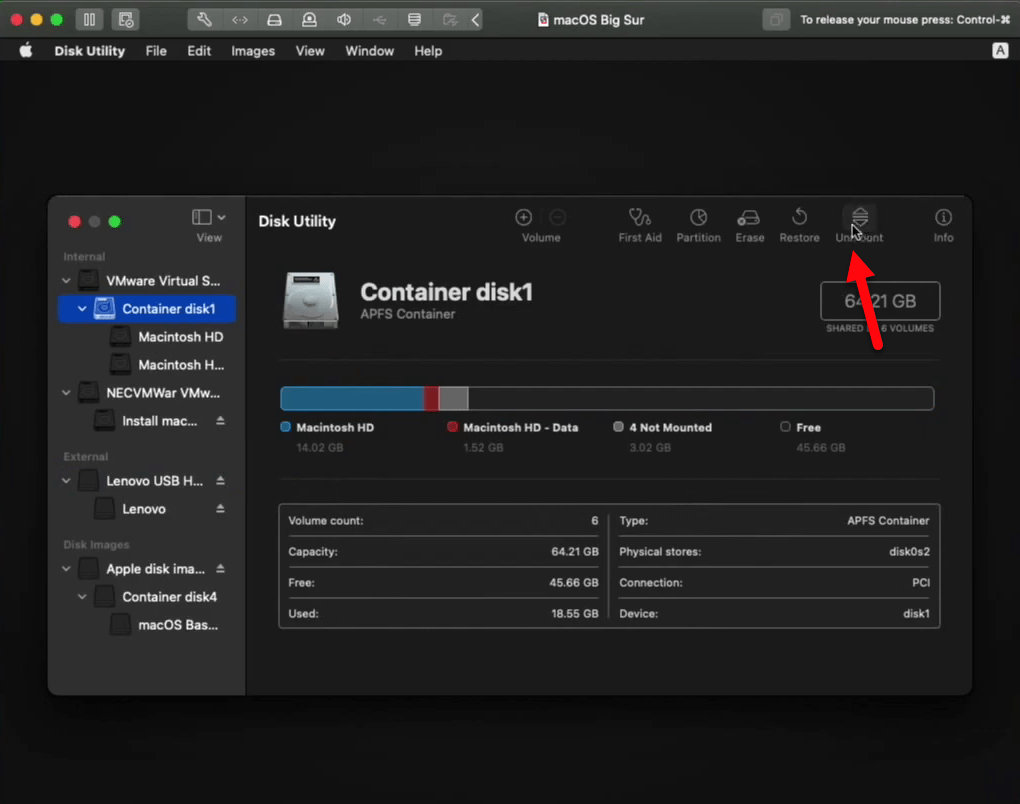
- Once the disk erased according to the above parameters, click Done.
- Unmount the “Container Disk1”
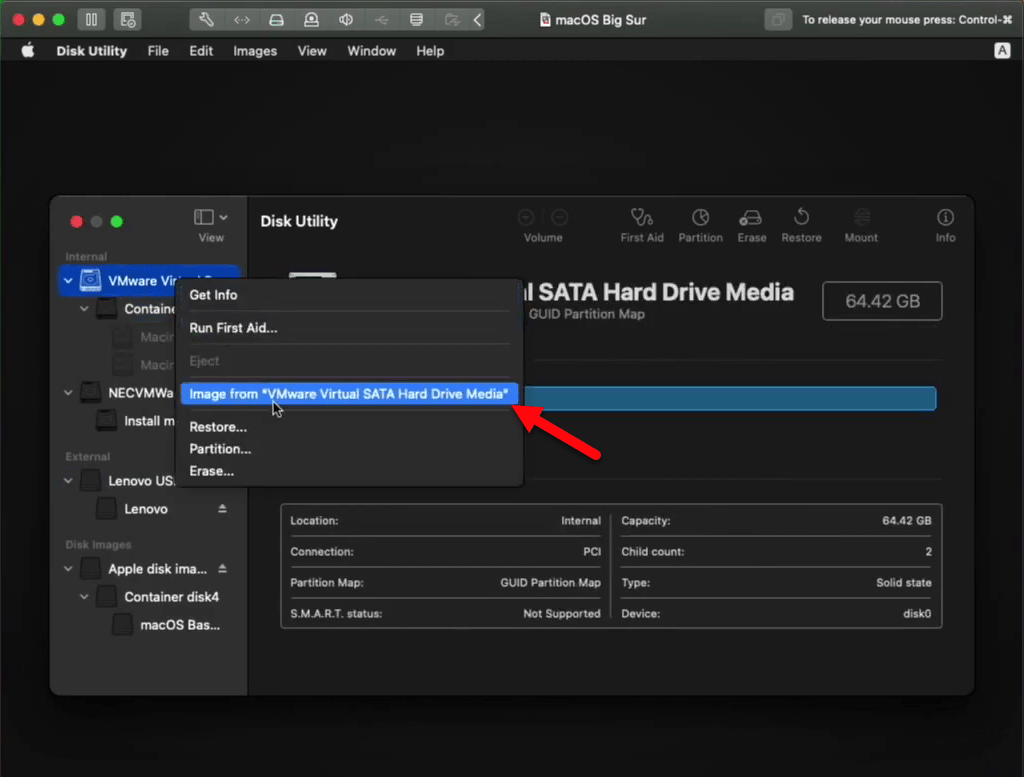
Now right-click on VMware virtual disk and select “Image from “VMware Virtual SATA Hard Drive Media”.
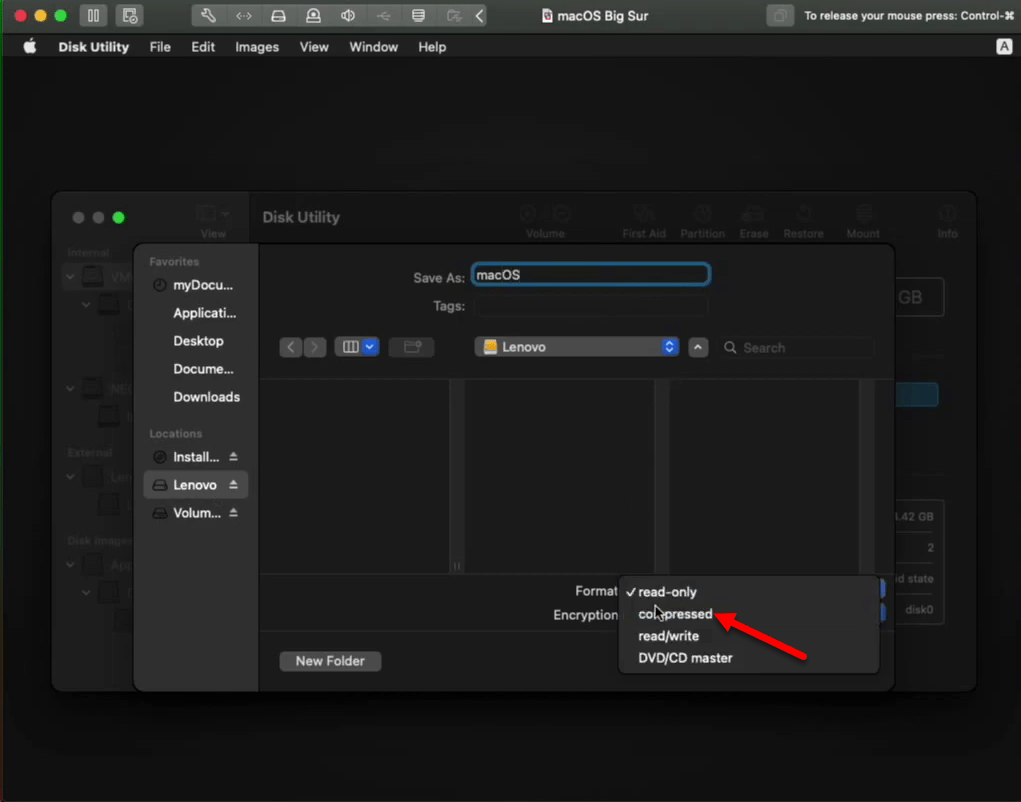
Select your external hard drive destination, change the name under macOS and click down on “^” and select “Compressed” then click Save. Once the file saved click on Done.
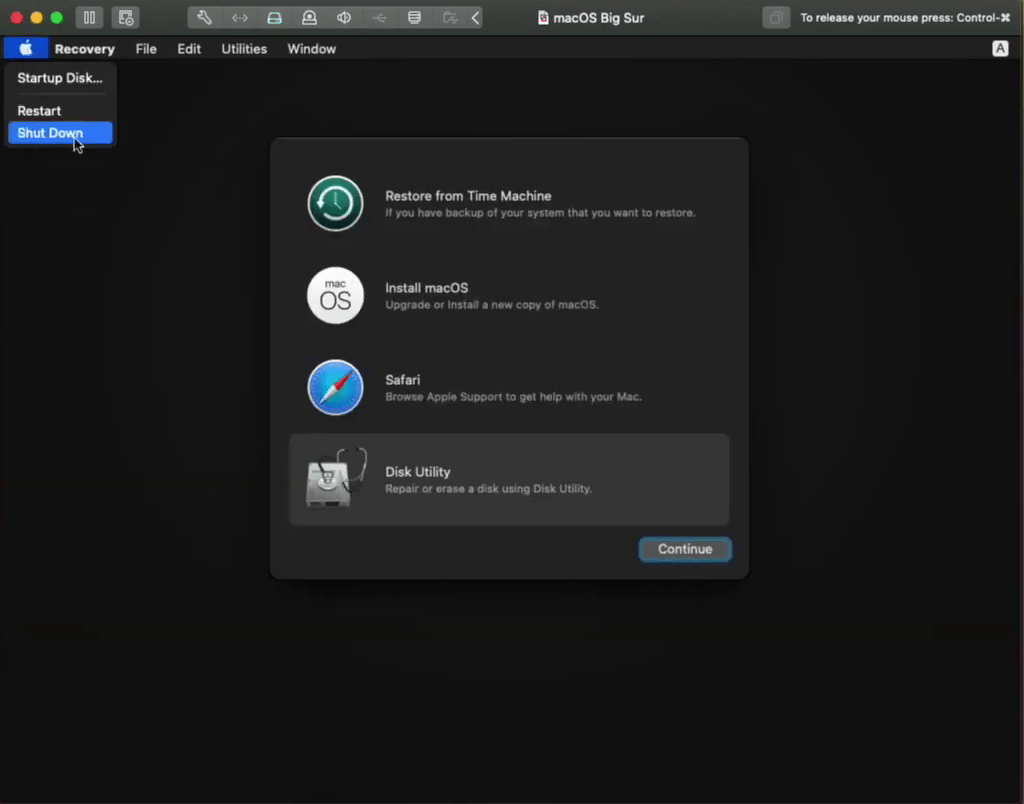
Close disk utility and shut down the VMware Fusion virtual machine by clicking on the left corner and shut down option.
Step #3. Create macOS Big Sur Bootable USB Drive
This is the step where you have to create macOS Big Sur Bootable USB for a perfect installation. Also, if you have already the macOS Big Sur dmg file, then there is no need to use this many steps for creating the recovery. On the other hand, you can use your Windows PC also for creating macOS Big Sur Bootable USB Drive. As we have written the article about that, so check the below link.
Connect the USB Flash Drive and format the USB flash drive, navigate to Utilities, and open Disk Utility. Then format the USB Flash Drive according to the below parameters.
- Name: macOS Big Sur
- Format: Mac OS X Extended (Journaled)
- Scheme: GUID Partition Map
- When the USB flash drive formated click on Done
- Close Disk Utility
Copy the macOS Big Sur installer dmg file from external hard drive to your USB Flash Drive. And close the window then eject the external media.
Attach your next flash drive to your computer, open Disk Utility select the USB Flash drive click on the “Erase” option. And erase it with the following parameters.
- Name: USB
- Format: Mac OS X Extended (Journaled)
- Scheme: GUID Partition Map
Once the USB flash drive erased close the disk utility, and open the Terminal from the search spotlight. When the terminal opened, apply the commands. Enter your username password and press enter, then type “Y” and press enter.
sudo /Applications/Install\ macOS\ Beta.app/Contents/Resources/createinstallmedia --volume /Volumes/USBAnd finally, macOS Catalina 10.15 Bootable USB drive has been created. Then copy the “Clover Configurator” to the macOS Catalina USB flash drive.
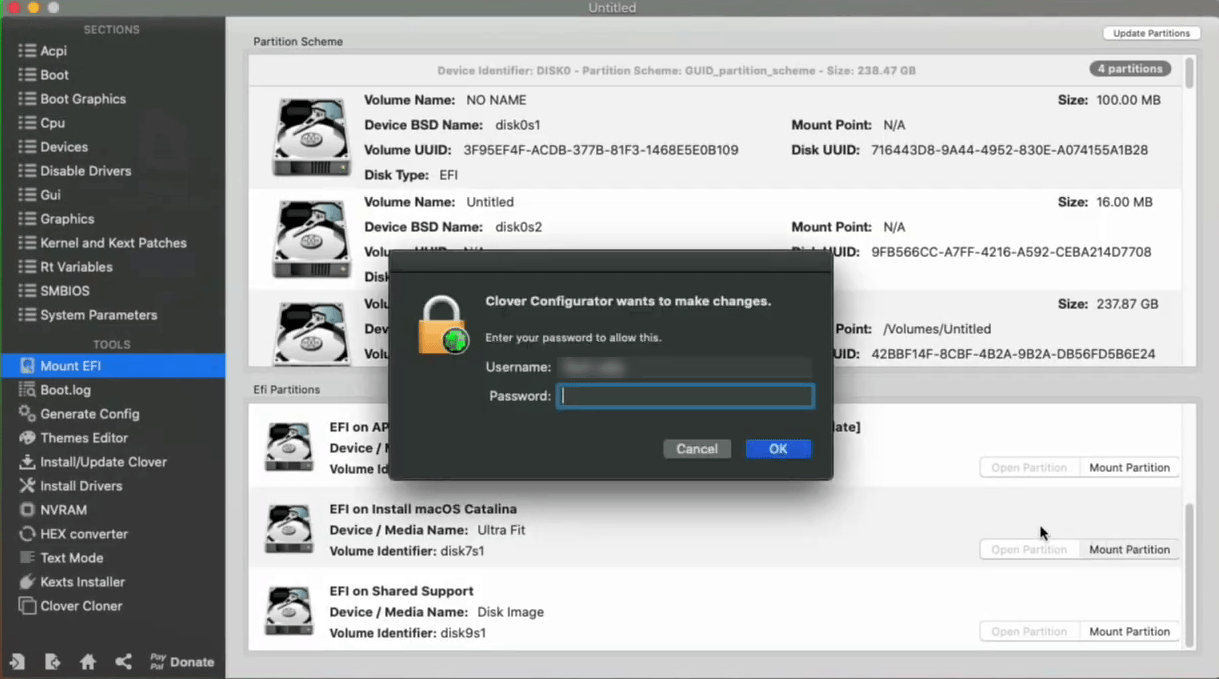
Open Clover Configurator click on “Mount EFI” and click on the “Mount Partition” option to mount the EFI partition of USB Flash Drive. When the USB flash drive mounted close the Clover Configurator. At last copy and paste the EFI folder to the EFI Partition.
Step #4. Install macOS Big Sur 11 on PC-Hackintosh?
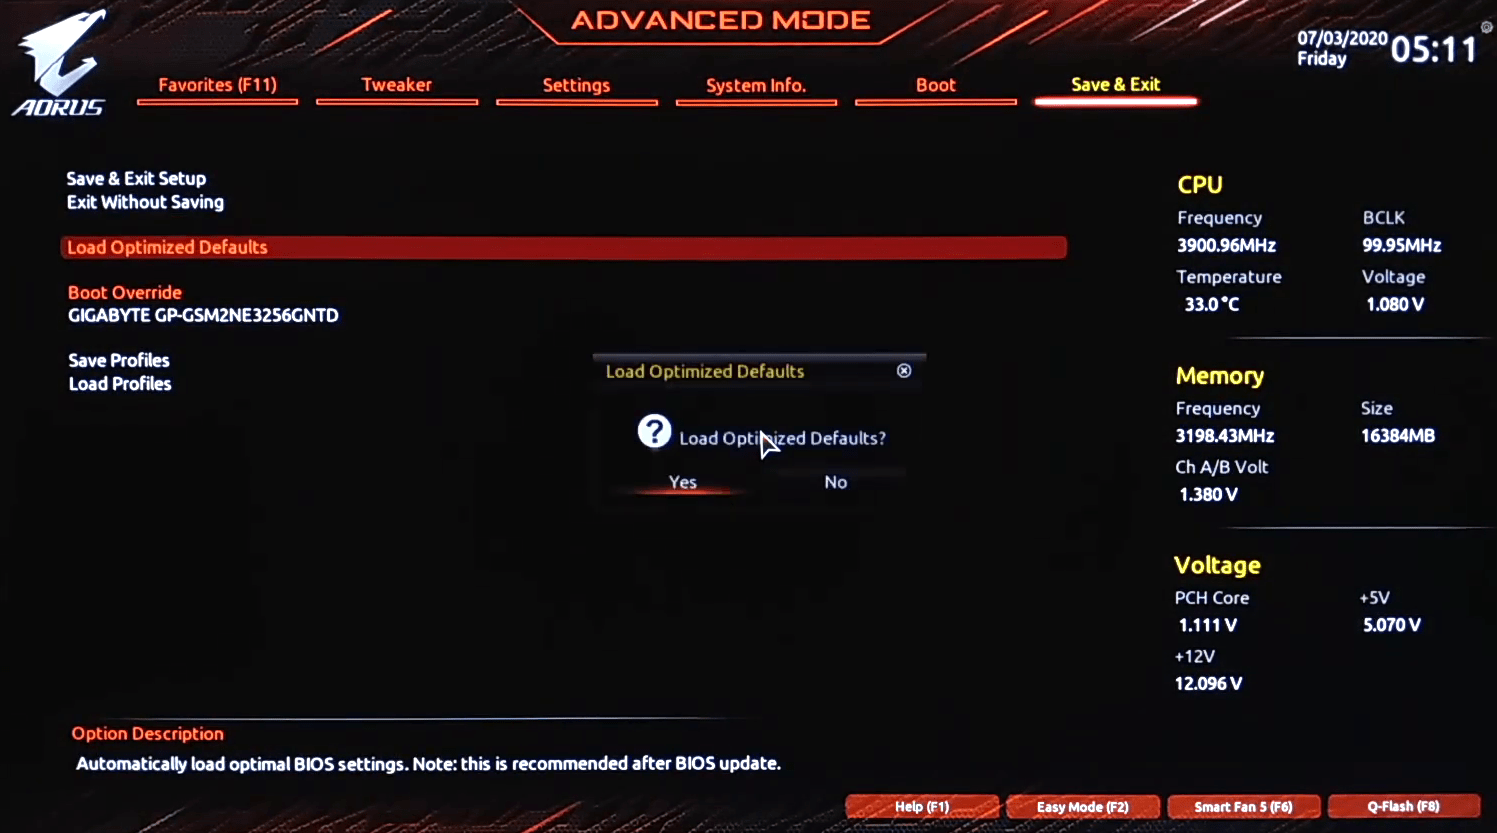
To begin the installation of macOS Big Sur on PC-Hackintosh first you need to bring some changes to BIOS settings of your computer. Restart your PC then press the Delete key to enter the BIOS settings window. Over ahead to “Save & Exit” tab, then select “Load Optimized Defaults” and press enter and select YES.
- Now attach the USB flash drive of macOS Catalina to your computer, then press the Boot menu and boot from the USB Flash Drive and press enter to boot.
- Select your language and click on continue
- From the Utilities window select “Disk Utility” and press continue.
Click on “View” then select “Show all devices”. Select your drive where you want to install macOS Big Sur, and “Erase” the drive according to the following parameters.
- Name: Optional
- Format: Mac OS X Extended (Journaled)
- Scheme: GUID Partition Map
Close the Disk Utility, then Attach you’re another USB Drive in which you made the recovery file of macOS Big Sur. Click on “Utilities” on the top bar, and open the “Terminal”.
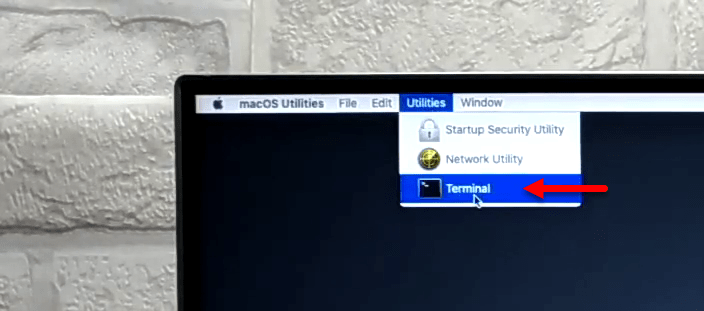
Once the terminal opened apply step by step the below down commands in the terminal.
diskutil list
#Mount the disk image to restore the image to target disk
holid -nomount /Volumes/SANDISK/macOS.dmg
#Restore the disk image on which macOS Catalina and macOS Big Sur installed
diskutil unmountDisk /dev/disk0
#Unmount the macOS Big Sur image
dd if=dev/disk25 of=dev/disk0 bs=32m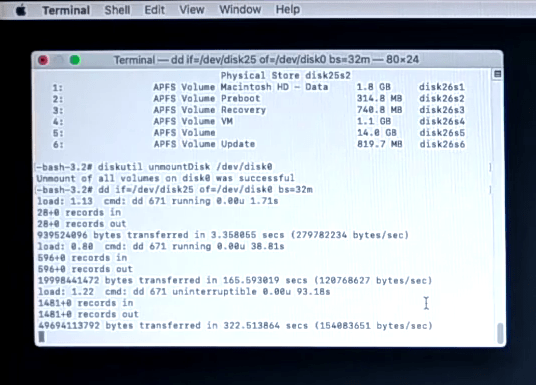
- Once the commands applied for restoring the macOS Big Sur image, close the terminal.
- In the Utilities window select “Disk Utility” and click continue.
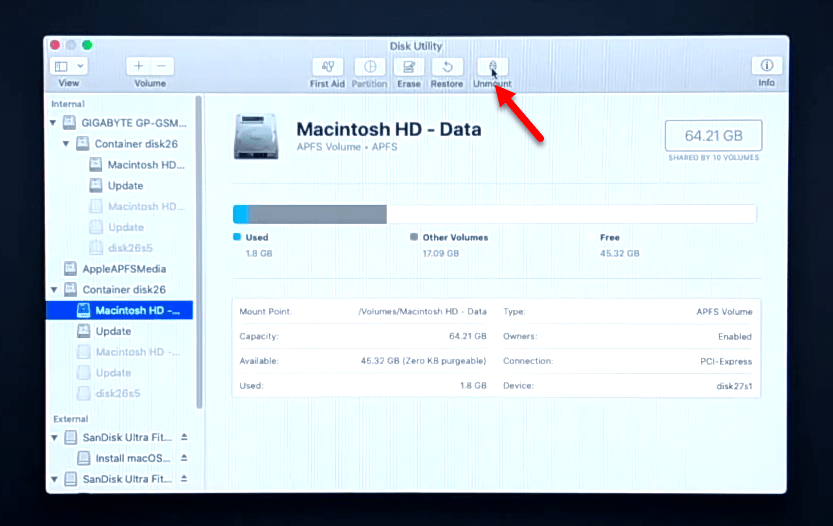
Now unmount the Macintosh-HD partition by selecting the disk and clicking on “Unmount” option
Close the Disk Utility and restart your PC
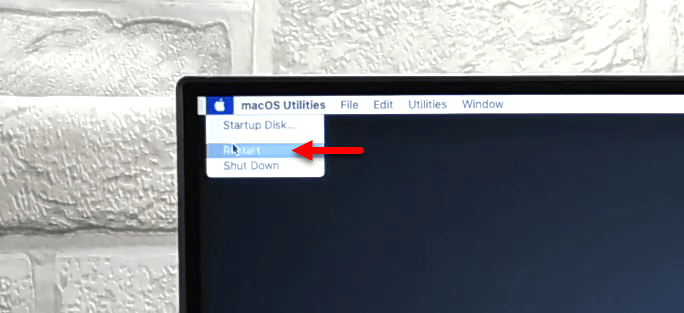
Now eject the macOS Catalin USB Flash drive and attach the macOS Big Sur USB flash drive. And press the Boot menu key, then select Macintosh-HD and press enter to Boot. When macOS Big Sur booted select your language and press continue.
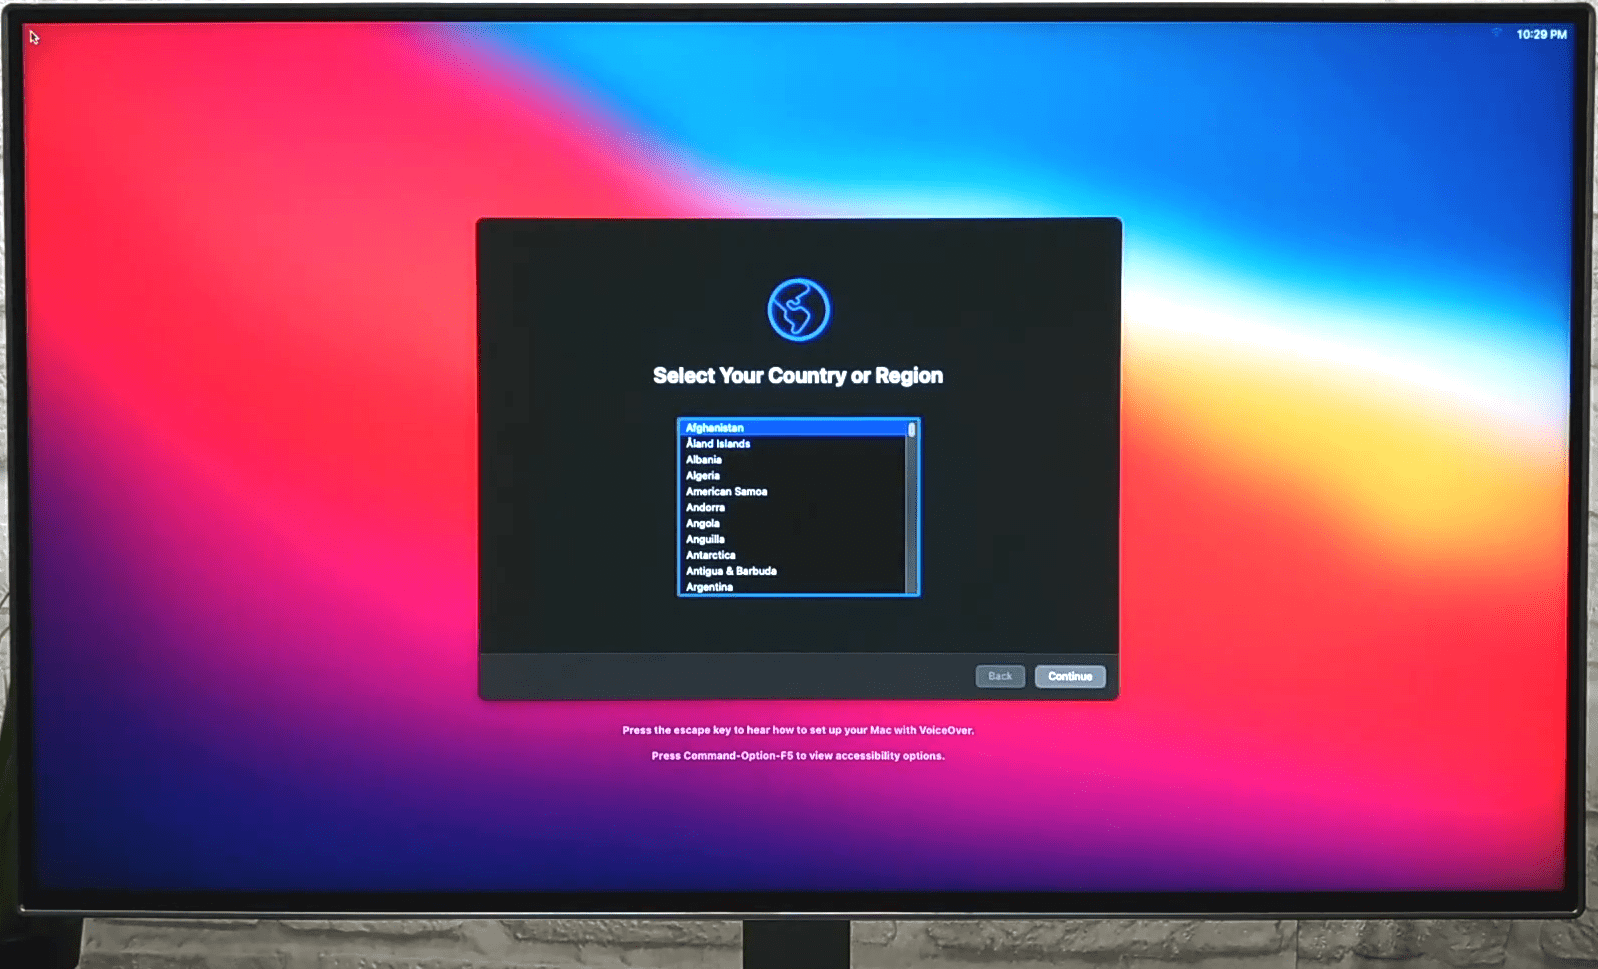
- Choose your written and spoken language and click continue.
- In Accessibility window simply click continue.
- In Data & Privacy window click continue.
- Sign in with your Apple ID.
- Agree with the terms and conditions of macOS Big Sur and click continue.
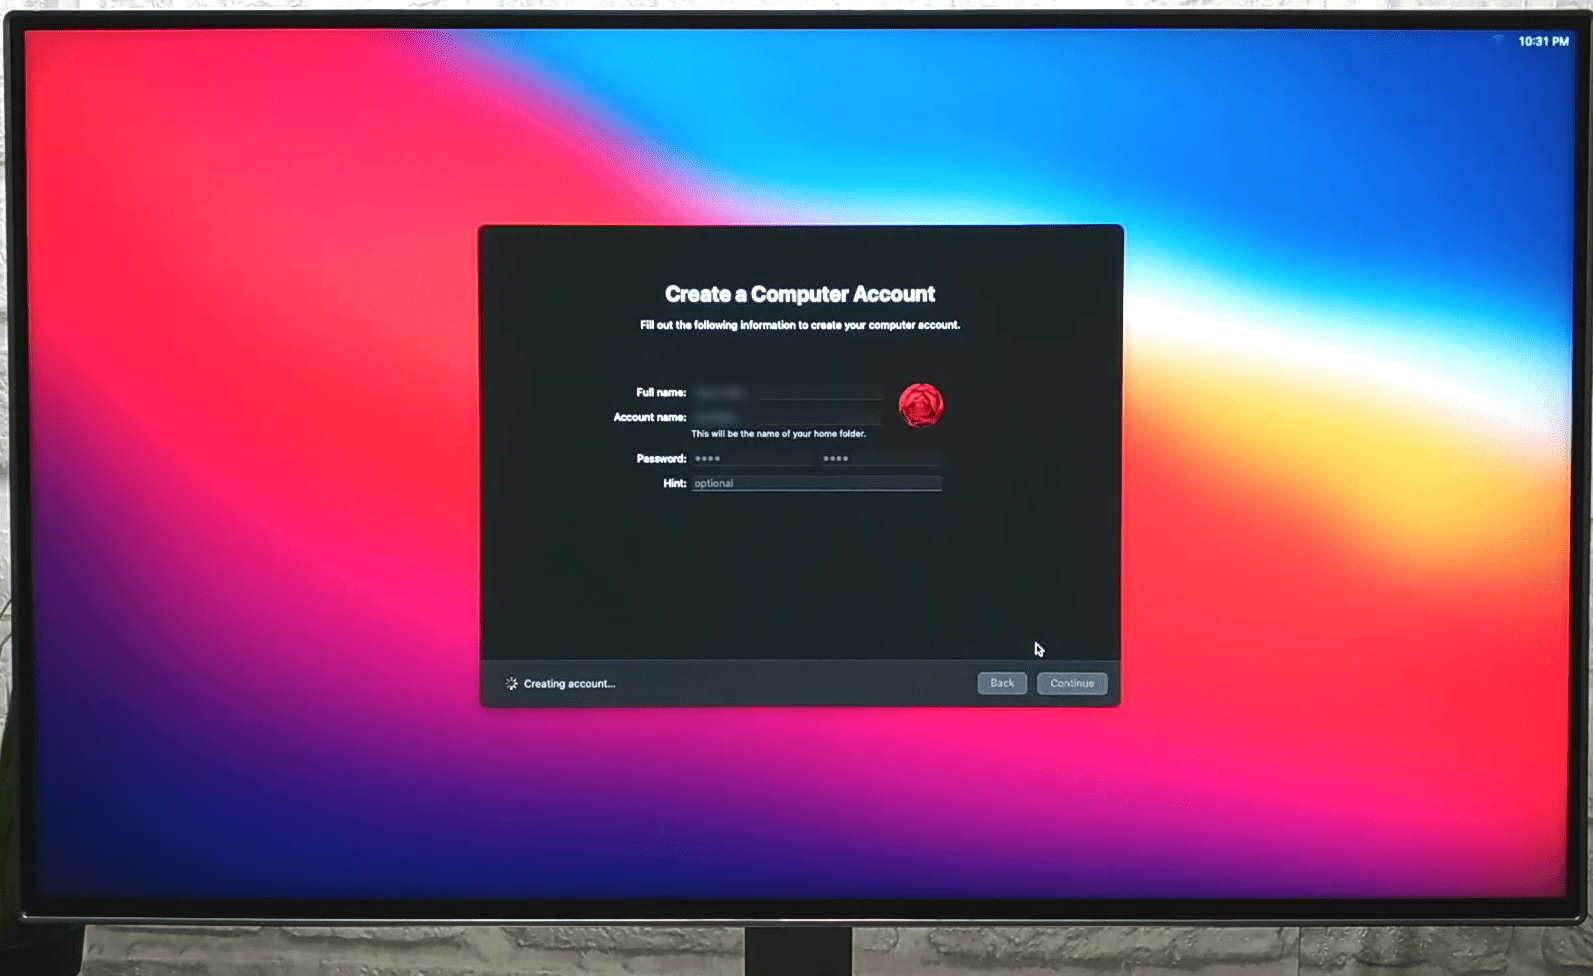
- Create your compute account
- On the express set tup window click continue
- Click continue to Analytics window
- Select Sign Up later with screen time window.
- Enable or Disable Siri
- Choose your look for macOS Big Sur.
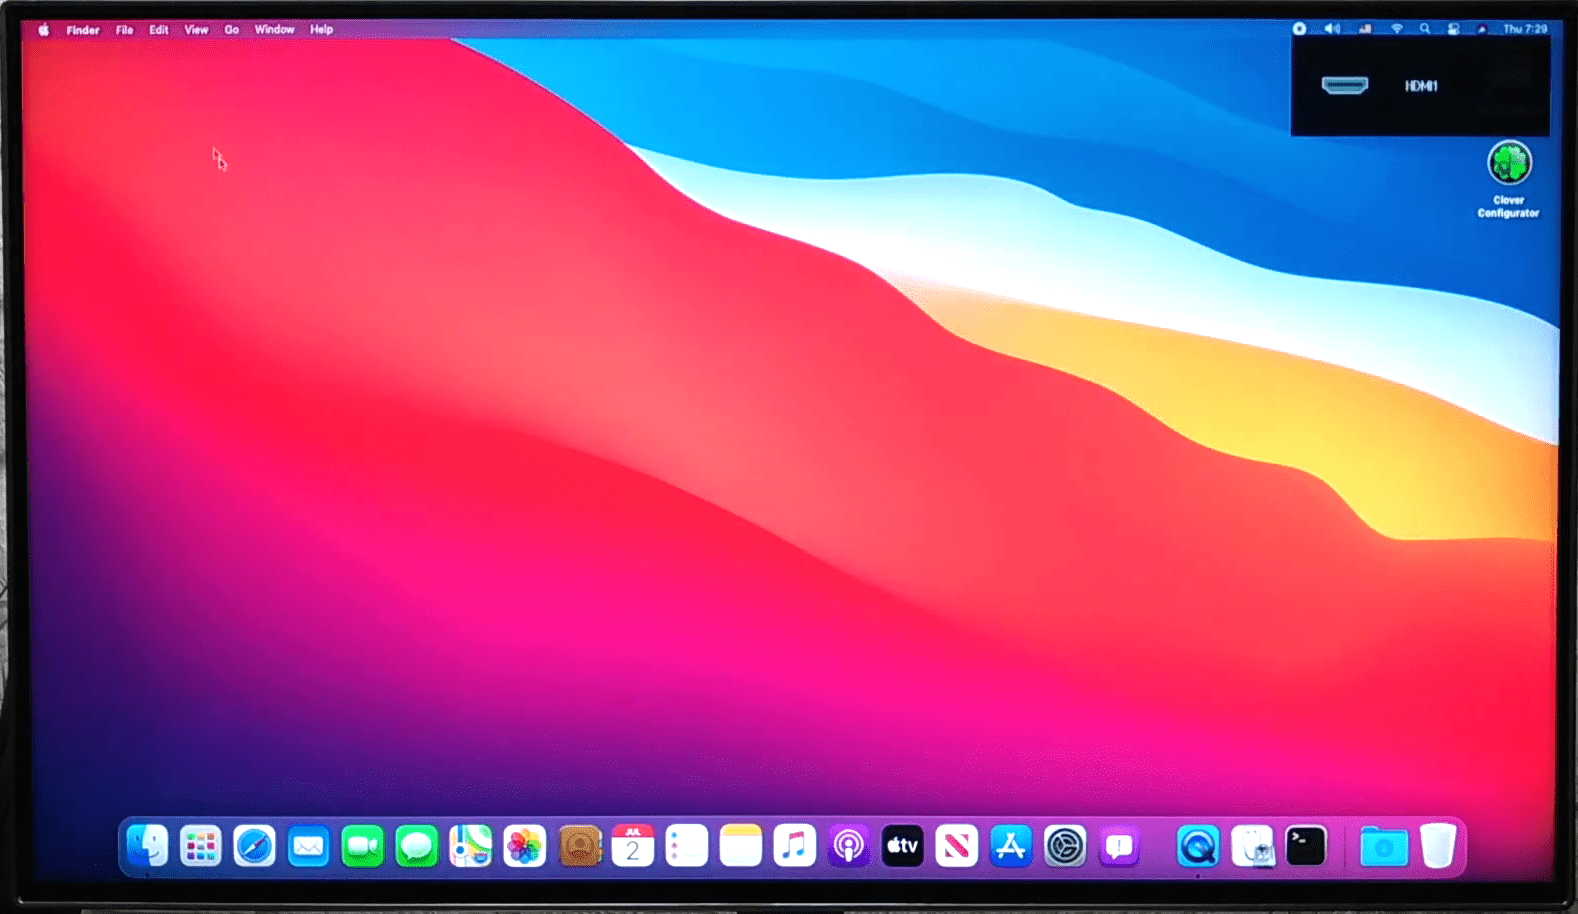
And finally, macOS Big Sur has been successfully installed on PC-Hackintosh.
Step #5. Resize the Disk and Container
After macOS Big Sur successfully installed, therefore, you need to resize the current partition of macOS Big Sur on your PC.
To do that, over ahead to the “Go” option from the top and click on the “Utilities” option. From the Utilities window select “Disk Utility” and open it and check the disk of partition disk.
For repairing the partition disk drive, over ahead to search spotlight and open the terminal. In the terminal window apply the below commands to repair or resize the disk.
diskutil list
Sudo diskutil repairDisk0
As you can see that we have repaired the partition disk drive from 64GB to its actual disk size 255GB.
Step #6. Install macOS Big Sur Drivers
- Copy the Clover Configurator from the USB Flash drive to the desktop.
- Double-click to open it, select “Mount EFI” and click on “Mount Partition”. Enter your username password and press OK. Mount the partition of USB Flash Drive and partition hard drive.
- Now copy the EFI folder from the USB Flash Drive, and paste it into the partition of hard disk drive.
- Close the Clover Configure, and Eject the partition hard disk and USB flash drives.
- At last click on Appl Logo and restart your PC.
After your PC restarted check everything, that is working perfectly or not such as Sound, Bluetooth, Wifi-WLAN, and other System preference settings.
I hope you enjoyed reading this article, if you got this important then share your useful feedback about this article.