macOS Big Sur 11 is the major release of macOS Apple Inc, operating system for Macintosh computers. macOS Big Sur is the successor to macOS Catalina 10.15. It was announced by Apple’s Worldwide Developer Conference on June 22, 2020, with a public beta schedule. Its name has been taken from the Coastal Region of Big Sur in the Central Coast of California. The Apple redirect the version to 11 after macOS Big Sur 10.15. The decision to release the macOS Big Sur with 10.16 version, according to users and developers expectations the put the version 11 on macOS Big Sur.
The final version of macOS Big Sur 11 will fall later this year. macOS Big Sur is the operating system for Macintosh computer (MacBook Pro, MacBook Air, iMac, Mac Pro, Mac Pro Tower).
At the event of Apple Developer Conference Apple’s also introduced macOS Big Sur 11 will not be supported the Mac computers below 2013 models. Indeed macOS Catalina supported the following Macs computers which macOS Mojave 10.15 supports. Unfortunately the Macs and MacBooks which are below 2013 models can be compatible with macOS Big Sur. There are some of Macs and MacBooks that can support the macOS Big Sur 11 operating system.
- MacBook: Early 2015 or newer
- MacBook Air: Mid 2013 or newer
- MacBook Pro: Late 2013 or newer
- Mac Mini: Late 2014 or newer
- iMac: Mid 2014 or newer
- iMac Pro
- Mac Pro: Late 2013 or newer
- Developer Transition Kit
macOS Big Sur New Features
Unlike Apple on 22, June 2020 didn’t introduce one of the most pretty interesting features of macOS Big Sur 11. Now macOS Big Sur can run the software updates and installation more faster in the background. If you wanted to update any software of macOS Big Sur latest update, then try to run in the background. Because it will cover less percentage of memory size.
- Safari: Safari is one of the major update in macOS Big Sur. Now use Safari applications even more faster than using it in macOS Catalina or macOS Mojave. Newly Apple added some cool features like Privacy Report, Password Monitoring, Page Previews. The shape of Safari is better redesigned in macOS Big Sur the before.
- Control Center: The Control was introduced in previous years in iOS, iPad, iPhone, and iPod. But one of the advanced jobs that Apple did is to bring Control Center inside macOS Big Sur. Control center is added beside the time option in macOS Big Sur on the top menu bar, by a single click you can turn OFF/ON the Wifi, Bluetooth settings. Even you can control the Music, or change light mode to dark mode.
- Notification Center: Here is one of the biggest changes in macOS Big Sur that Apple made. The notification center is more stylish and beautiful in macOS Big Sur as users expectations. The notification center is redesigned with new features and a new widget similar to iOS 14. Notification center in macOS Big Sur is more customizable.
Steps to Perform Clean Installation of macOS Big Sur 11
To perform clean installation of macOS Big Sur on an actual Mac and MacBook follow the steps.
Backup your Important Files
If you are already using macOS Catalina 10.15, macOS Mojave 10.14, or older version of the macOS operating system on your PC. Then you need to update it to macOS Big Sur latest operating system. In that case, you will delete all the files which are installed on the C drive. Before the installation make sure that you have the complete backup of your important files. For taking backup usually, most of the users are using “Time Machine”. Time Machine is an internally built software that allows you to take backup of your files on Mac. For taking backup of your files you need an external hard disk drive. The time machine will take automatically the backups of 24 hours, day, week, and month, and past years or even deleted files on the disk.
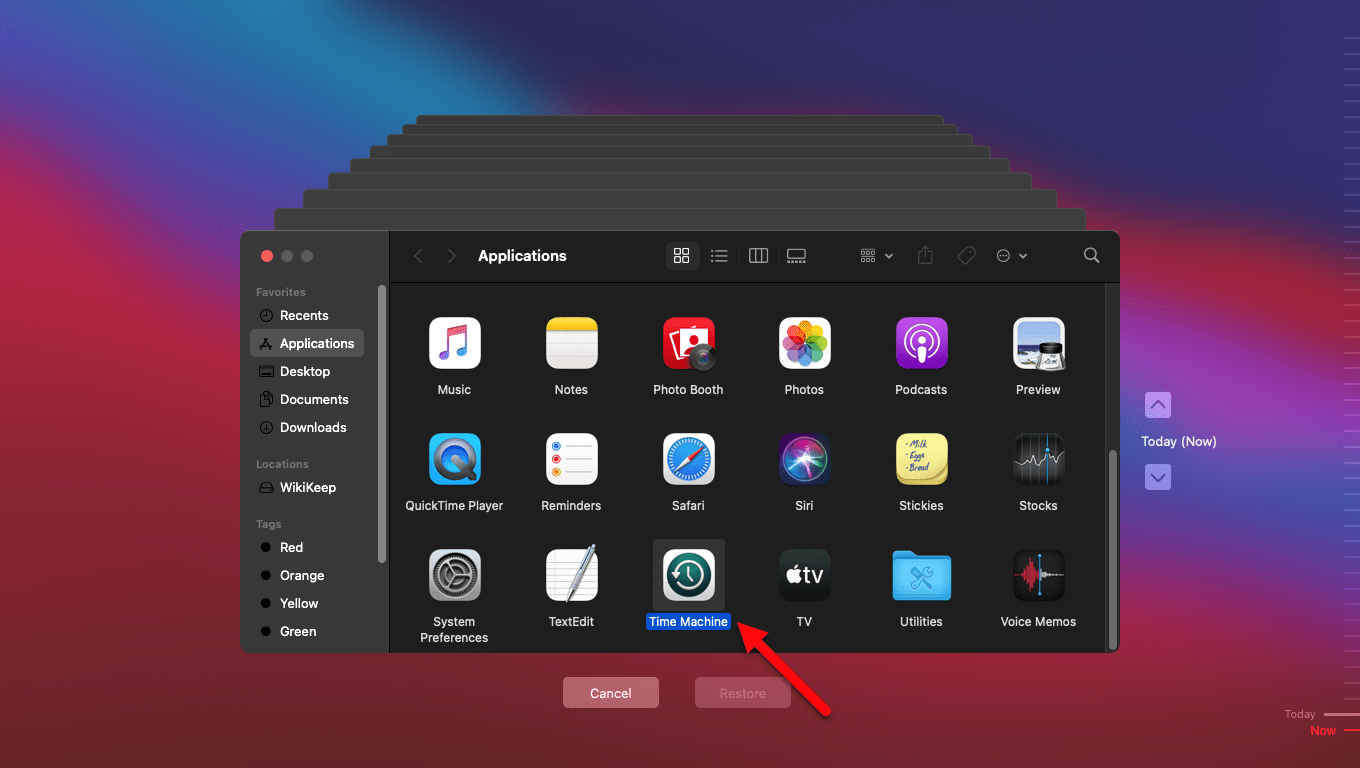
To take backup to navigate to search spotlight type “Time Machine” and open it.
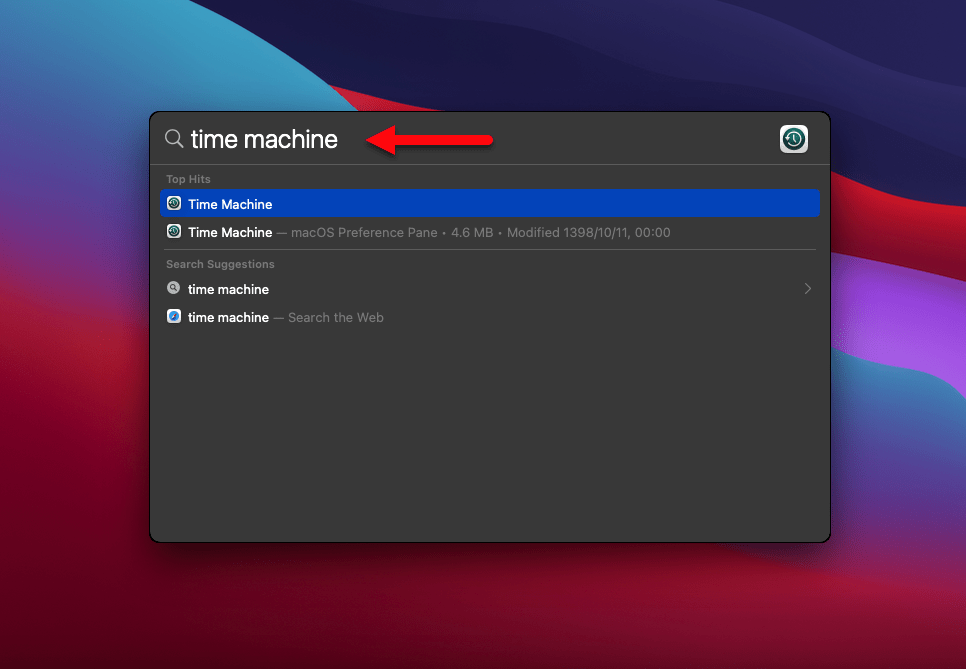
While the time machine opened start taking backup of your necessary files.
Download macOS Big Sur Installer File dmg
For downloading the macOS Big Sur installer file you need to be enrolled with Apple Developer Program website that costs $100. Or you can use the Assistant Package installer to download macOS Big Sur update on your Mac. On the other hand, the macOS Big Sur is ready in the below link to download.
- Download macOS Big Sur dmg
- Download Assistant Package
- Once you have downloaded the Assistant Package installer, double-click to extra the dmg. And open its file again double click on “macOSDeveloperBetaAccessUtilit.pkg” to run the installation.
- In the introduction window click continue.
- Click install enter your password and press install software.
- Wait for installation
- Once the installation completed click close.
- Automatically after installation, it will start searching for macOS Big Sur.
- Click on the “Upgrade Now” option.
- Wait until the macOS Big Sur installer file should download.
Create macOS Big Sur Bootable USB Drive
For creating macOS Big Sur Bootable USB Drive you have to individuals method. If you are a Windows user then you can use TransMac for creating Bootable USB Drive. If you are a Mac user then use the Disk Utility for reading the USB Drive, and using some commands in terminal to create Bootable USB Drive.
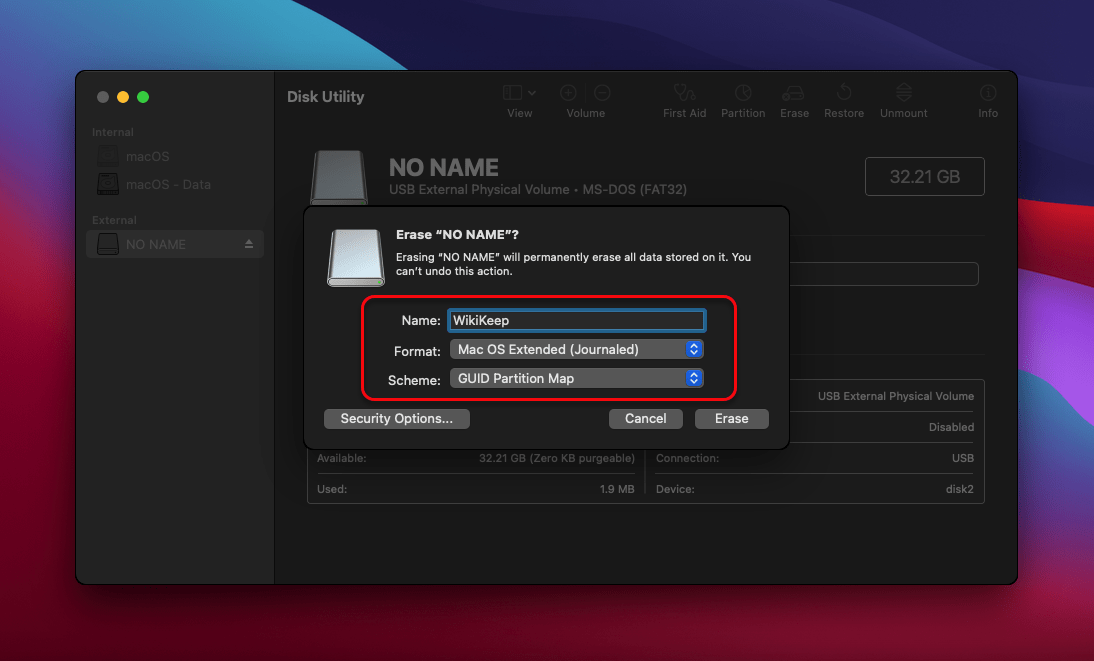
Over ahead to search spotlight or Applications folder and open Disk Utility. Once the Disk Utility opened select the USB Drive click on the “Erase” option. Give a name to USB Drive, Format Mac OS X Extended (Journaled), Scheme GUID Partition Map, and click Erase.
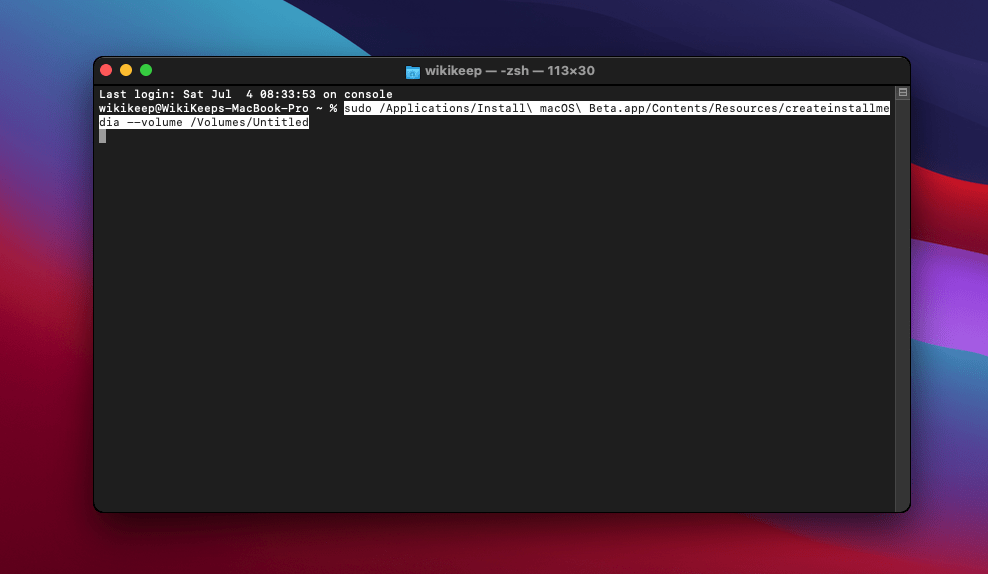
Again navigate to search spotlight type terminal and press enter.

When the terminal opened, apply the below commands then press enter, enter your username password, and press enter. Wait for the process to copy the macOS Big Sur installer file to USB Drive.
Install macOS Big Sur 11 on Your Mac
When everything is ready so let’s get started installing macOS Big Sur on Mac.
- Attach the USB Flash drive to your Mac
- Restart your Mac computer and press hold down the option to boot into the boot menu.
- Select the USB Drive option and press enter to boot.
- Select Disk Utility and click continue option.
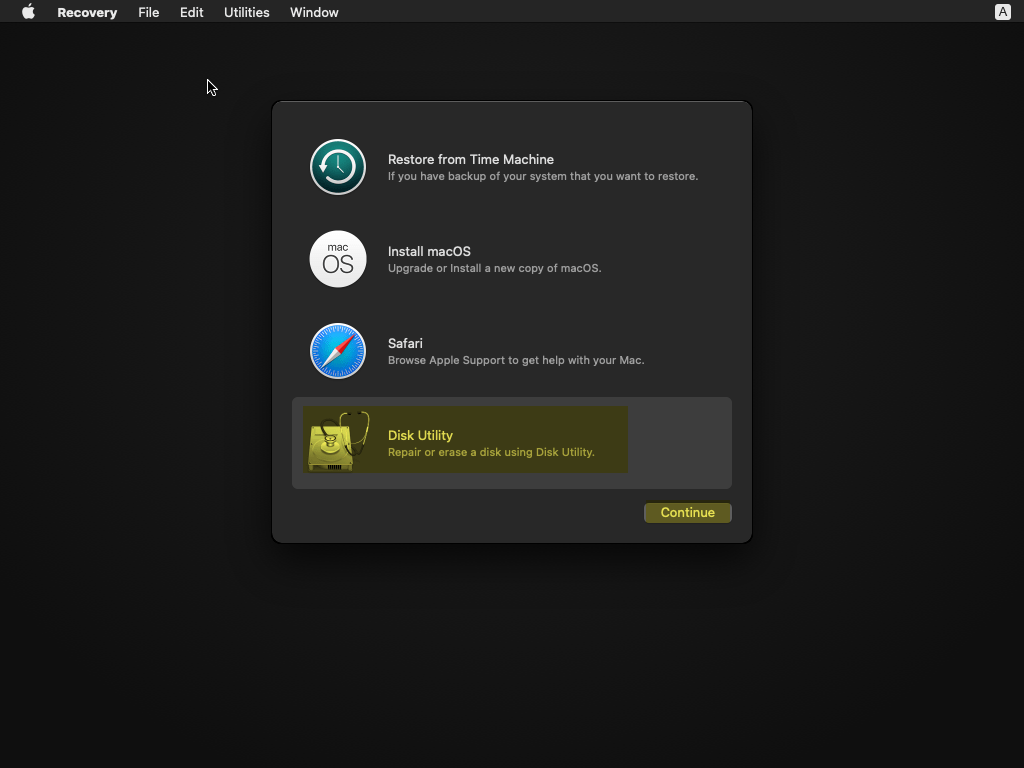
- In the Disk Utility window choose the drive for macOS Big Sur installation. Click on the “Erase” option.
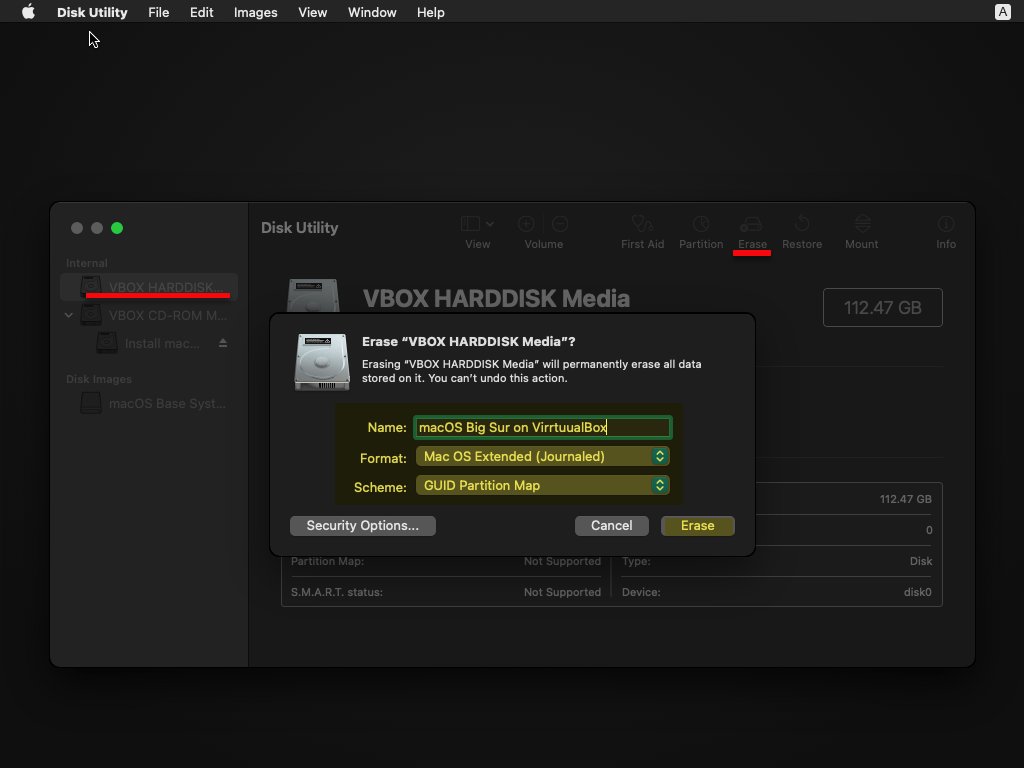
- Once the disk erased click done and close the Disk Utility window.
- From the Utilities window choose “Install macOS” and click continue.
- To set up the installation of macOS Big Sur click continue.
- Agree with the terms and conditions of macOS Big Sur.
- Select the disk where you want to install macOS Big Sur.
- Wait for macOS Big Sur installation, when the installation completed your Mac will restart.
- When your Mac restarted complete the basic settings of macOS Big Sur on your Mac.
Fur further inquires about the article please use the below down comment section. Also, your feedback will be a great support for WikiKeep so share your nice feedback about the article.