Apple every year releasing a macOS operating system for Macs user, like every year this year Apple Inc released its latest operating system macOS 11, Big Sur, with lots of changes. This operating system of Apple is the first operating system that runs on Apple’s upcoming Silicon Processors. Apple moved the version of the operating system from macOS 10.15 to macOS 11.x.
Installing the beta version on our computers will be always risky, a couple of users tried to install macOS 11, Big Sur, on their PCs. Certainly, there are being encountered with some critical issues.
Some of Windows users have tested the macOS 11 Big Sur on their PCs using the Virtualization platforms. And according to me one of the safest places to test macOS Big Sur is a virtual machine until the release of final version. However, Windows users are using VirtualBox and VMware Workstation for installing macOS Big Sur. And those who are Macs users they can also install macOS Big Sur on VMware Fusion or VirtualBox.
macOS 11 Big Sur?
Usually, every year Apple releases the final version of macOS, Watch OS, iOS 14, and iPad OS 14, in September and October of the year. Currently, the Beta version of macOS Big Sur is in our hands, we are thankful of Apple that they concentrate for Tech lovers and Developers. In WWDC “Worldwide Developer Conference” event 2020 Apple introduced the new iPhone, iPad, MacBooks, and iWatch. You can get the macOS Big Sur Beta version right now if you are a part of the Apple Developer Program.
At the WWDC event Apple transition from Intel chips to ARM silicon. Apple introduced the ARM-based Silicon processor later this year for new macOS Big Sur.
Install macOS Big Sur on VMware Fusion on Mac
If you are a Windows user then you can use the two best Virtualization software called VMware Workstation, and VirtualBox for installing macOS Big Sur. The two advanced virtual machine allows you the best environment of installation, whether you are installing macOS, Linux, Android OS, or even Windows OS. We have covered each and everything for macOS Big Sur, which you can get from below links.
- How to Install macOS 11 Big Sur on VirtualBox on Windows PC
- How to Install macOS 11 Big Sur on VMware on Windows PC
– Download macOS Big Sur
Unfortunately, Apple doesn’t allow the users to download the macOS Big Sur straightforward like other Applications. Enrolling with the Apple Developer account, then open the beta download applications page. In the beta applications page click on the install button then download the “macOSDeveloperBetaAcessUtility”. Once the dmg file downloaded double-click to extract the file, then launch the “macOSDeveloperBetaAccessUtility.pkg” to download the macOS Big Sur Beta version.
Wait the Apple will soon update the Beta version to Public Beta in July 2020, or wait for September and October for the final version. In case, of installing macOS Big Sur you have to download the vmdk file or ISO file. Check the below links on how to download macOS Big Sur beta version, and download macOS Big Sur vmdk file.
- Download macOS 11 Big Sur VMDK (VMware & VirtualBox Images)
- How to Download and install macOS 11 Big Sur on your Mac
If you are having Mac or MacBook and want to update to the macOS Big Sur Beta version, then check the below link on how to make it happen.
– Create macOS Big Sur ISO file
Usually while downloading macOS Big Sur from App Store or using the Package installer it doesn’t come in ISO file. For this process, you need to mount and convert the dmg file to ISO file. Don’t worry we make it very easy, first off all, download the macOS Big Sur then move to Applications folder.
Once the macOS Big Sur downloaded for converting to ISO file open the “Terminal”. Over ahead to top left-handed bar and click on search spotlight then type “Terminal” and press enter to open.
When the terminal opened copy each of the below commands and apply step by step on the terminal to create a macOS Big Sur ISO file.
c# Create a Big Sur Virtual Disk Image
hdiutil create -o /tmp/bigsur -size 10250m -volname bigsur -layout SPUD -fs HFS+J
# Mount this Image to macOS
hdiutil attach /tmp/bigsur.dmg -noverify -mountpoint /Volumes/bigsur
# Use macOS Big Sur Createinstallmedia Tool to create a Installer Image
sudo /Applications/Install\ macOS\ Beta.app/Contents/Resources/createinstallmedia --volume /Volumes/bigsur --nointeraction
# Unmount Volume Big Sur
hdiutil eject -force /Volumes/Install\ macOS\ Beta
# Convert the bigsur.dmg to a bigsur.iso for Virtual Machine
hdiutil convert /tmp/bigsur.dmg -format UDTO -o ~/Desktop/bigsur.cdr
# Move and Rename bigsur Image to Desktop
mv ~/Desktop/bigsur.cdr ~/Desktop/bigsur.iso
– Create macOS Big Sur dmg file
While downloading the macOS Big Sur installer file, in order to move that to created Bootable USB drive. Firstly, you have to create the dmg file, directly we cannot move the installer file to USB drive. In that case, you have to create the macOS Big Sur installer file to dmg file.
To do that move the macOS Big Sur downloaded image to the Applications folder. Then over ahead to search spotlight type “Terminal” and press enter to open. When the terminal opened apply step by step each of the below commands.
cd ~/Downloads

# Create and mount sparse volume:
hdiutil create -o install_container -size 20G -layout SPUD -fs HFS+J -type SPARSE
hdiutil attach install_container.sparseimage -noverify -mountpoint /Volumes/install_build

# Copy contents of installer .app into mounted volume:
/Applications/Install\ macOS\ Beta.app/Contents/Resources/createinstallmedia --nointeraction --volume /Volumes/install_build

# Detach the completed image:
hdiutil detach -force /Volumes/Install\ macOS\ Beta

# Convert and rename the image:
hdiutil convert install_container.sparseimage -format UDZO -o $dmgName.dmg

# Cleanup

rm install_container.sparseimage

exit 0
Download and Install VMware Fusion on Mac
What is VMware Fusion? VMware Fusion is a software hypervisor developer by VMware for Macintosh computers. VMware Fusion allows Intel-based Macs to run operating systems such as Windows, Linux, NetWare, or Solaris on Virtual machines on Mac. Alongside, you can run macOS operating systems on VMware Fusion on Mac.
You can download VMware Fusion from VMware official website and install it on your PC. Using the VMware Fusion Pro full version it will cost, but don’t worry it has the trial version of 30-days.
- Download VMware Fusion
Once the VMware Fusion dmg file downloaded, double-click to extract the file, then double-click to launch the setup. Again double-click on the VMware Fusion logo to open the installation.
- Please read and agree with the terms and conditions of VMware Fusion and click Agree.
- Now if you have the license key of VMware Fusion enter it, if not then check the option of “I want to try VMware Fusion 11 for 30 days” and click continue.
- Here one is VMware Fusion simple, and the next one is VMware Fusion Professional. So, it depends on you which one you want to try it and click continue.
- Now everything is ready click Done to install VMware Fusion on Mac.
Create a New Virtual Machine for macOS Big Sur
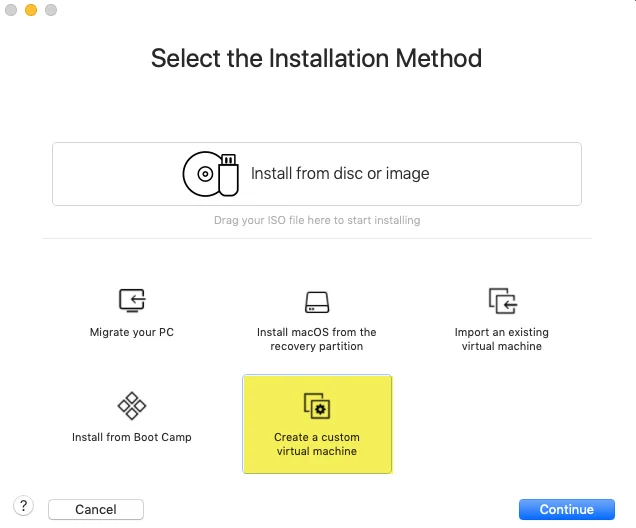
Once the VMware Fusion successfully installed on your Mac, then over ahead and open the VMware Fusion for creating a new virtual machine.
Open the VMware Fusion select the “Create a Custom Virtual Machine” and click continue.
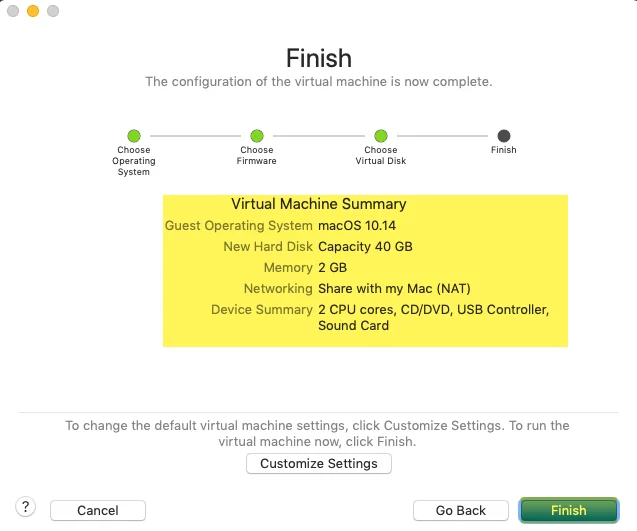
Select the operating system for a virtual machine, choose “Apple OS X” and choose “macOS 10.15” then click continue.

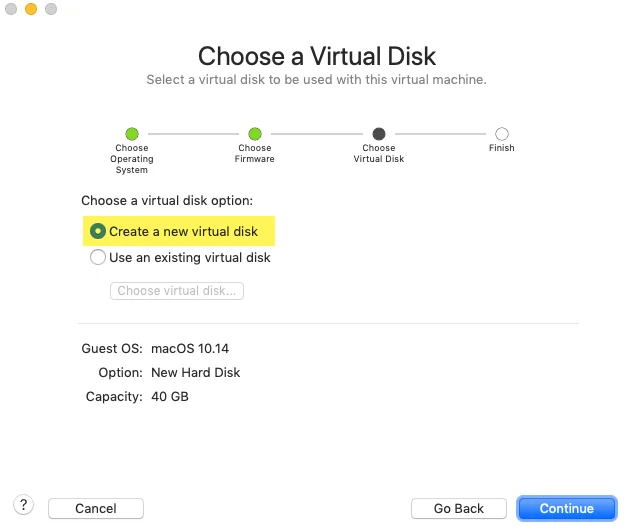
Select the “Create a new virtual disk” option and click continue.
Now the virtual machine is ready click “Finish” to create the virtual machine.
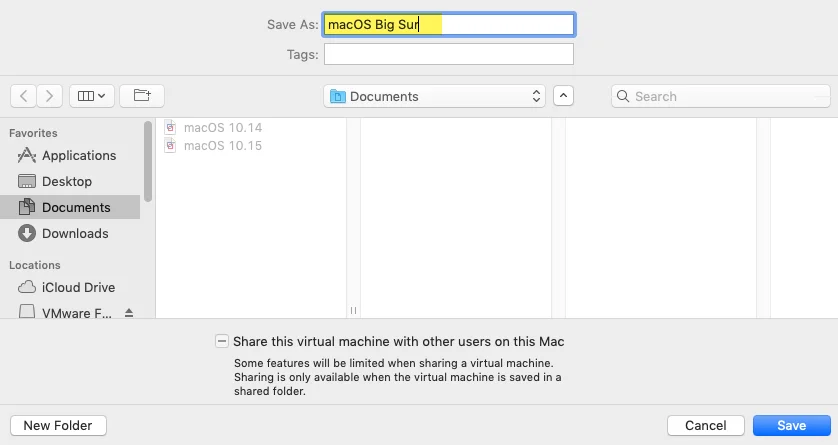
Manage the location where you want to save macOS Big Sur and click Save.
Edit Virtual Machine Settings
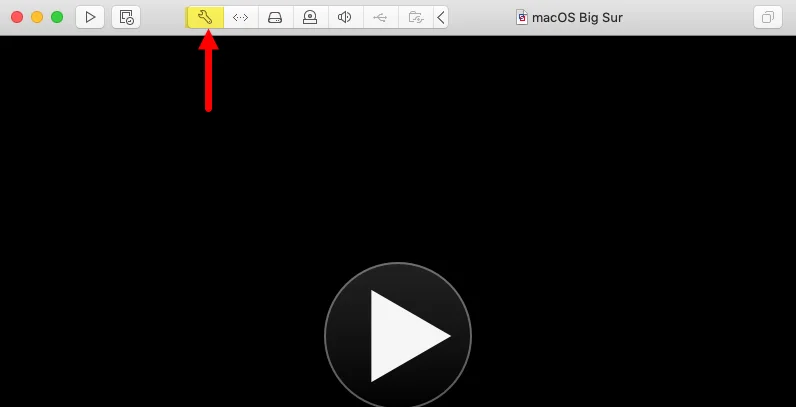
For having best installation performance you need to edit some BIOS settings of Virtual machine settings. To that click on “Settings” icon option.
Click on “CD/DVD (SATA)” icon for inserting the macOS Big Sur vmdk file.
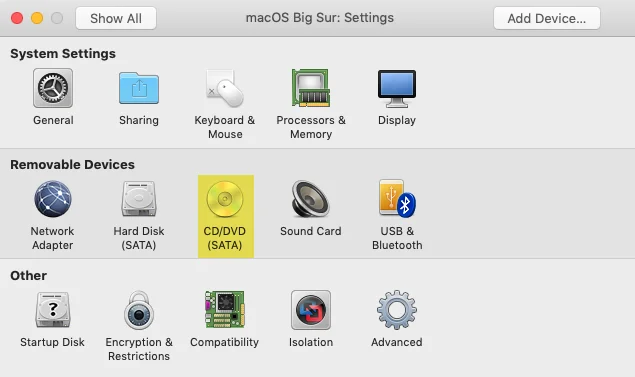
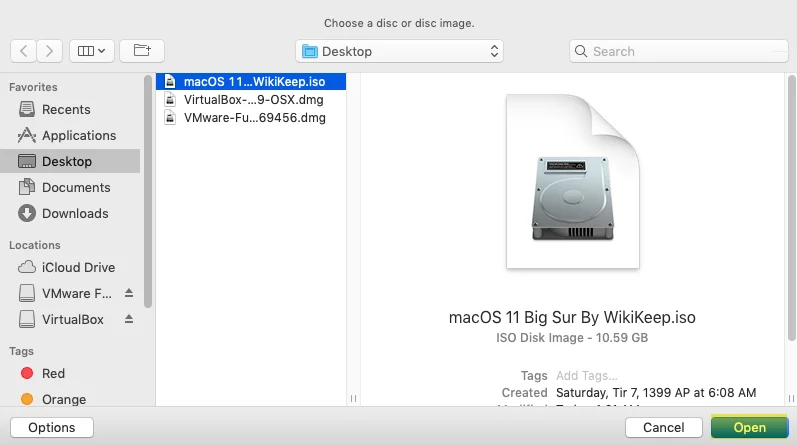
Under the “Connect CD/DVD Drive” option click there and select “Choose a disk or disc image” option.
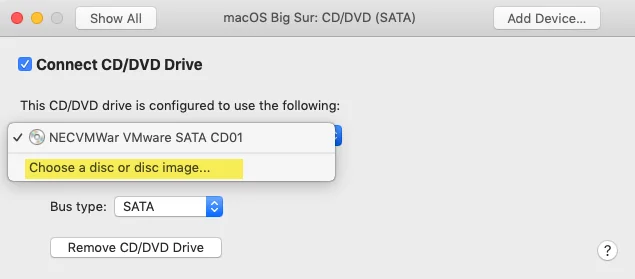
Now select the macOS Big Sur vmdk file and click open.
When everything is ready click the “Play” button to start installing macOS Big Sur.

- Wait for the Apple logo to go-ahead.
- Select your language and click on the continue option.
- Select “Disk Utility” and click continue.
- Now select the disk from left-handed and click on the “Erase” button. Enter a name, Format: Mac OS X Extended (journaled), Scheme: GUID Partition Map, and click “Erase”.
- When the disk erased click Done and close the Disk Utility window.
- Choose Install macOS and click continue.
- To set up the installation click continue.
- Agree with the terms and conditions of macOS Big Sur.
- Select the disk where you want to install macOS Big Sur.
- Wait for the installation of macOS Big Sur.
Fix macOS Big Sur “BiErrorDomain error 3.” During installation
If you faced the above error while installing macOS Big Sur on VMware Fusion, VMware Workstation, and VirtualBox then check the below link.
- Once the macOS Big Sur installation completed select your language and click continue.
- Select your written and spoken language and click continue.
- On the Accessibility window click continue.
- On the Data & Privacy click continue.
- Sign in with your Apple ID and click continue.
- Agree with the terms and conditions of macOS Big Sur and click continue.
- Create a computer account
- In the Express set up window click continue.
- On the Analytics window click continue.
- Select sign up later in the screen time window.
- Disable or Enable Siri for macOS Big Sur.
- Choose light, Dark, an Auto mode for macOS Big Sur.
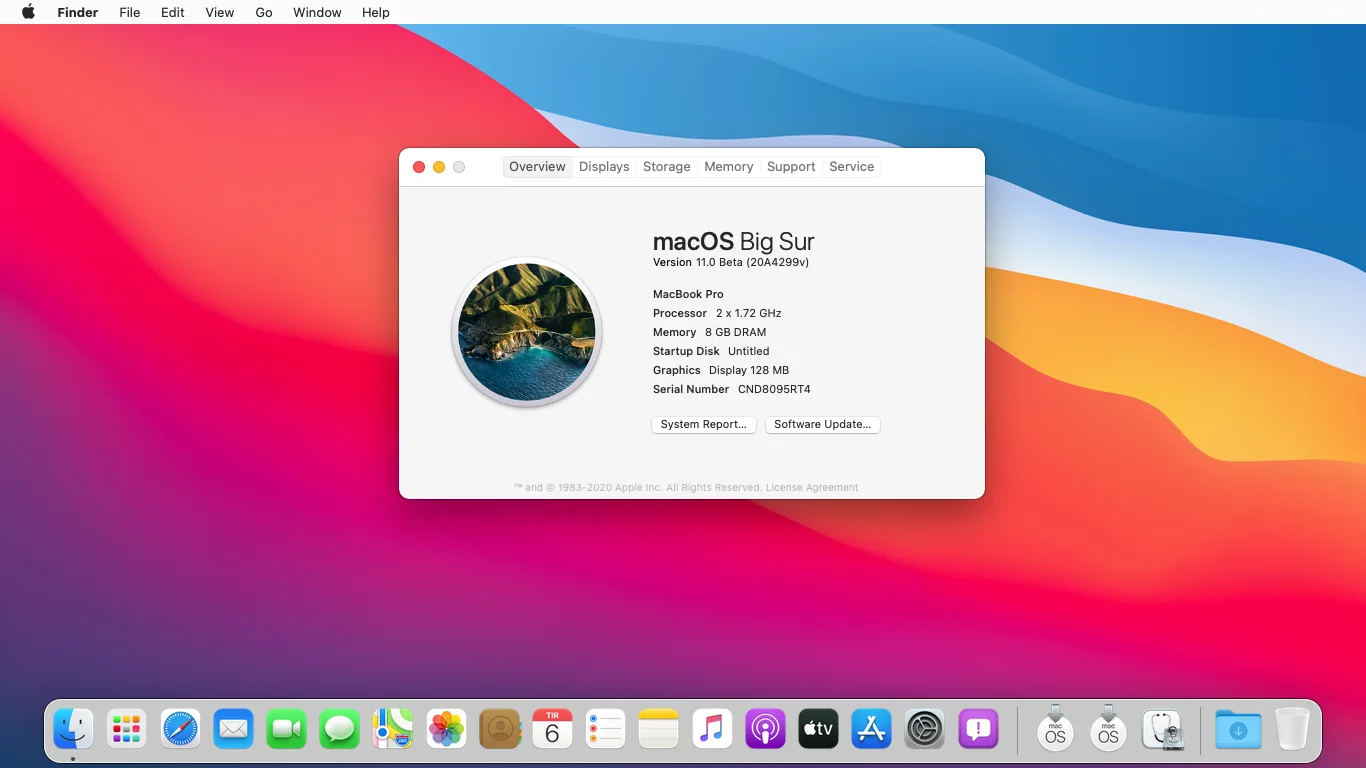
- And Finally, macOS Big Sur has been installed on VMware Fusion on Mac.
If you faced any kind of problem then contact us using the below comment section for sharing your problem. We are always waiting for your beautiful feedback, so share your feedback for this content.
Related:
after installation I get back on recovery page and I should to erase vm hdd and install it again
now I am on this loop
what should I do?
I don’t have any error