Recently Apple released the latest series of macOS operating systems called macOS Big Sur 11. The latest series of macOS called one of the biggest releases of Apple this year. You can experience the latest feature of macOS Big Sur on the new M1 Chip MacBook Pro & Air. Especially, Apple designed the macOS Big Sur 11 for the M1 Chip Silicon Processor which looks quite stable. In the history of macOS Apple kicked out the macOS Big Sur with a new look for their users.
macOS Big Sur is the redesigned of macOS Catalina with has been inspired by iOS 14, you can experience its new look, Control Center, Widgets, Safari Improvements, New Maps, Upgraded Messages, Better Spotlight search, iPhone and iPad Apps on M1 Chip Macs, Nutrition Label in the App Store, Automatic Airpods switching
One of the biggest advantages that you can get from macOS Big Sur that you can run all the iOS Apps for the first time on macOS Big Sur. According to most of the websites that did research on iOS Apps which can run on macOS Big Sur is a bit unstable that causes some critical issues.
We are at the final stage of macOS Big Sur a few weeks ago Apple released the latest update of macOS Big Sur 11.1, and reminded the users that soon the macOS Big Sur 11.2 update will release in the App Store. Since macOS Big Sur was in Beta mode we have tried ways of installing it on secondary devices. If you are a Windows user then easily you can install macOS Big Sur on your PC virtually. The virtual machine is the best platform for testing macOS on Windows PC. Therefore, we have already tested the macOS Big Sur on Windows using VMware Workstation and VirtualBox.
- How to Install macOS 11 Big Sur on VirtualBox on Windows PC
- How to Install macOS 11 Big Sur on VMware on Windows PC
- Install macOS big Sur on VirtualBox on Windows – VMDK
The above installation of macOS Big Sur on VMware & VirtualBox contains the ISO file, but this contains its different all its installation process because we are using the VMDK file. The ISO file and VMDK file installation have many differences in the installation procedure which will be explained clearly in this article.
What is Virtualization?
In computing, virtualization (alternatively spelled virtualization) refers to the act of creating a virtual (rather than actual) version of something, including virtual computer hardware platforms, storage devices, and computer network resources. Usually, the Virtualization platforms allow you to run two or more two operating systems at the same time on a single PC. When the other OS is being installed on a virtual machine on an actual PC, the virtual machine will act to be the real OS, but it can’t perform like the actual OS. Because one of them is Physical and one of them is Virtual.
In the era of Virtualization technology software, there are two best Virtualization tools that help you to run a second OS on your machine. And those Virtualization tools are VMware & VirtualBox. The Virtual machine gives you to run multiple OS on your main machine. On your Windows, you can install Windows, macOS, Linux, Android OS.
Before Installing macOS Big Sur on Windows be sure that you have your computer has the below down requirements.
- Enable the Virtualization technology from the BIOS option.
- You need to have a 64-Bit Windows OS
- 8GB Ram for better installation
- for macOS alongside Windows, you need at least 40GB of free storage.
Install macOS Big Sur on VMware on Windows – VMDK
Download Required files:
Once your computer configured and get ready for installing macOS Big Sur on a Virtual machine, then let’s try out downloading the macOS Big Sur VMDK file which is available in the below download link.
- Download macOS 11 Big Sur VMDK (VMware & VirtualBox Images)
- Download VMware Workstation Pro 16 For Free – Latest Version
Once you have downloaded the macOS Big Sur VMDK file and VMware Workstation setup. For extracting the file you need to install WinRAR or 7zip. When the file extracted install the VMware Workstation Pro 16 on your Windows PC. Remember that VMware Workstation doesn’t need the macOS Unlocker already the macOS service is available in VMware Workstation. So, there is no need to download and install the macOS Unlocker alongside VMware.
Create macOS Big Sur Virtual Machine
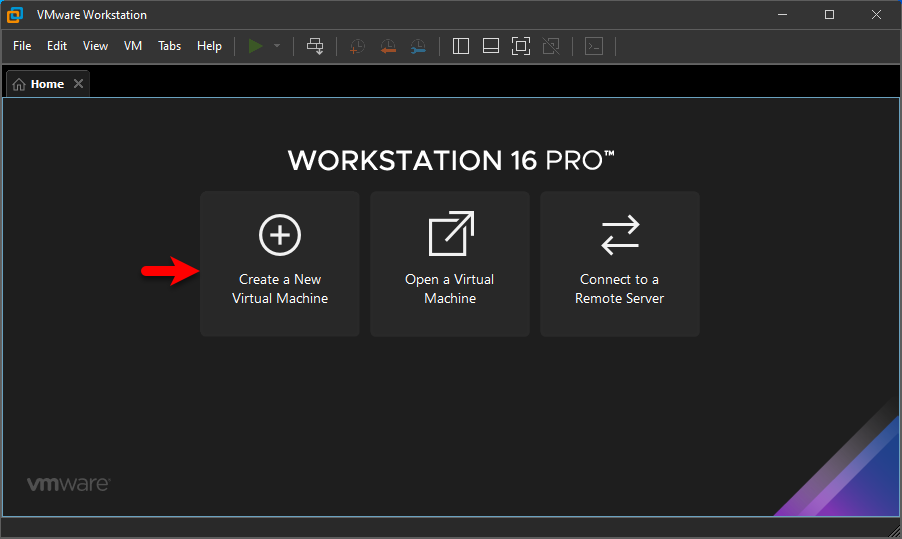
When everything gets ready head over to the VMware Workstation and create a new virtual machine for macOS Big Sur. Open up the VMware Workstation, at the wizard screen click on “Create A New Virtual Machine”.
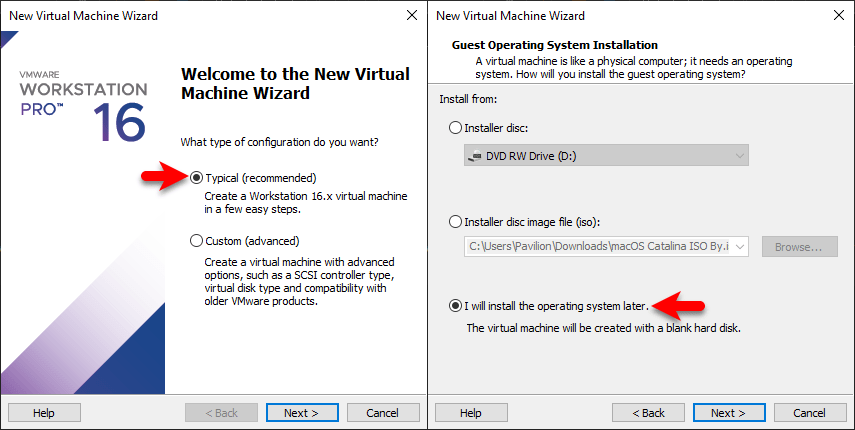
On the next screen select “Typical (Recommended)” and click next, then select the option “I will install the operating system later” and click next.
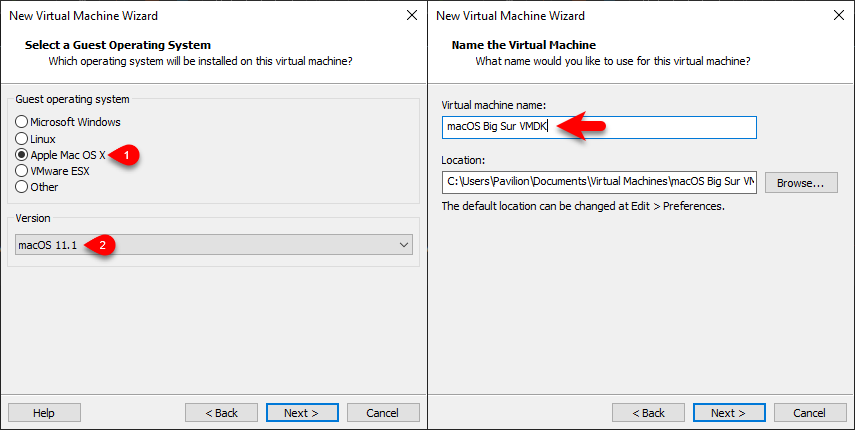
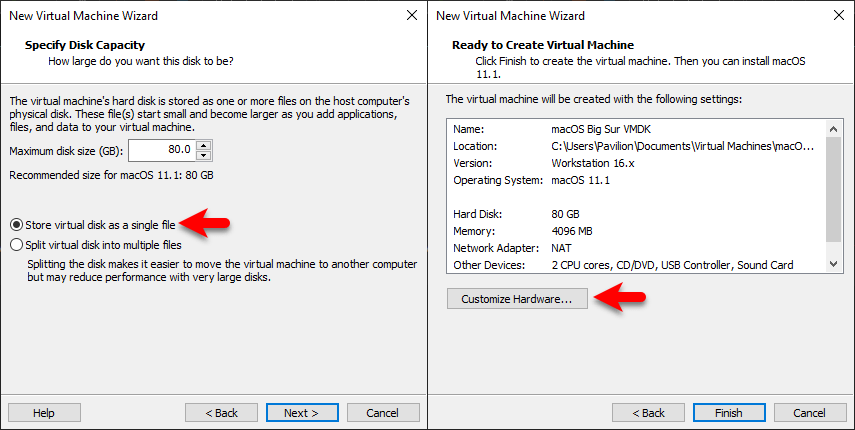
Select “Mac OS X” from the list, under the version select “macOS 11.1” and click next, on the next window type the virtual machine name and click next.
Specify the disk capacity for macOS Big Sur 11 and choose the option “Store virtual disk as a single file” and click next. When you get to the last window click on the “Customize Hardware” option.
Customize Hardware Settings
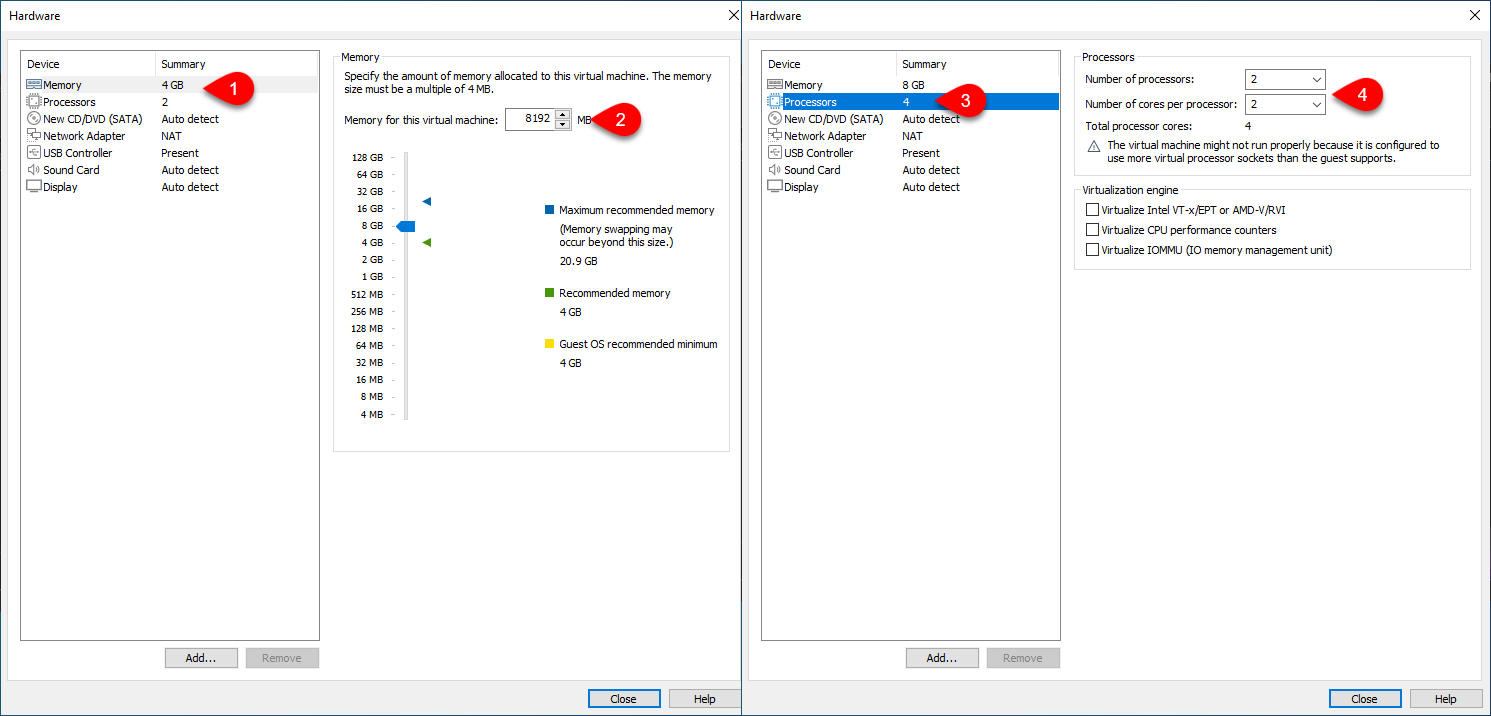
For having a clean installation of macOS Big Sur with the highest performance you need to customize some hardware settings.
When the hardware window opened from the left-handed screen select the “Memory” tab then increase the size of your memory. Select the “Processor” tab and increase the number of processors.
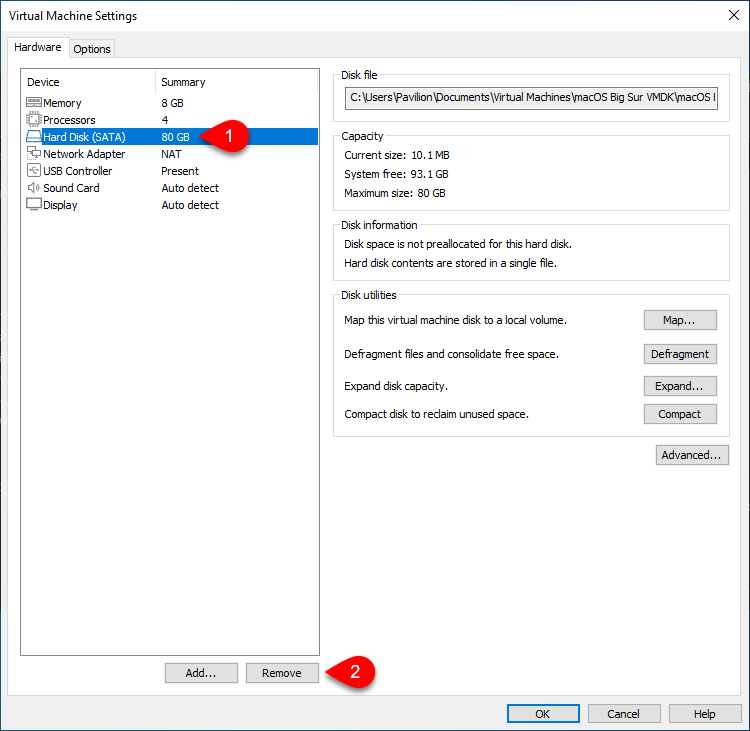
Select Hard Disk (SATA) tab and click Remove.
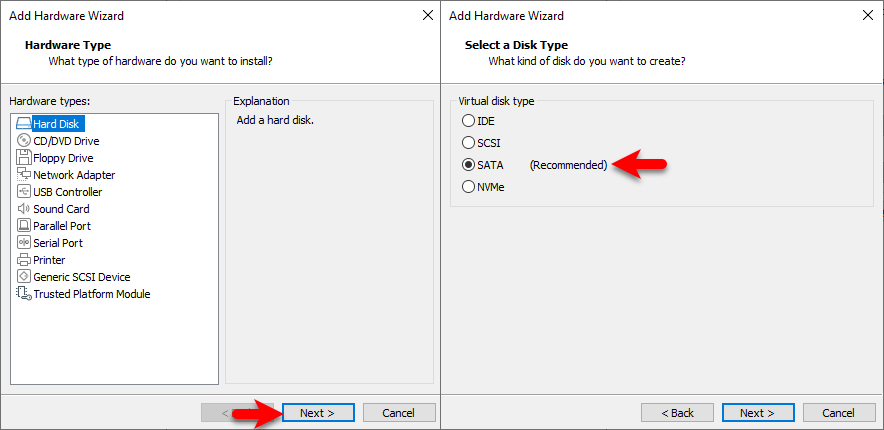
Once the Hard Disk tab removed from the list again click on the “Add” option. On the next screen from the Hardware, Types select the “Hard Disk” option then click next, from the virtual disk type select SATA (Recommended) and click next.
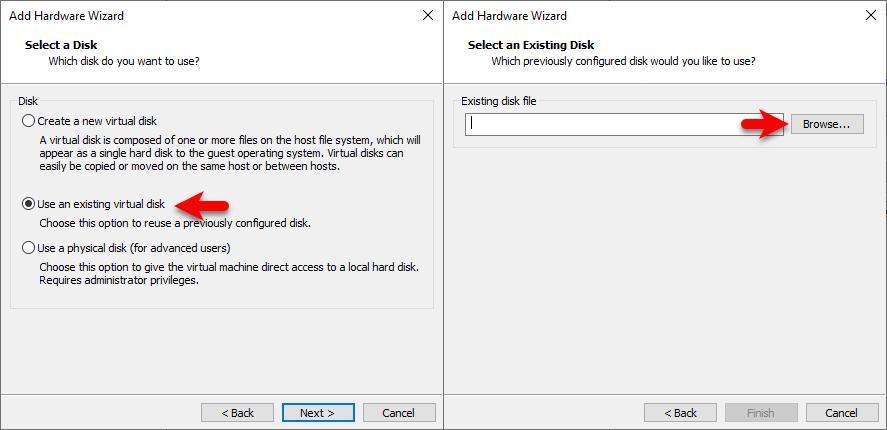
Choose the “Use an existing virtual disk” option then click next, on the next window click on “Browse”. Once the other window opened choose the macOS Big Sur VMDK file and click open.
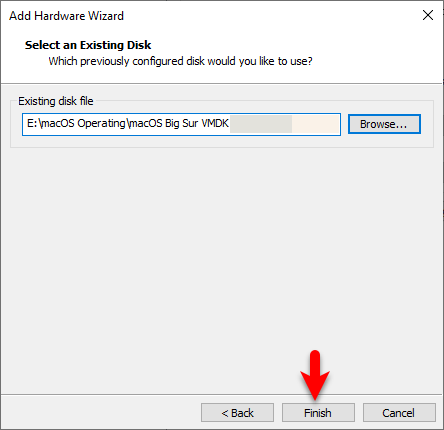
When the macOS Big Sur VMDK file inserted click Finish.
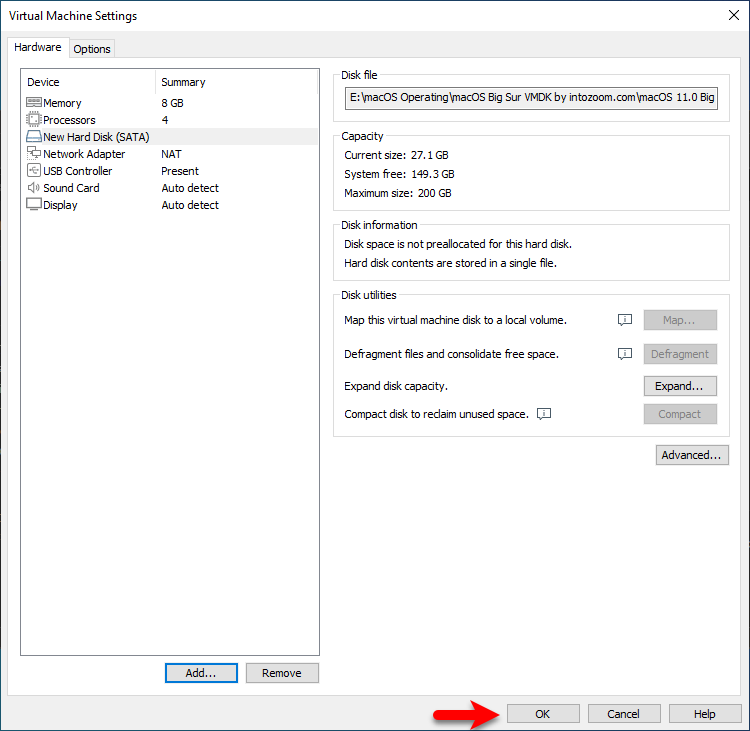
Now click OK to save changes to the macOS Big Sur settings on VMware.
Edit VMX File
For configuring the macOS Big Sur on VMware you need to edit the vmx file which will help you to proceed with the installation of macOS Big Sur on VMware. For editing the Vmx file completely close the VMware workstation.
Now go to the Documents folder, find out Virtual machine folder then find the macOS Big Sur file there. Once you find it, right-click on the Vmx file select Open With>Notepad.
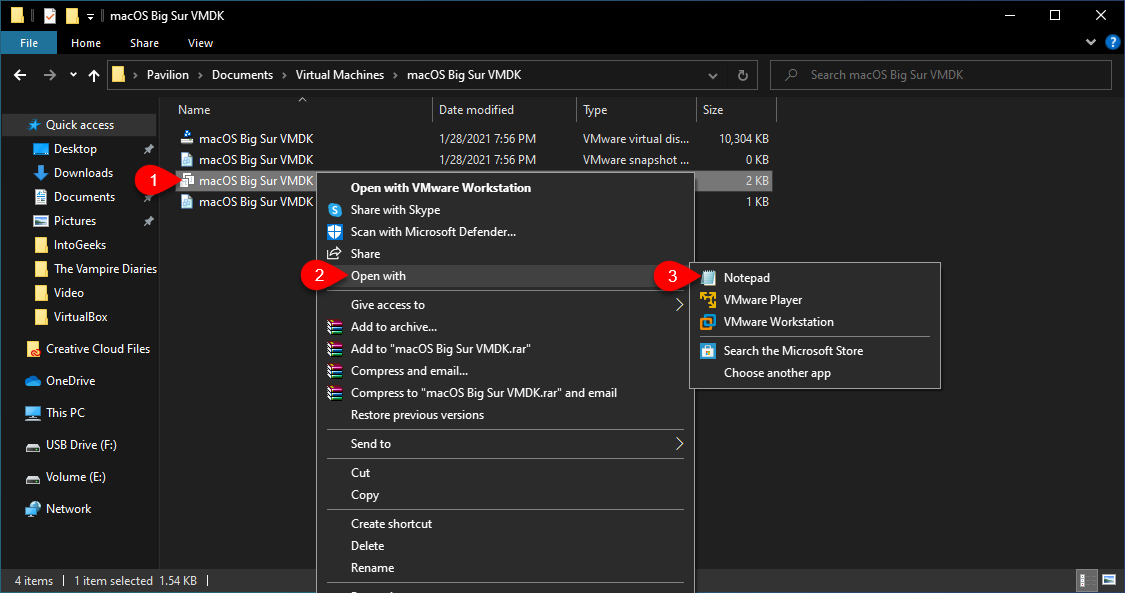
When the Vmx file opened on the notepad scroll down and at the end of other commands copy and paste the below commands and press Ctrl+S to save changes.
smbios.reflectHost = "TRUE"
hw.model = "MacBookPro14,3"
board-id = "Mac-551B86E5744E2388"
Smc.version = "0"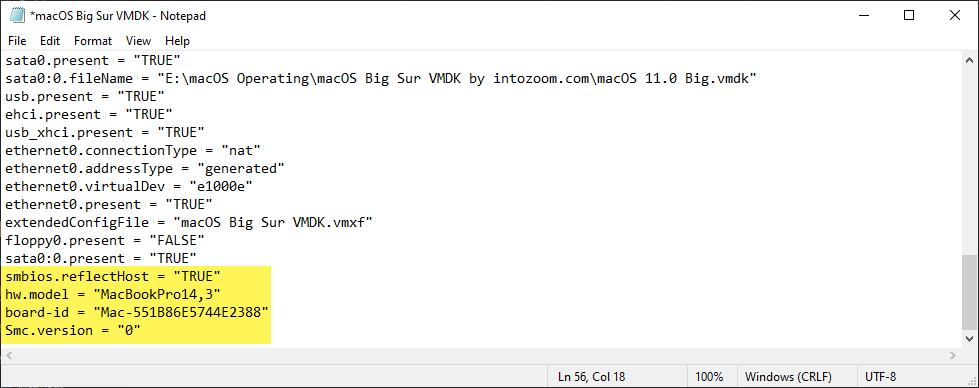
Install macOS Big Sur
- When everything gets ready for a clean installation of macOS Big Sur open up the VMware Workstation. From the list select macOS Big Sur virtual machine and click Power on this virtual machine.
- Once the installation launched wait for the Apple logo
- Wait until the installation should be completed, once the installation successfully completed the virtual machine will restart automatically.
- When the virtual machine restarted at the first welcome screen select your country and click continue.
- Select your written and spoken language and click continue.
- On the Data & Privacy click continue.
- Select “Don’t transfer any information right now” and click continue.
- Click Sign up later and click Skip.
- Agree with the terms and conditions of macOS Big Sur.
- Create your computer account and click continue.
- On the express setup simply click continue.
- On the Analytics click continue
- And on the Screen time again click continue.
- Select your theme for macOS Big Sur.
- Wait until it should set up the macOS Big Sur for the first use.
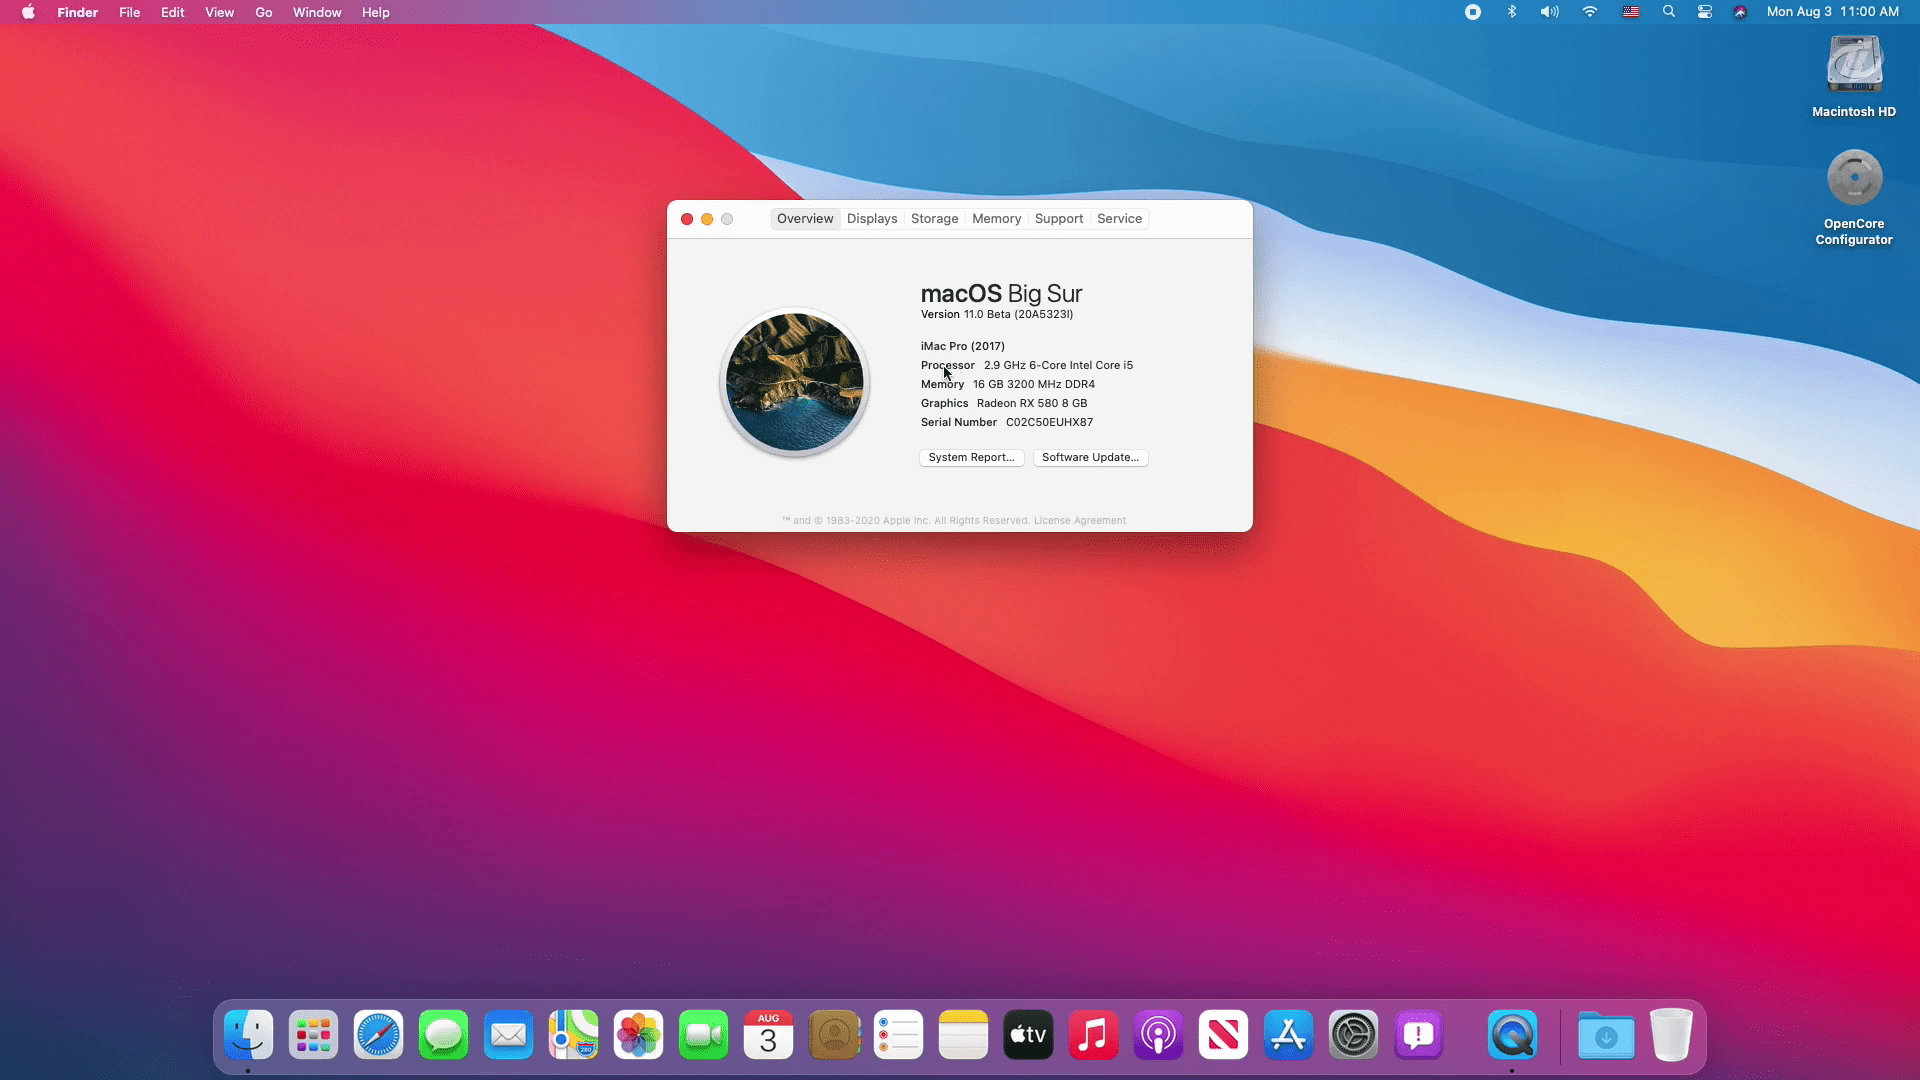
- And finally, macOS Big Sur successfully installed on VMware.
If you faced any kind of problem feel free to share with us via the comment box.