Apple Officially Unveiled macOS Mojave 10.14 at WWDC 2018. After several months of Beta and Public Beta testing, finally, macOS Mojave was made available for everyone as a free download in the App Store. macOS Mojave 10.14 was the first operating system that included a bunch of new features, and including the new dark mode interface feature for every part of the operating system. Also, improved workflow for markups, a Continuity Camera, new Apps, enhanced privacy while suffering in Safari, and more.
Since Apple unveiled macOS Mojave 10.14 final version most of the people have been testing the beta version on their computer. For being sure about macOS Mojave features and bugs, that should report directly to Apple developers.
To begin to start the process, be sure that your Mac is compatible with macOS Mojave 10.14. However, macOS Mojave is the free software update the were introduced for mir-2012 or later, 2010, and 2012 Mac pro models with Metal-capable graphics cards. Below down are some list of compatible Macs and MacBooks that supports macOS Mojave 10.14.
- Mid-2012 or newer MacBook Pro
- Mid-2012 or newer MacBook Air
- 2015 or newer MacBook
- Late 2012 or newer iMac
- All iMac Pro models
- Late 2013 or newer Mac Pro, and mid-2010 and mid-2012 models with Metal GPU.
- Late 2012 or newer Mac Mini
As macOS Mojave 10.14 is a pretty interesting operating system. But now it’s time of macOS Big Sur 11.0 that new release of Apple Inc in June 2020. macOS Big Sur is the operating system that has been inspired by iOS 14 and iPadOS 14, which includes a bunch of new features. Also, there is good news that macOS Big Sur can support Intel-based processor computers. Due to that Apple is developing the latest computer with Intel-Based Silicon Processors, which should support easily the upcoming operating system and macOS Big Sur 11.0.
Install macOS Mojave 10.14 on Laptop
As the above title is mentioned through this guide I will show how to install macOS Mojave 10.14 on a laptop. macOS Mojave 10.14 can be supported on every laptop with best-recommended Memory card, graphic cards, and other requirements. But indeed it need some tips to be guided, in order to install it on a laptop. So, the laptop which I want to install macOS Mojave 10.14 on that is having the following specifications.
Steps to install macOS Mojave on laptop
- Download the required files
- Create Bootable USB drive for macOS Mojave
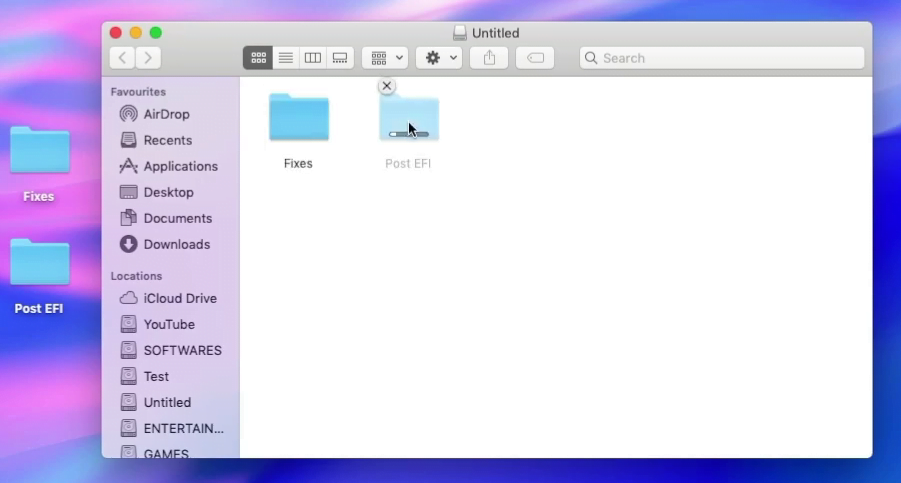
- Copy Pre EFI files to USB flash drive
- Copy Post EFI and Fixes folder to the USB drive
- Configure BIOS settings
- Install macOS Mojave 10.14
- Install the fixes files
To begin the installation firstly, you need to download the required files.
- Download Realtek ALC235 Audio Fix
- Download Realtek 8111 Ethernet Fix
- Download Battery Fix
- Download Postinstall Folder for macOS Mojave
- Download Pre EFI folder
Step 1. Create Bootable USB drive for macOS Mojave
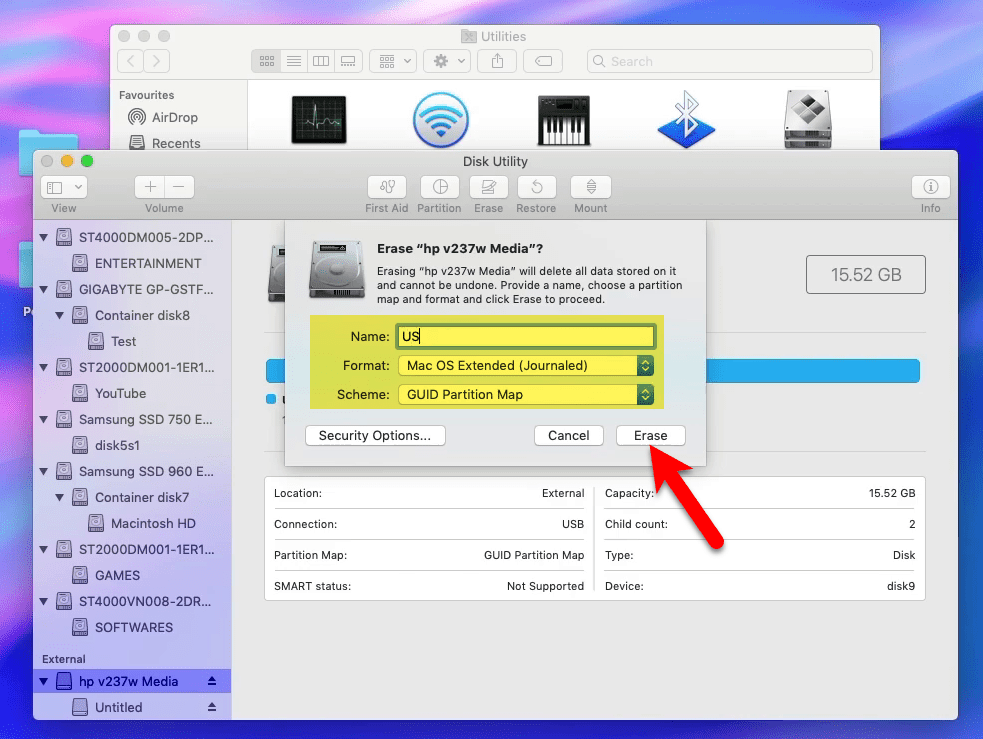
First of all, you need to create macOS Mojave 10.14 Bootable USB drive, for that you need a macOS Mojave dmg file. Or navigate to App Store sign in with your Apple ID, and search for macOS Mojave installer file. Once the installer file downloaded quickly cancel the installation. So, for creating a bootable USB drive attach your USB drive. And head over to Go>Utitlies>Disk Utility, then format the USB with below down settings.
- Name: USB
- Format: Mac OS Extended (Journaled)
- Scheme: GUID Partition Map
Once the USB flash drive formatted head over to search spotlight, then type terminal and press enter to open. On the terminal window copy and paste the below down commands and press enter to proceed, then type “Y” to confirm and press enter.
sudo /Applications/Install\ macOS\ 10.14\ Beta.app/Contents/Resources/createinstallmedia --volume /Volumes/Untitled —applicationpath/Applications/Install\macOS\ 10.14\ Beta.app —nointeractionAttach the next USB flash drive, then go to Go>Utility>Utilites and format the USB flash drive.
- Name: Fixes
- Format: Mac OS Extended (Journaled)
- Scheme: GUID Partition Map
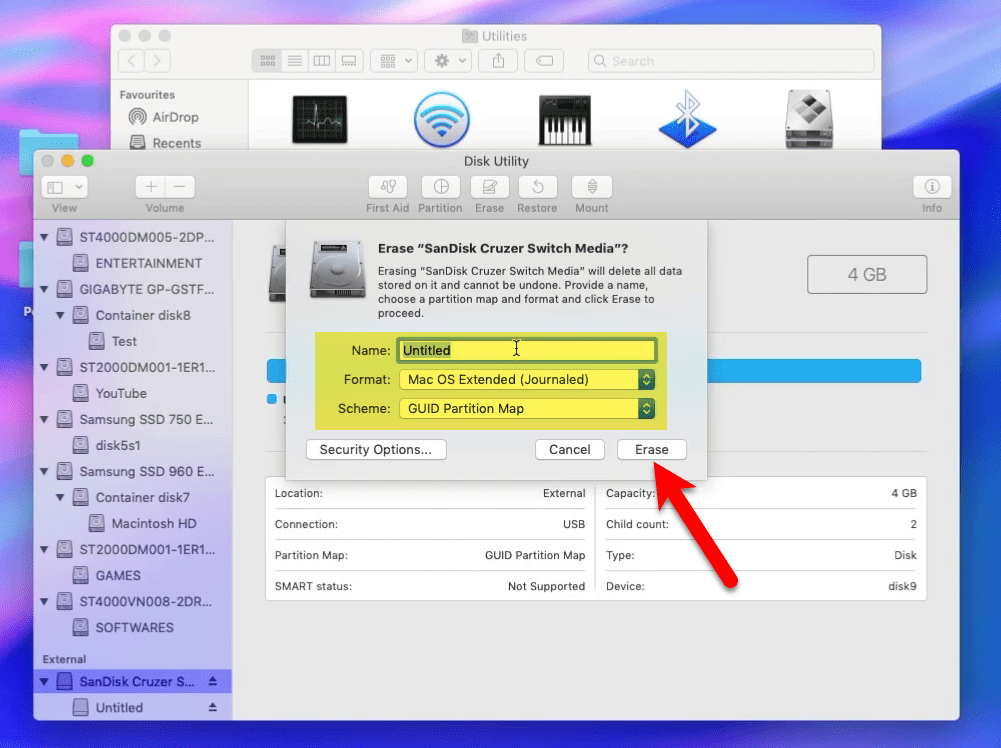
Once the USB drive formatted open it, then copy and paste the Fixes files.
Step 2. Configure BIOS Settings
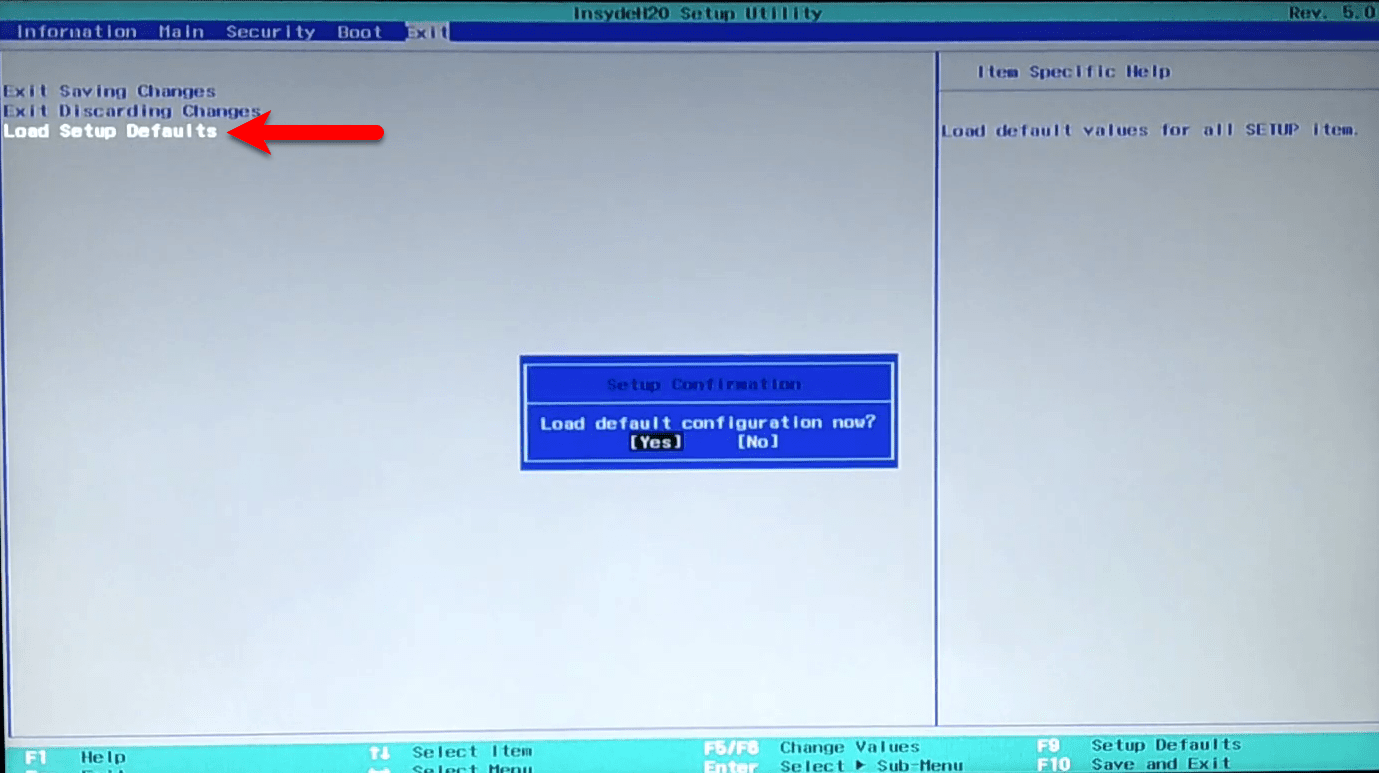
To begin the installation of macOS Mojave on a laptop you need to configure the BIOS settings. For that, restart your laptop and press the BIOS menu key. When the BIOS window appeared to go to the “Exit” tab, select “Load Setup Defaults” and press enter key then select “Yes”.
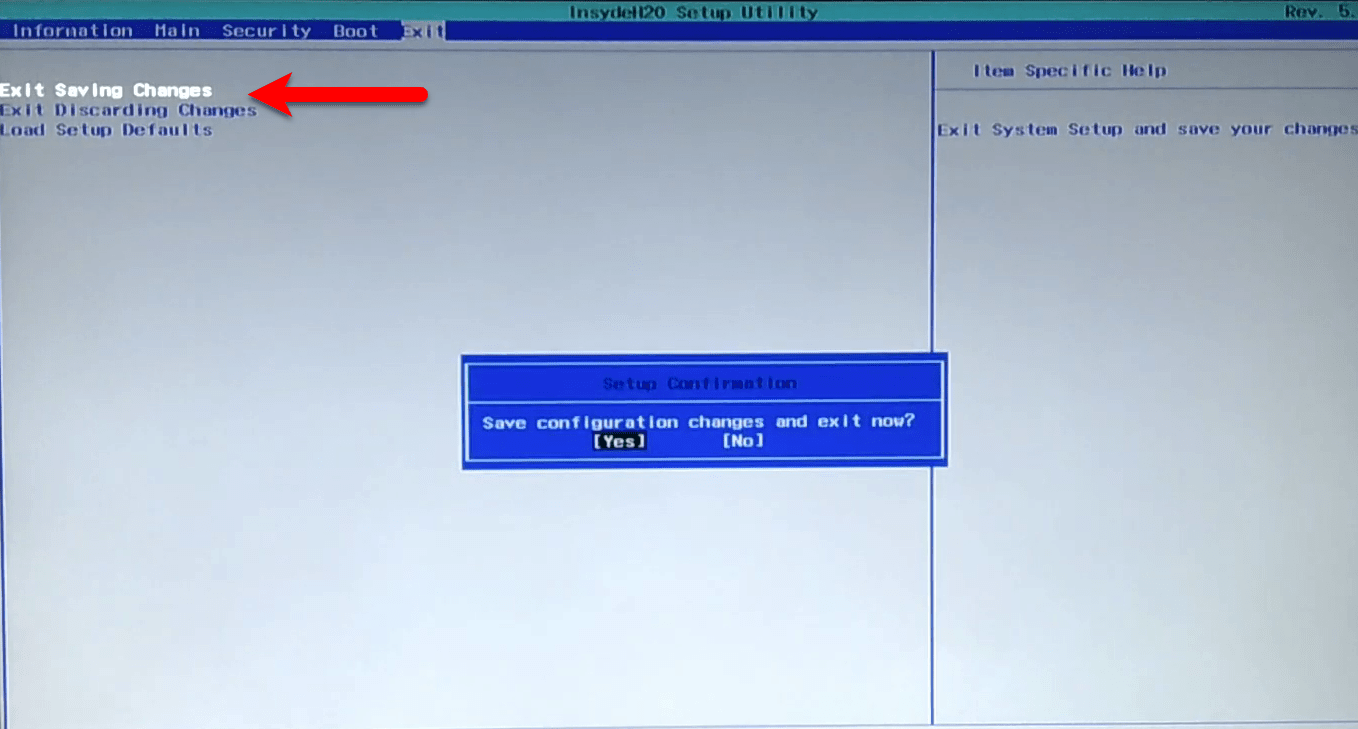
Again select the “Exit Saving Changes” option, press enter, and select “Yes”. Automatically, your laptop will restart.
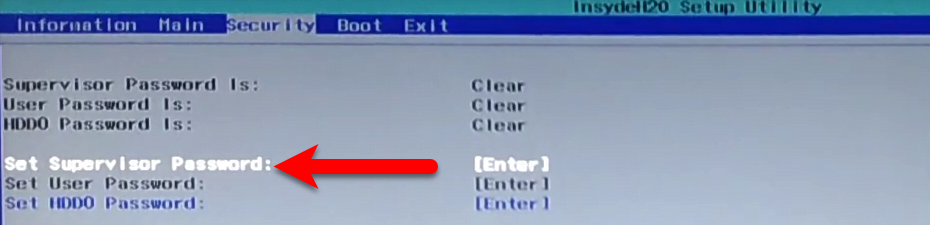
When your laptop restarted again press the BIOS menu key when the BIOS screen appeared to head over to the “Security” tab. Then select the “Set Supervisor Password” option, press enter type “Password, and confirm it.
Select the “Boot” tab, then select the “Boot Mode” option press enter and select the “UEFI” option.
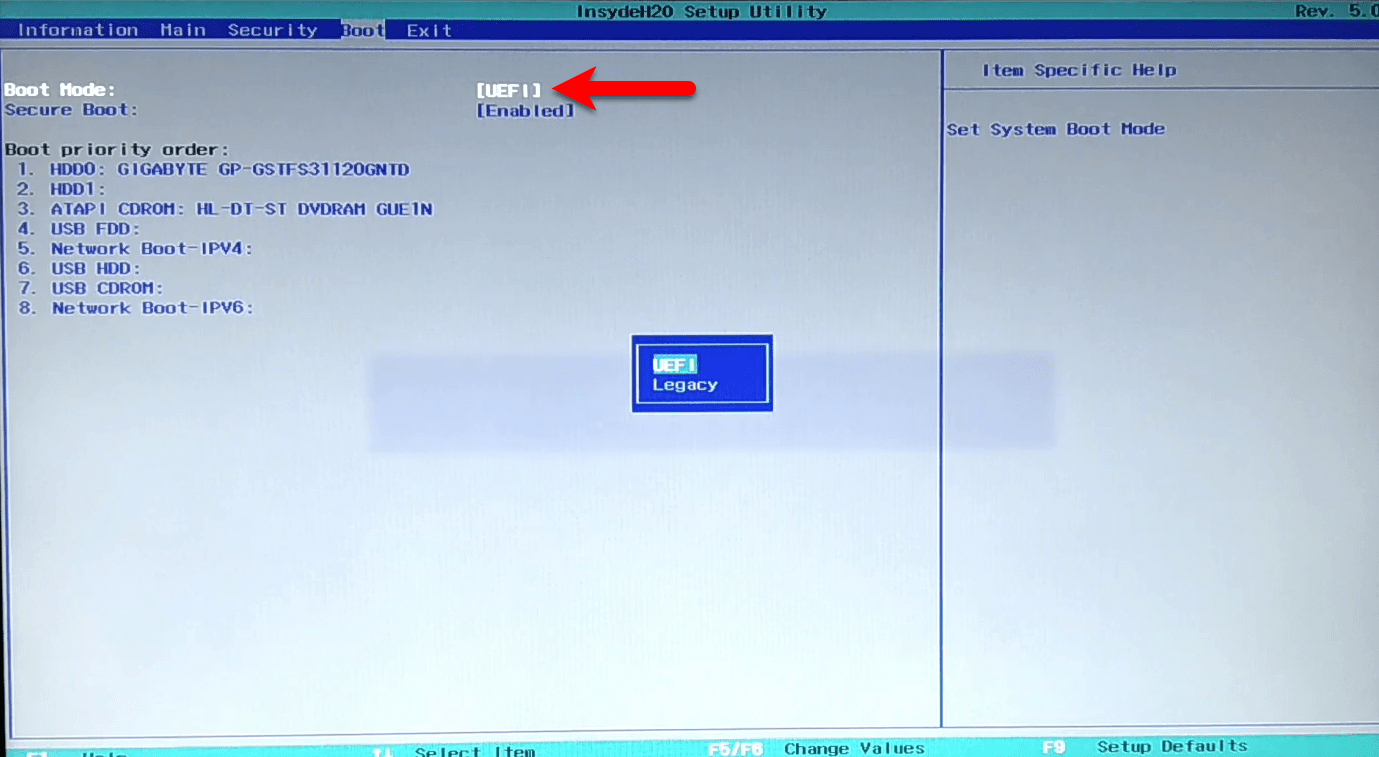
Select “Secure Boot” option, press enter and select “Disabled”.

Now go to the “Exit” tab, select the “Exit Saving Changes” option press enter and select “Yes”. Automatically, your laptop will restart and make changes to BIOS settings.

Step 3. Install macOS Mojave 10.14 on Laptop
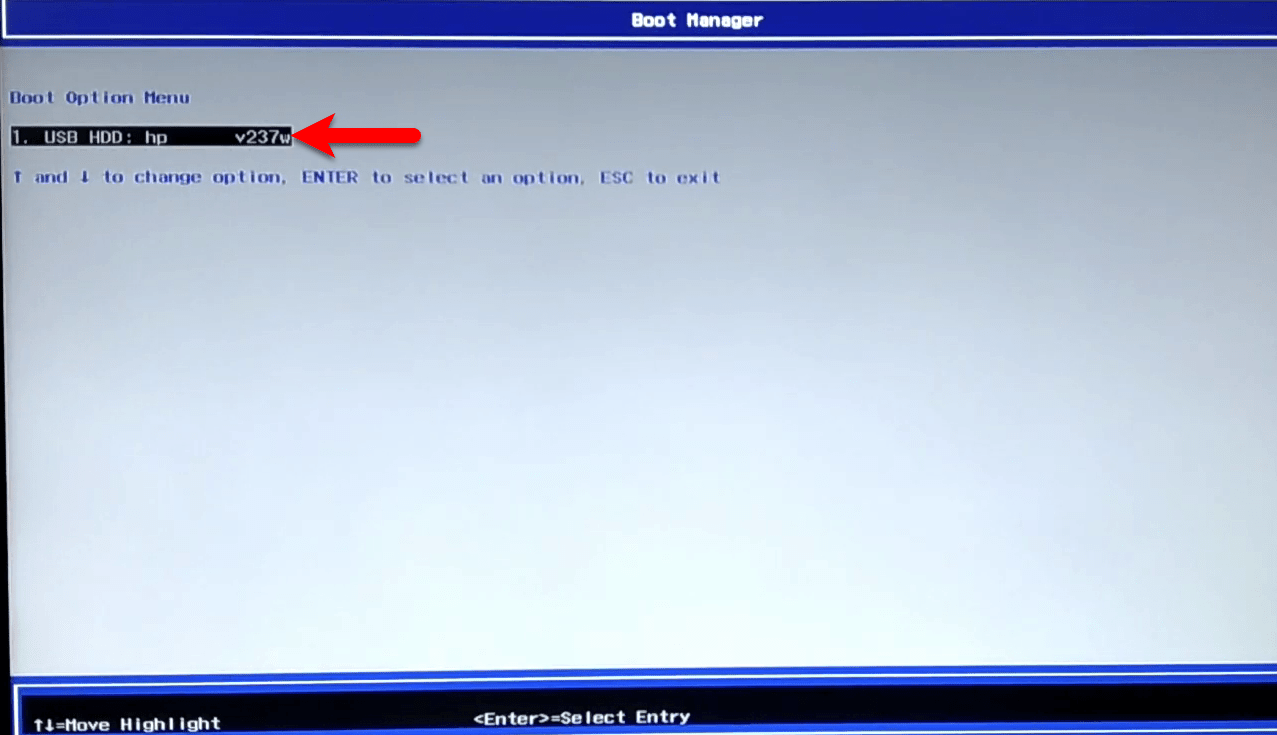
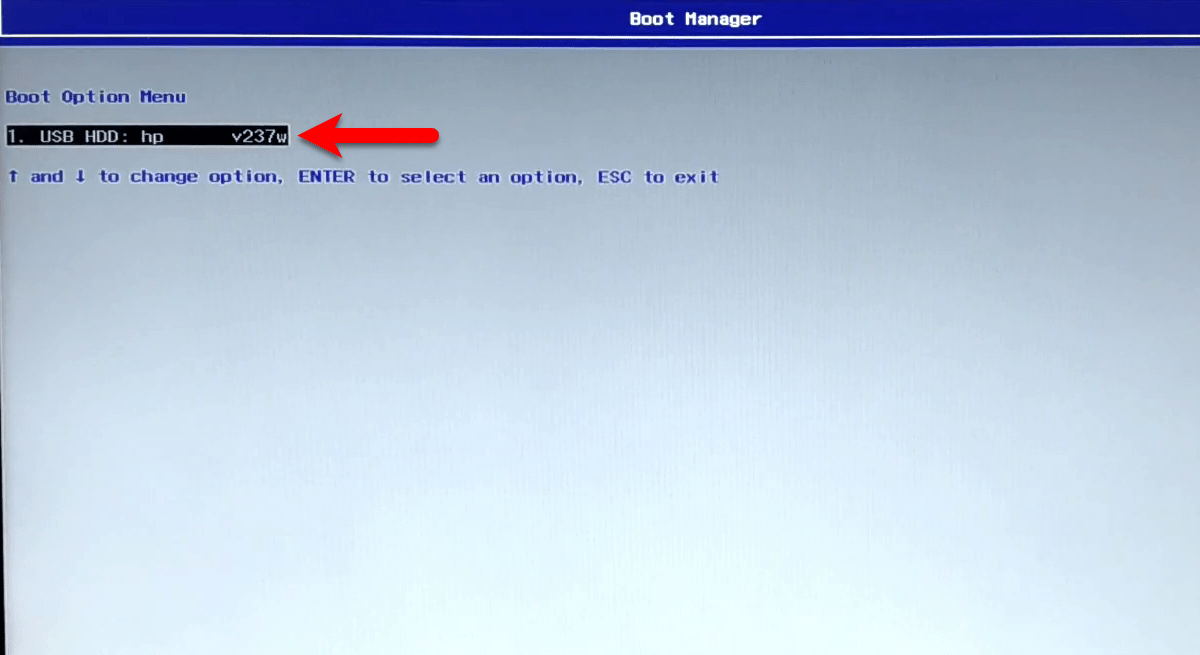
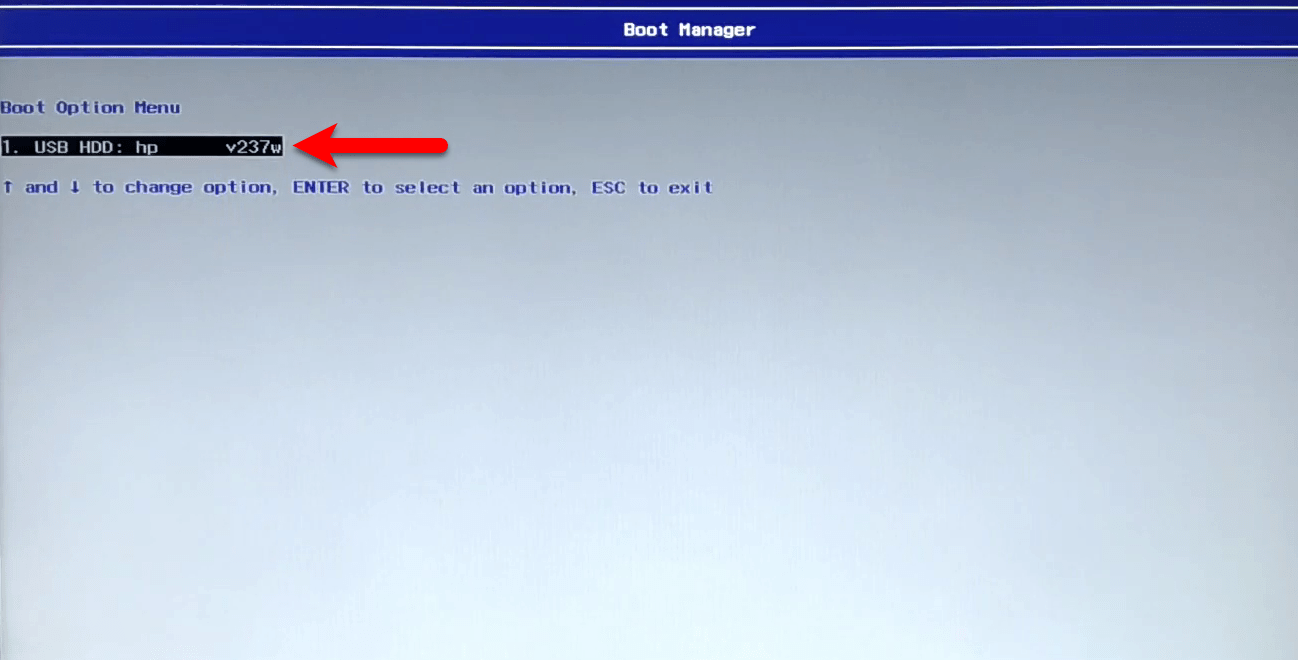
Once the BIOS settings are successfully configured, attach the macOS Mojave Bootable USB drive and restart your laptop. Quickly press and hold the Boot menu key, and boot macOS Mojave from USB drive.
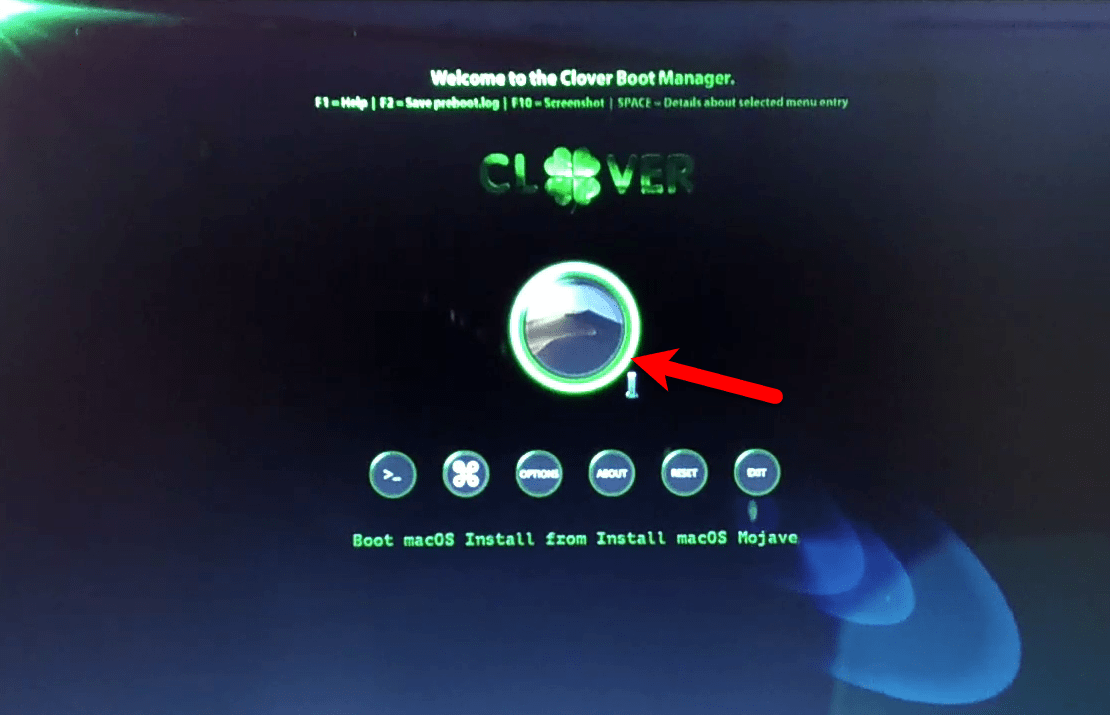
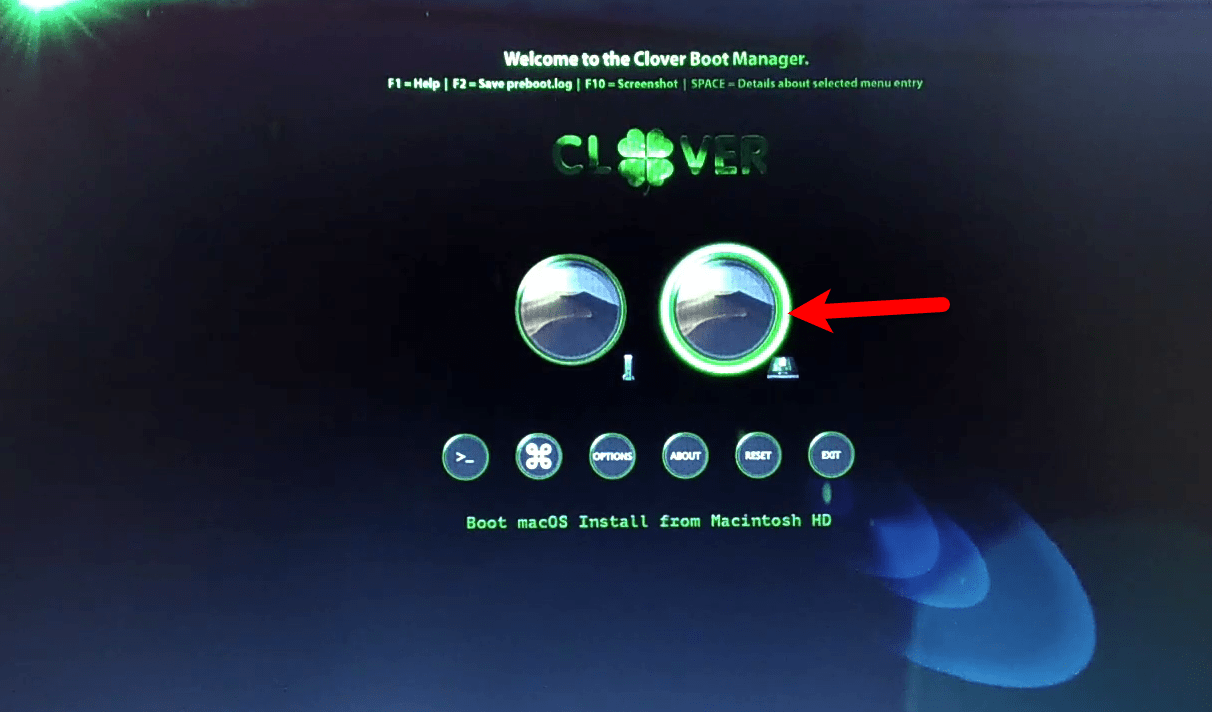
Select Boot macOS Install from Install macOS Mojave and press enter.
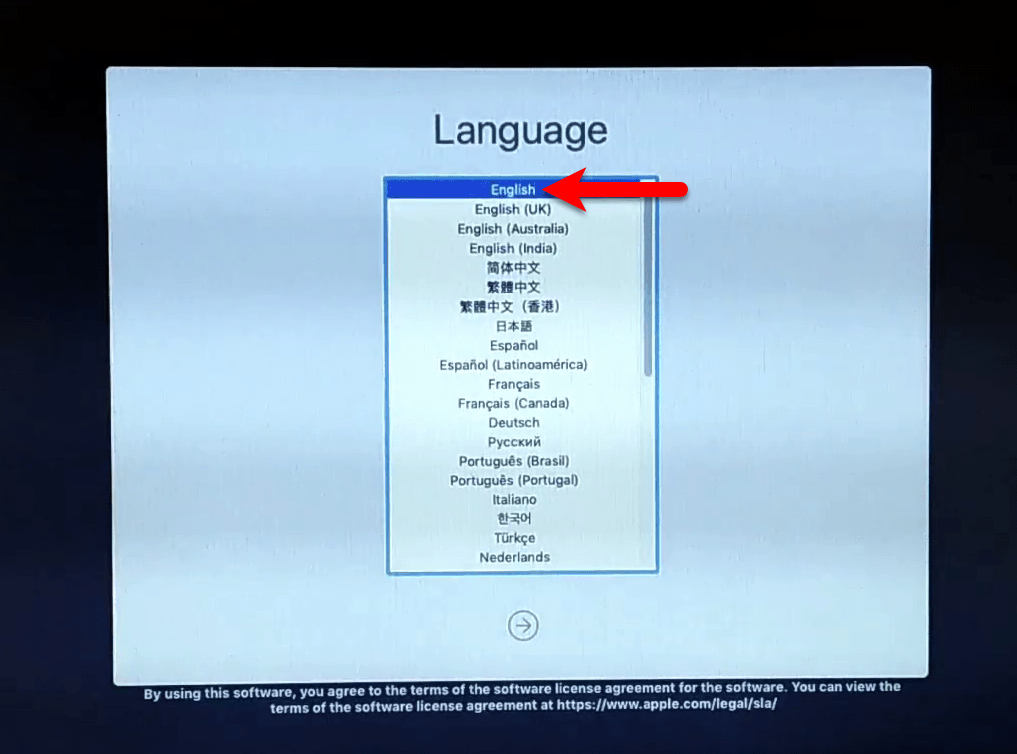
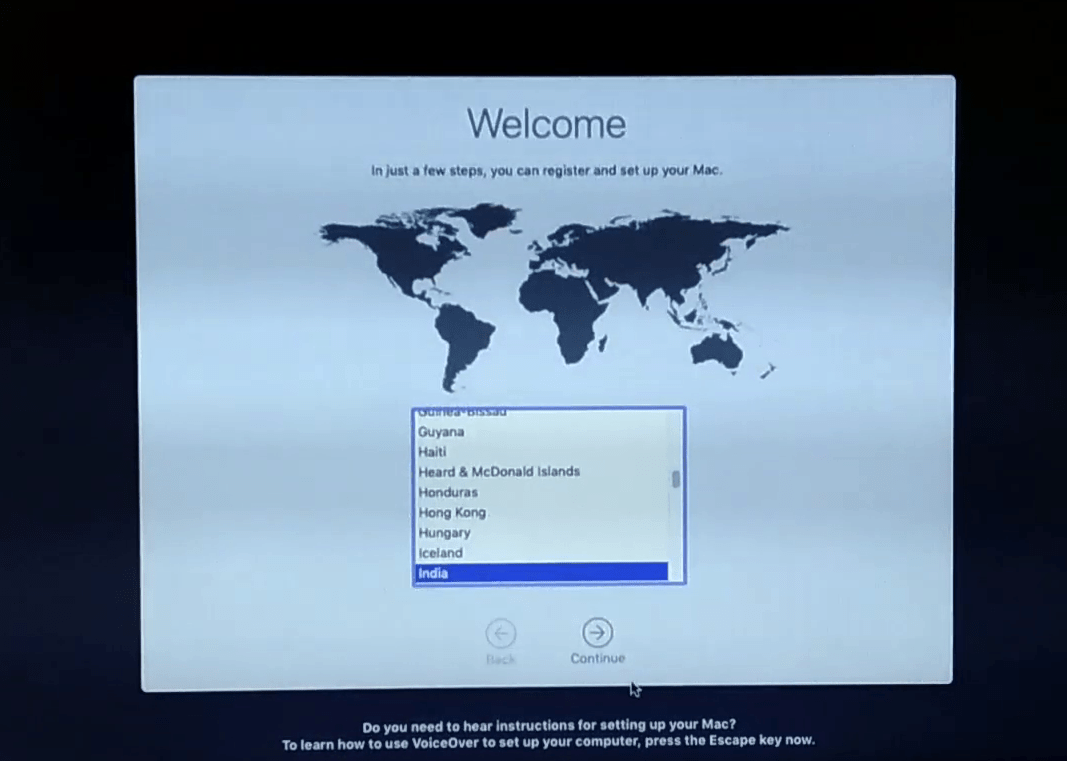
When macOS Mojave welcome wizard appeared select your language and press continue.
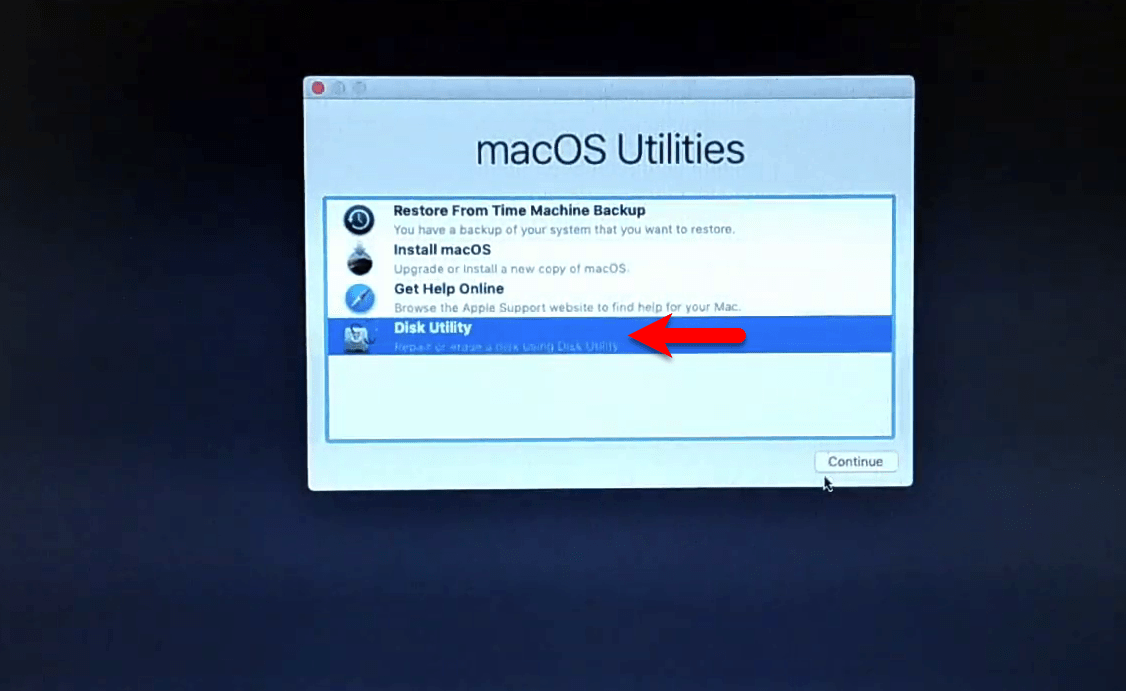
From the Utilities window select “Disk Utility” and press continue.
If the list of the disks disappeared here, click on “View” and select “Show All Devices”.

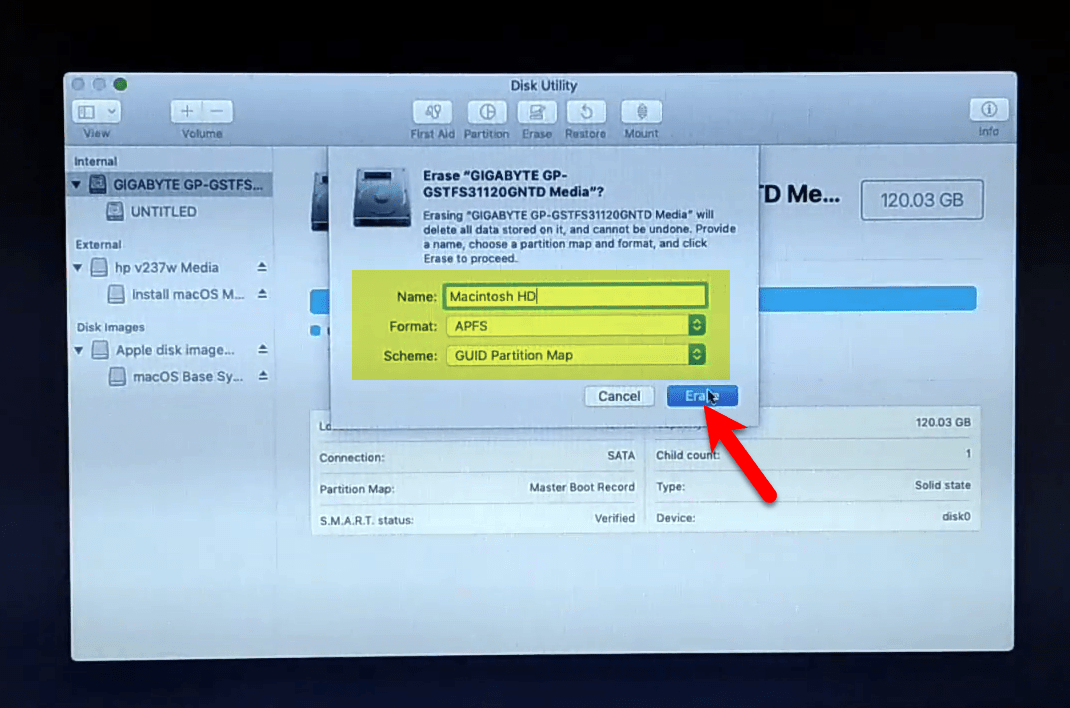
Select the disk which you want to create a partition for macOS Mojave installation, then click on the “Erase” option, and format the disk with the below down settings.
- Name: Macintosh HD
- Format: APFS
- Scheme: GUID Partition Map
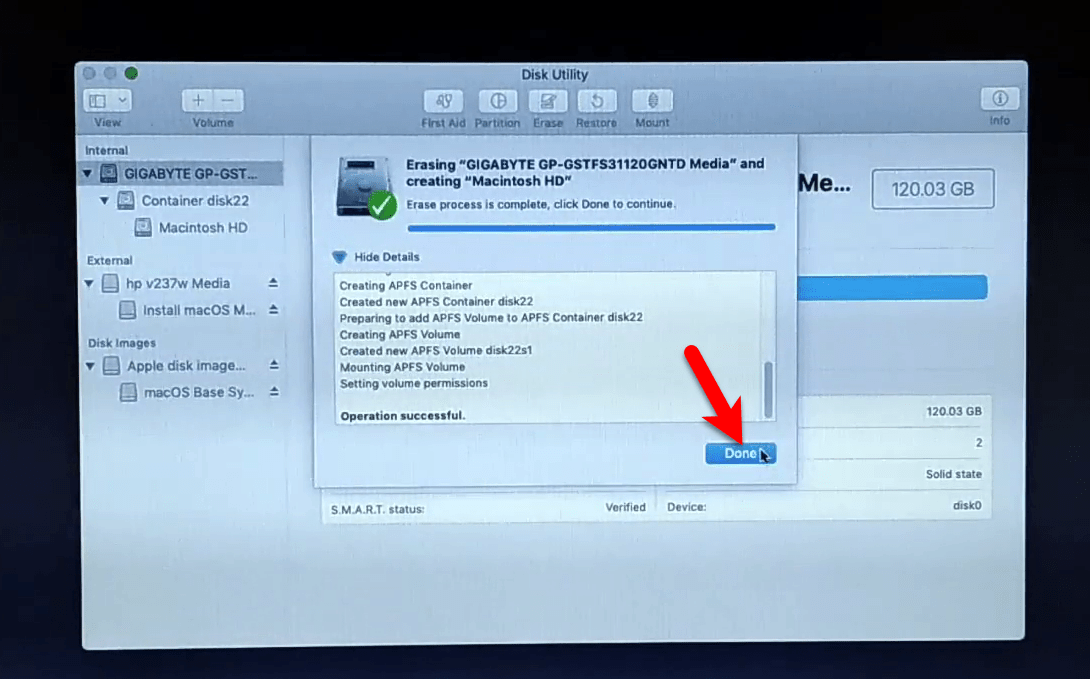
Once the disk erased click on “Done” and close the Disk Utility.
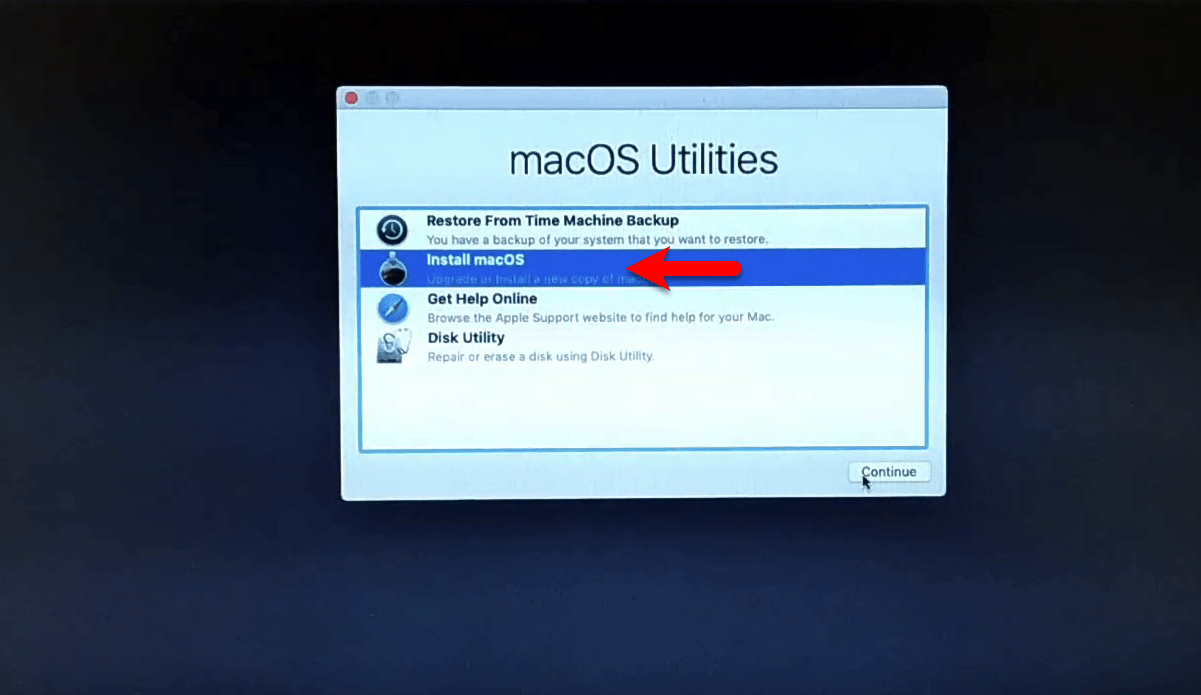
Select install macOS and press continue.
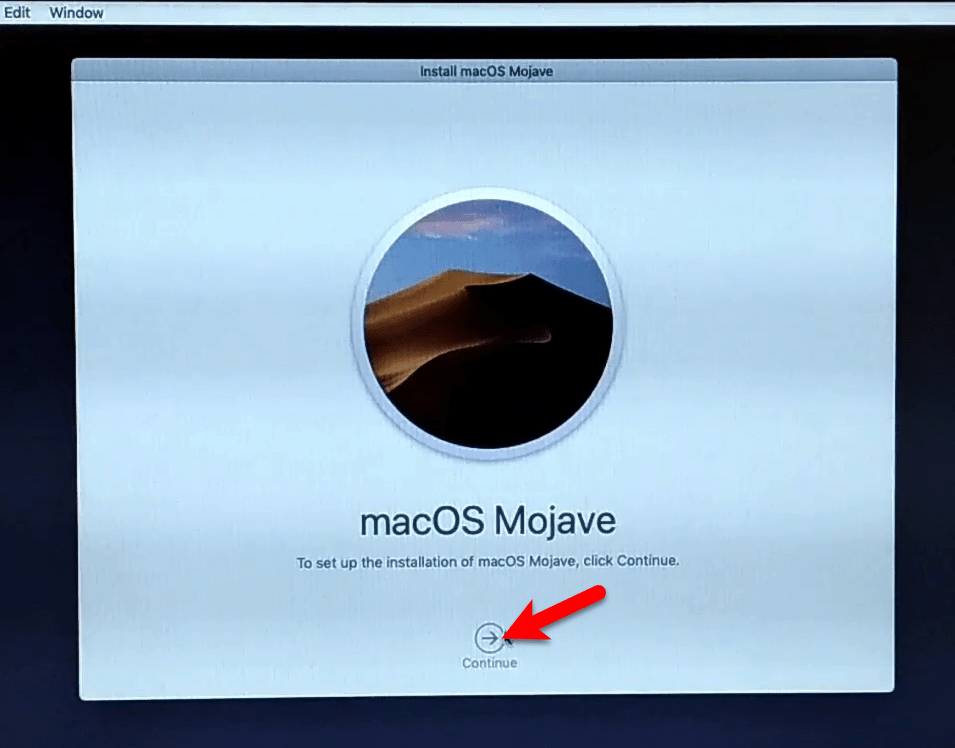
To setup the macOS Mojave installation press continue.
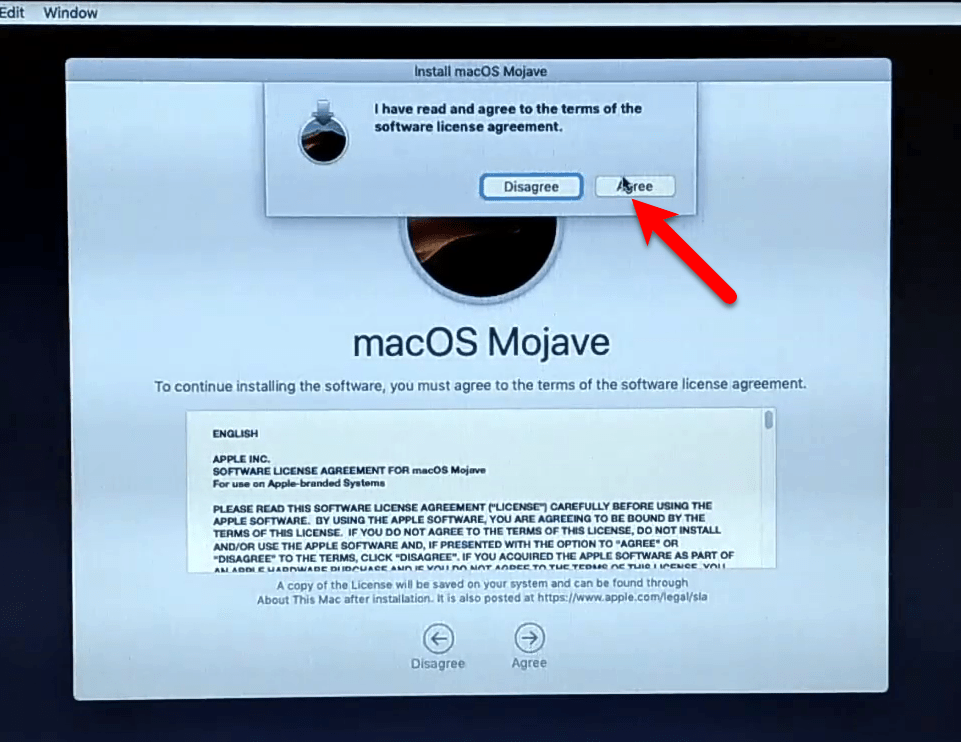
Agree with the terms and conditions of macOS Mojave 10.14.
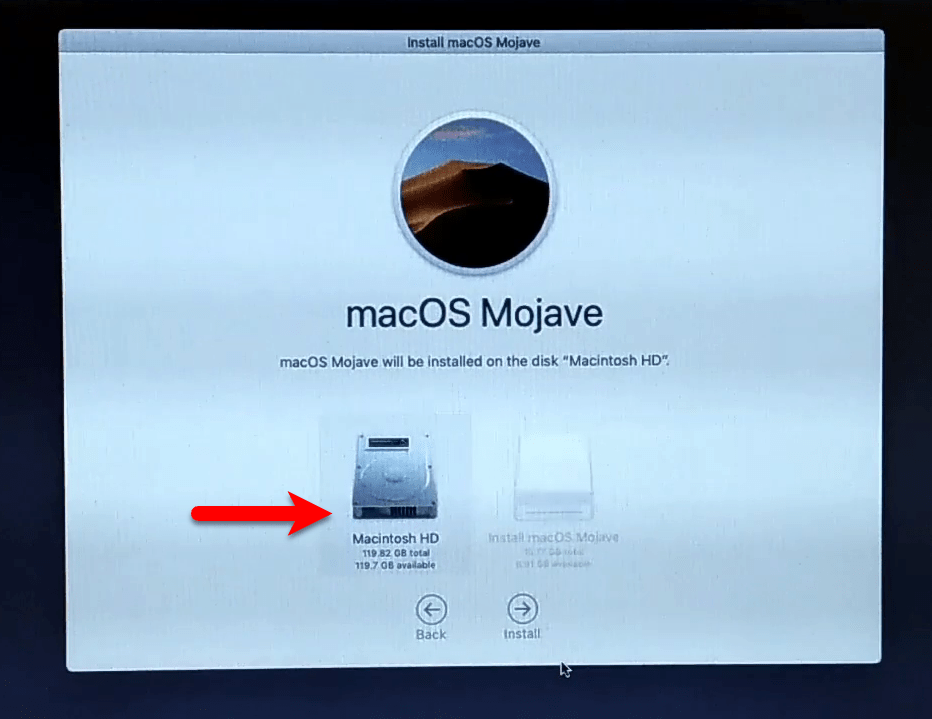
Select the disk where you want to install macOS Mojave and press Install.
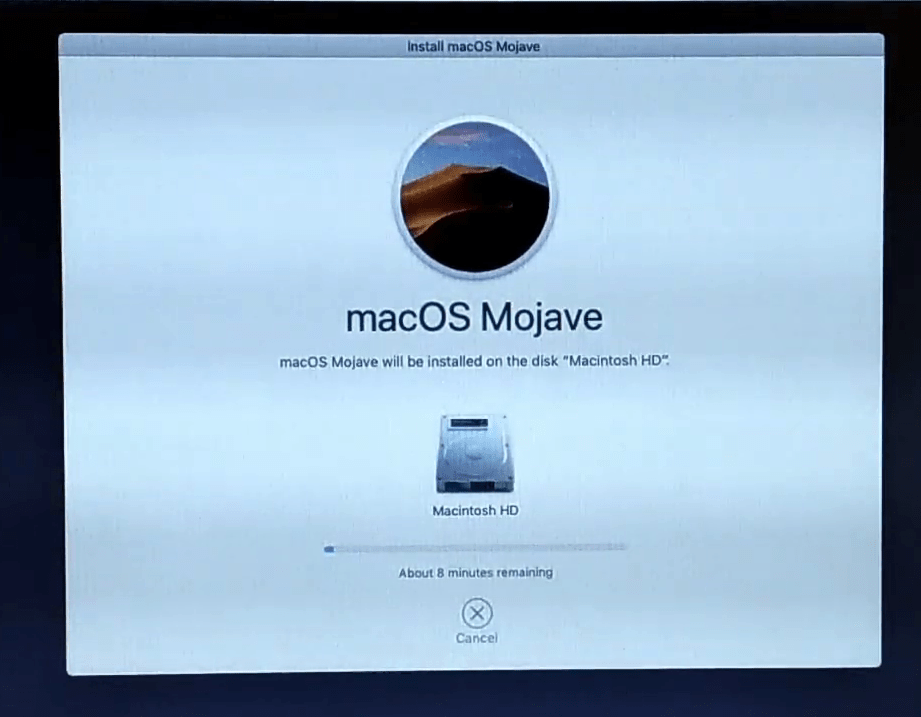
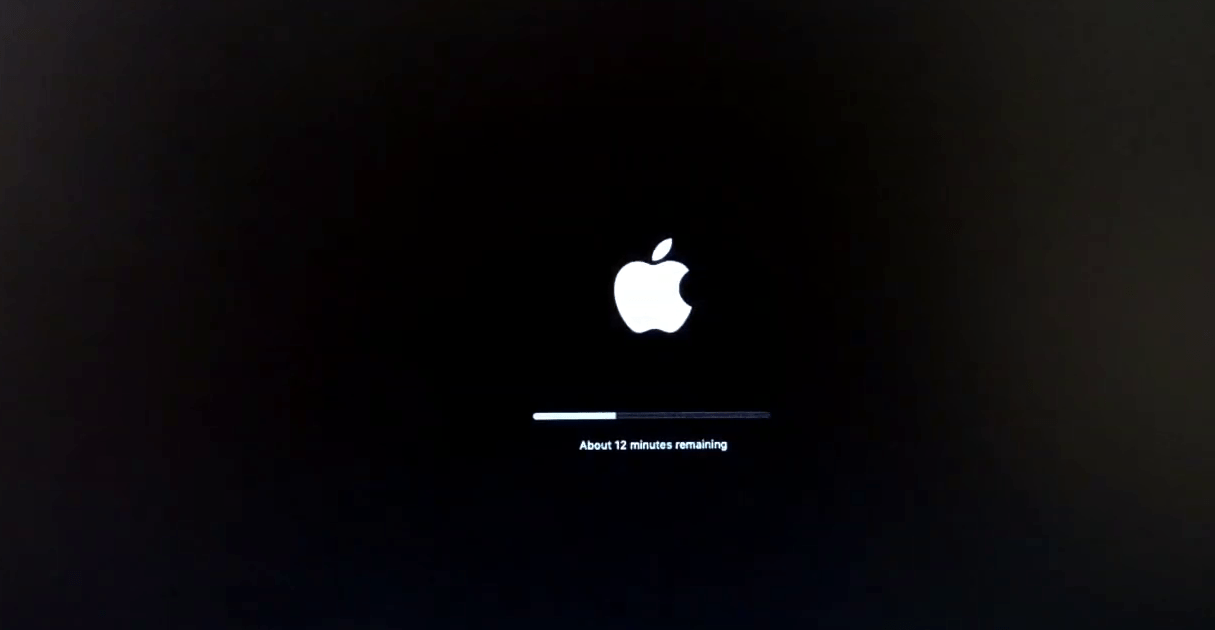
Now macOS Mojave starts installing, once the installation completed your laptop will restart.
After your laptop restart press and hold the Boot menu key, and boot macOS Mojave from USB.
Select Boot macOS Install from Macintosh HD.
Now wait for this step of the installation, it will take some time.
When the installation completed, automatically your laptop will restart then press and hold the Boot menu key. And Boot macOS Mojave once again from USB drive.
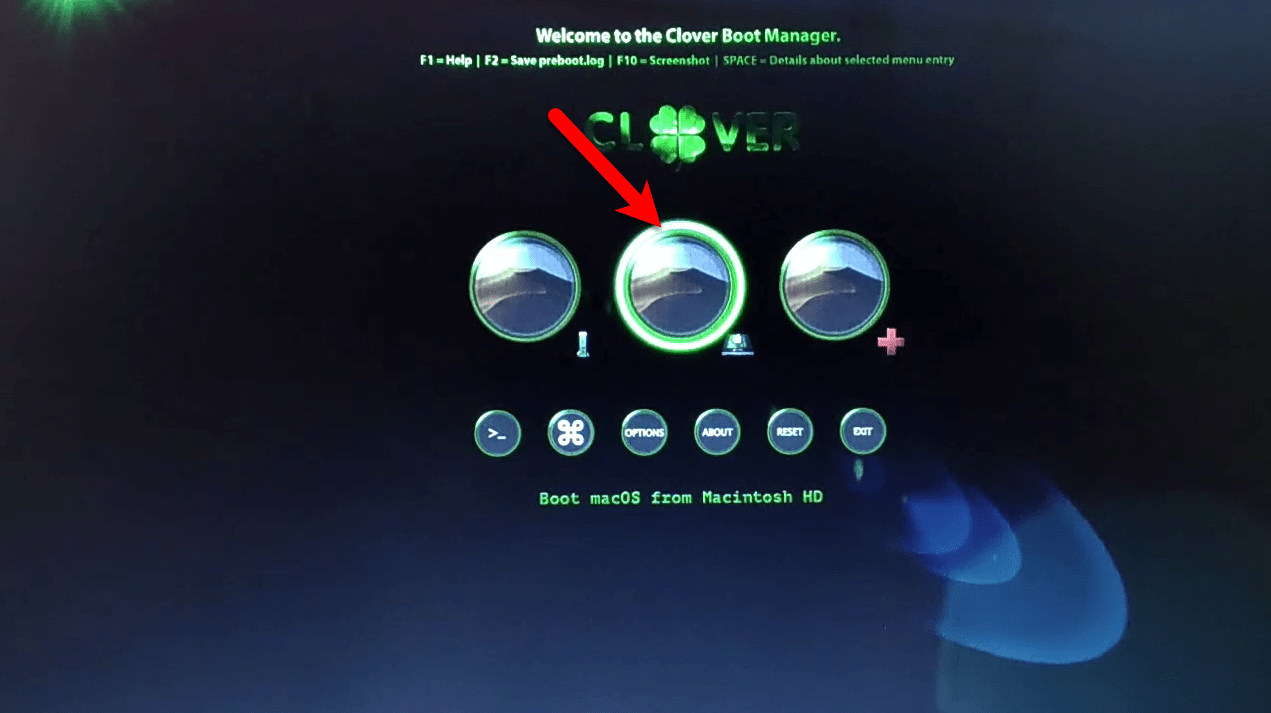
Select Boot macOS from Macintosh HD and press enter.
In the welcome wizard select your language and press continue.
Step 4. Install macOS Mojave Fixes files
When macOS Mojave 10.14 is successfully installed on a laptop, you need to install the fixes files. Attach the USB drives, and navigate to the Apple logo and click on preferences. Then copy all the fixes folder from USB to your desktop.
Open up the Clover Configurator, then mount the EFI partition of the system drive.
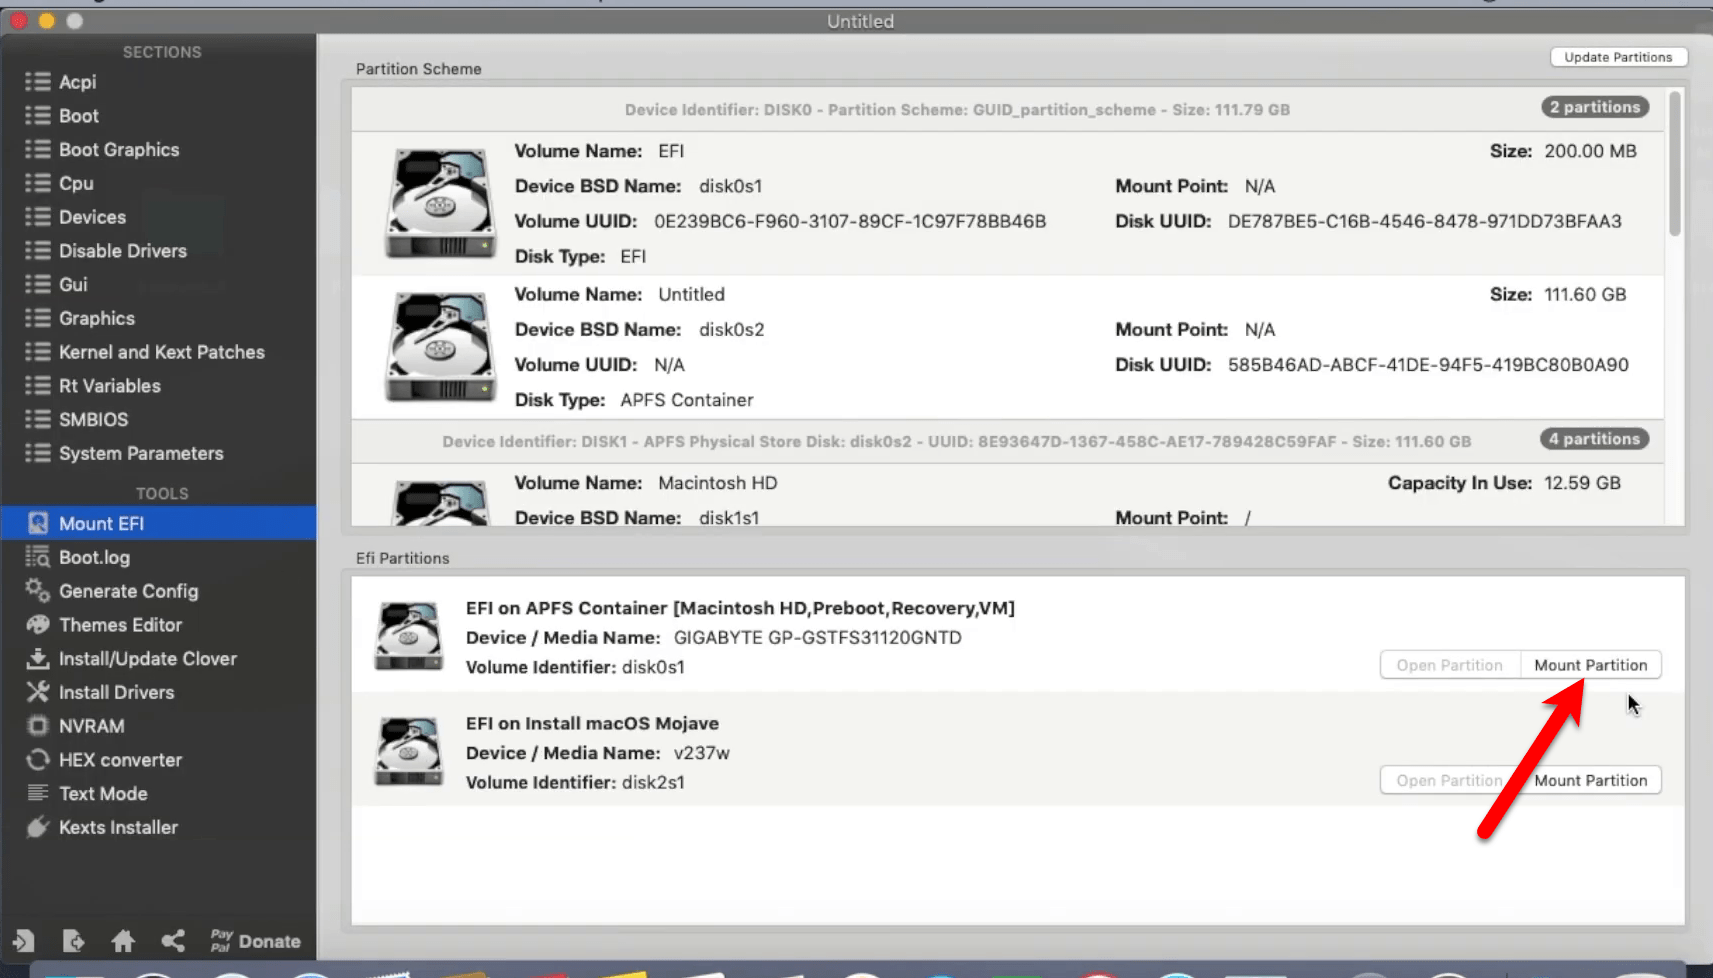
When the EFI partition mounted to your desktop, open it and delete the EFI folder. Then go to fixes folder copy and paste the EFI folder the EFI partition of system drive.
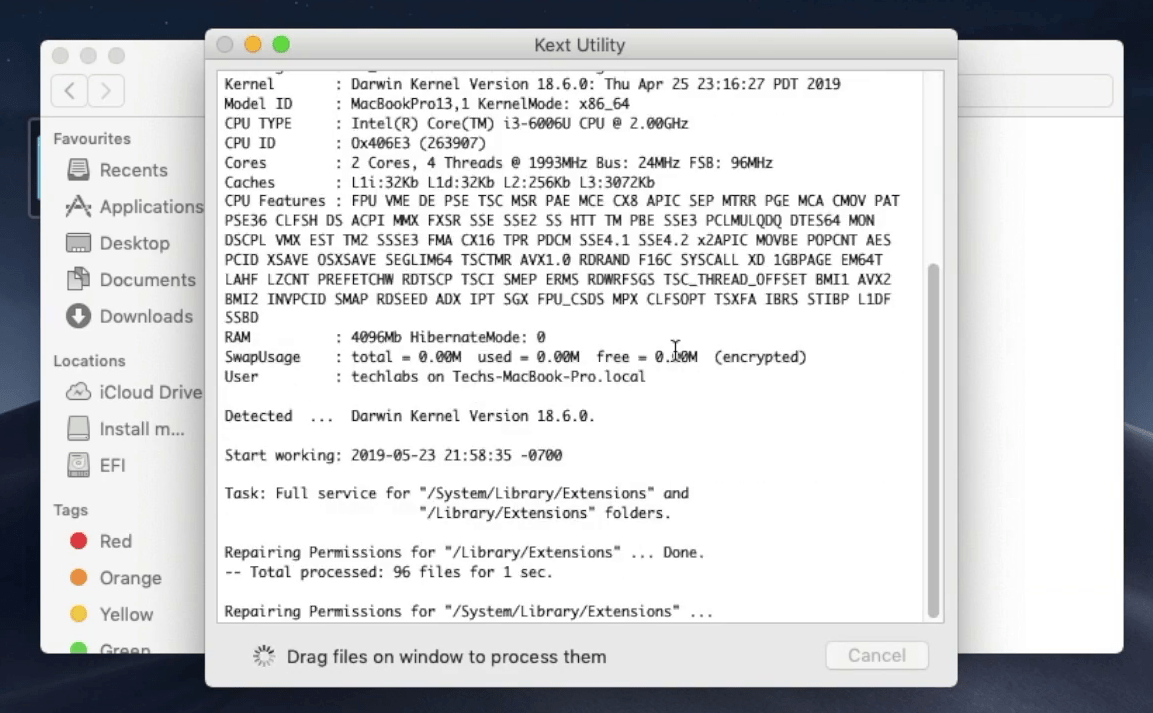
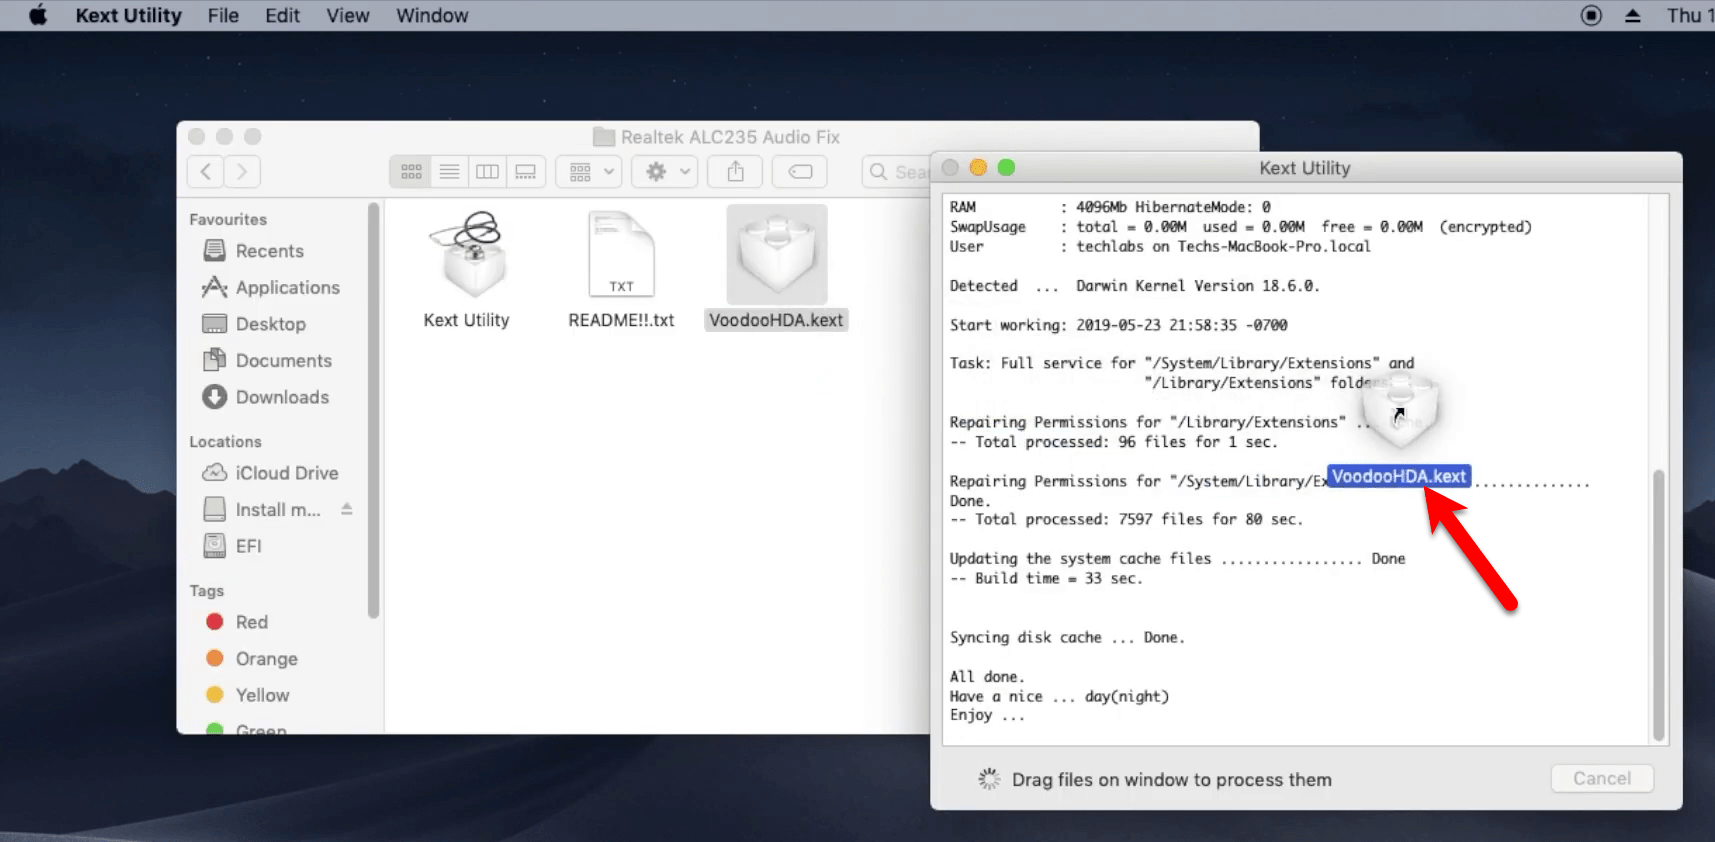
Open Fixes>Open Realtik>Open Folder>Open Kext Utility> Enter your password and press OK, and the Kext Utility will built the permission.
Drag and drop the VoodoHD to Kext Utility, and enter your password.
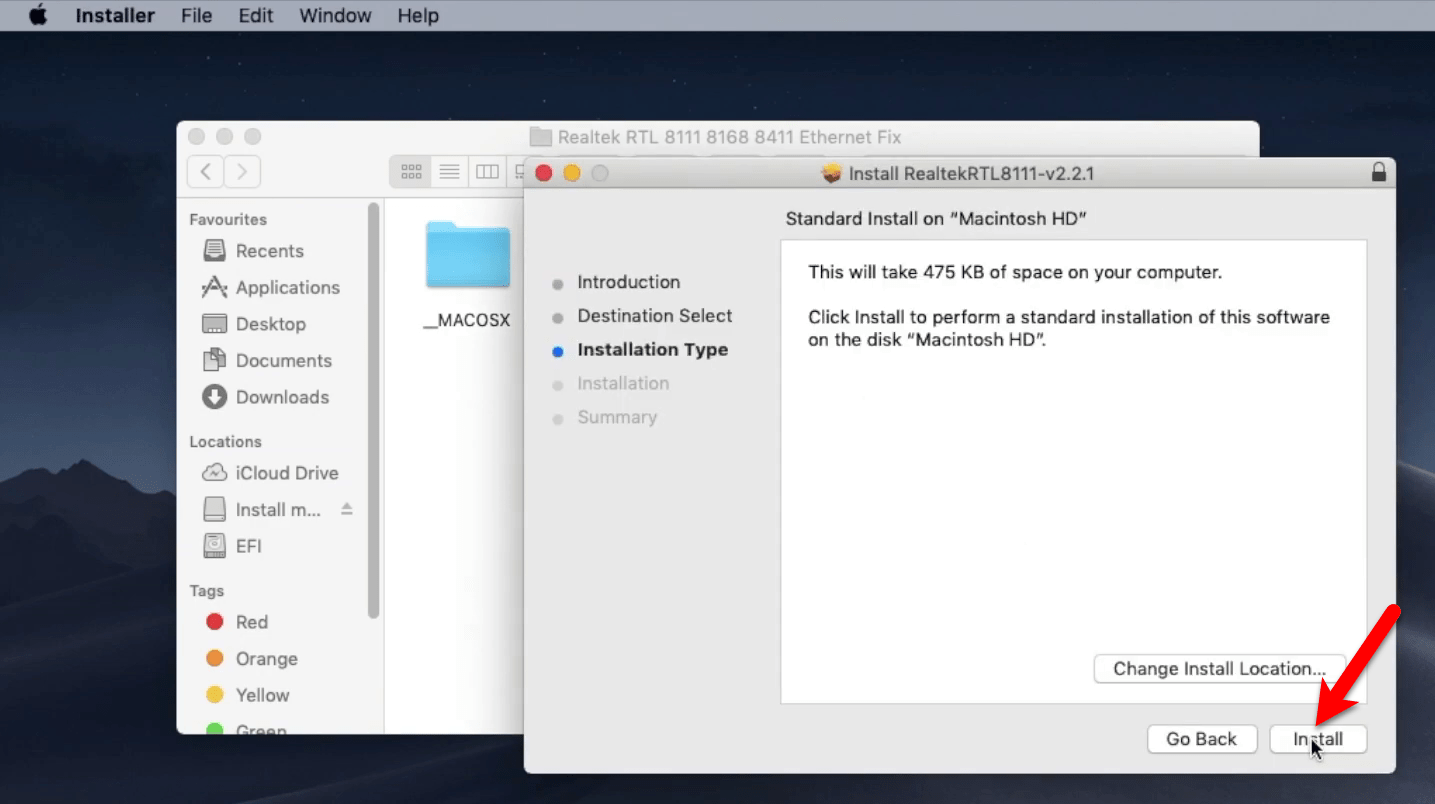
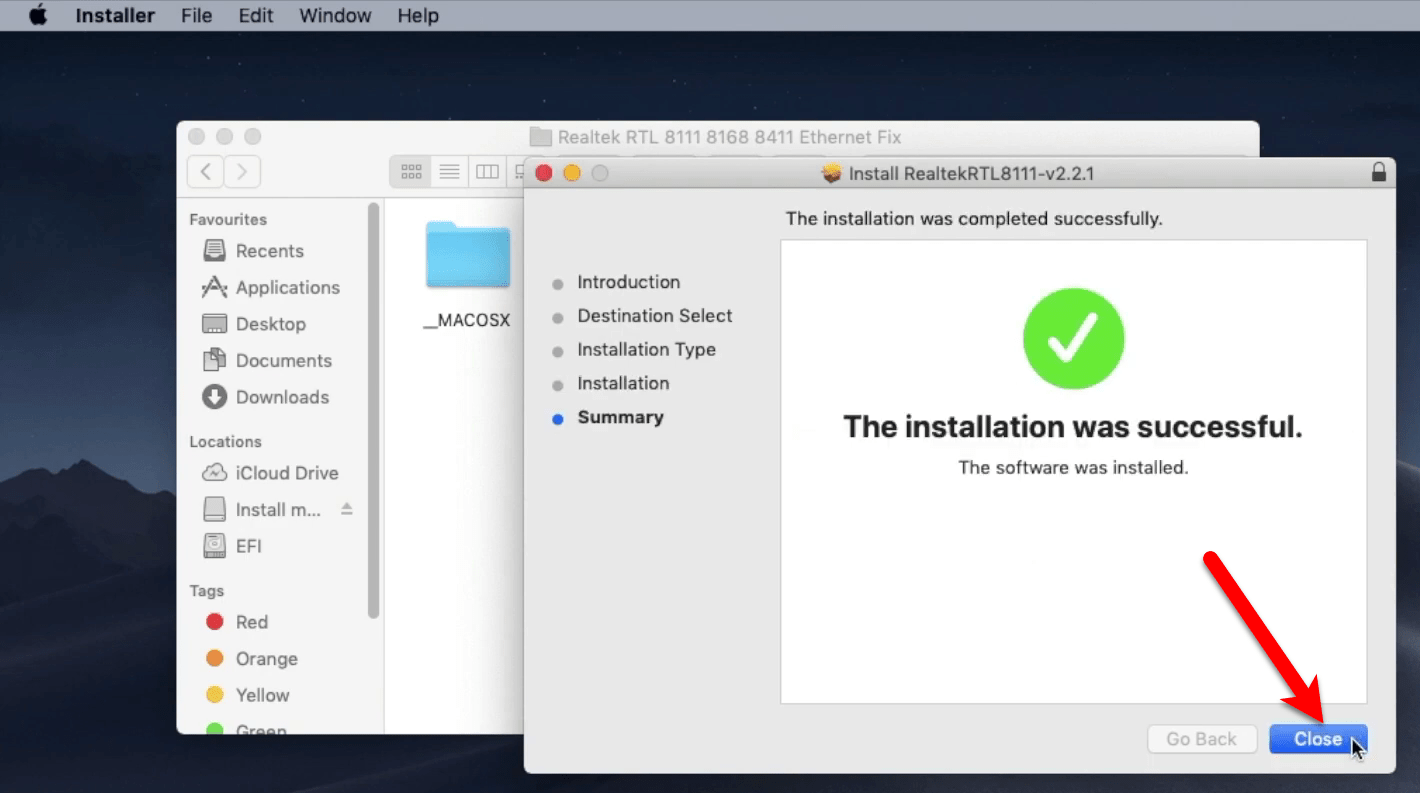
Now go to Ethernet Fixes, double-click to launch the installation. Once it launched click on Install, then enter your password and press Install Software.
When the installation completed click Close.
Now go to the Battery fixes folder, double-click to extract the packages. Then open the Post Install folder, open Kext Utility, then enter your password and press OK. Then drag and drop the “ACPIBatteryManage” file to Kext Utility, then enter your password and press OK.
Once all the fixes files successfully installed head over to left-handed then click on Apple Logo and click on Restart. After your laptop restarted be sure that the below down settings are working properly.
Related:
- How to Install macOS Catalina 10.15 on Laptop – Complete Guide
- How to Install macOS Big Sur on Laptop – Complete Guide