macOS version 13 better and well known as macOS Ventura, Ventura is expected to launch with many enhancements and the best features in the market alongside other products of Apple. macOS Ventura version 13 includes two best features such as Stage Manager, new spotlight search, and many more features. One of the most highlighted features of macOS Ventura version 13 is Safari performance increased. Fortunately, if don’t have a MacBook PC, then you can easily install Ventura 13 on your Windows PC, such as VMware Workstation/Player, or VirtualBox. So, through this guide, you will learn completely how to install macOS Ventura 13 on VMware on Windows PC?
Also, if you want to install macOS Ventura on your Hackintosh device then you need to have the following devices to install macOS Ventura on it.
- iMac (2017) and later
- iMac Pro
- MacBook (2017)
- MacBook Air (2018) and later
- MacBook Pro (2017) and later
- Mac Pro (2019)
- Mac Studio
- Mac Mini (2018) and later
What is VMware Workstation/Player?
When it comes to the world of Virtualization, then VMware Workstation or VMware Player is one of the most advanced technologies that allow everyone to create several virtual machines on a single device. VMware is a completely free tool that gives you the best environment to test several operating systems on a single machine. For example, if you are using Windows PC, then you can create multiple VM on a VMware player to run macOS, Linux, or other operating systems.
There are no differences between VMware Player/VMware Workstation, both of them are installed at the same time on a device with a single installation. The only change is VMware Workstation is having different interface than the VMware Player.
Also Read:
Requirements to install macOS Ventura on VMware on Windows PC
- The best computer with 64-Bit Windows OS doesn’t matter whether it should be Windows 10/11.
- The minimum requirements for macOS Ventura are at least 8GB of RAM, and 80GB of Disk space.
- VMware Workstation Player, or VMware Workstation Pro latest version.
- macOS Unlocker to unlock the macOS services on VMware.
- macOS Ventura ISO image file
Steps to Install macOS Ventura on VMware on Windows PC
Step 1. Install VMware Workstation on Windows PC
You can download all the required files from the above links but not the VMware Workstation/Player, you can get the latest update of VMware Workstation from its official website. The process of installing a VMware Workstation on a Windows PC is pretty much easy with a few clicks you can install it. Once you installed it make sure that the VMware is updated to the latest version.
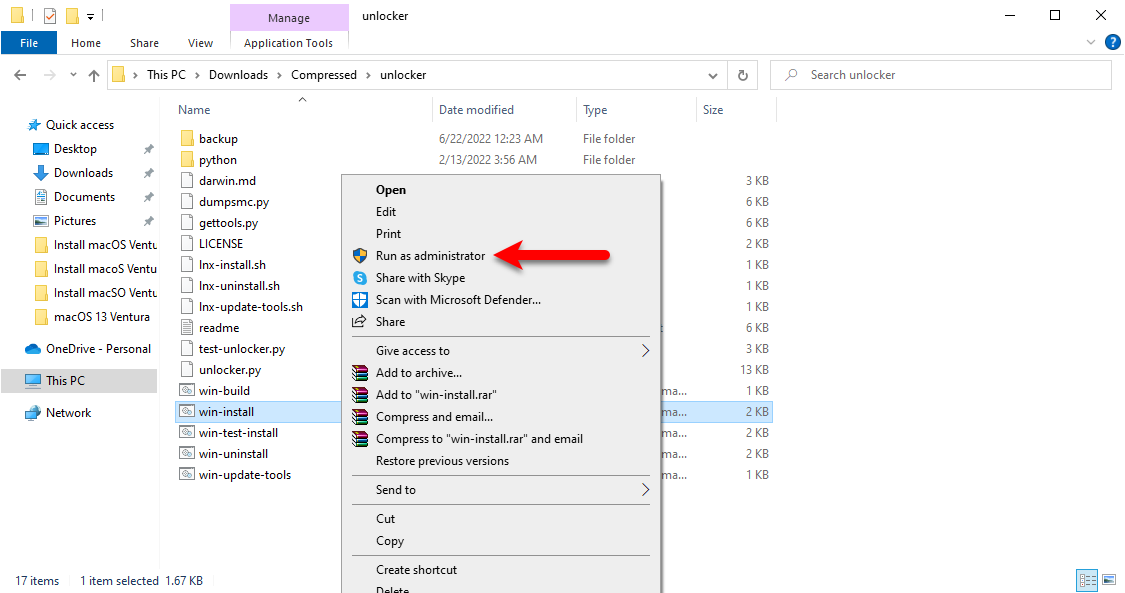
Step 2. Install macOS Unlocker
Installing the macOS Unlocker on VMware Workstation is a must because the macOS Unlocker will allow you to have access to some of the advanced features and options on the VMware Workstation/player. If the Mac OS X option is not available during creating VM on Workstation then you have to install the macOS Unlocker.
To install the macOS Unlocker firstly extract the macOS Unlocker, then find out the “Win-Install” file, right-click on that, and “Run As Administrator”.
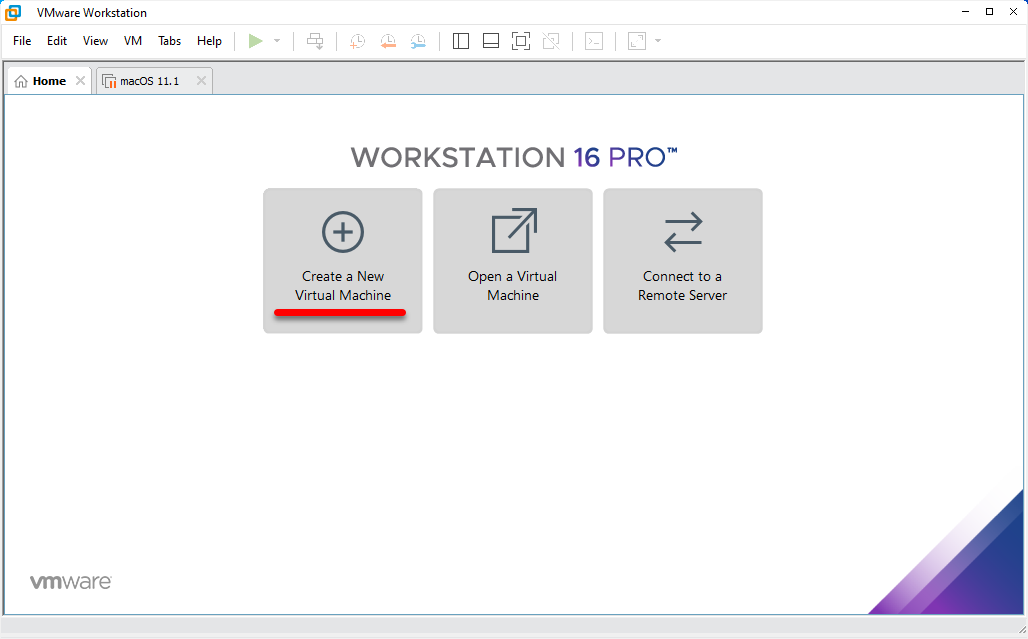
Step 3. Create a New Virtual Machine for macOS Ventura
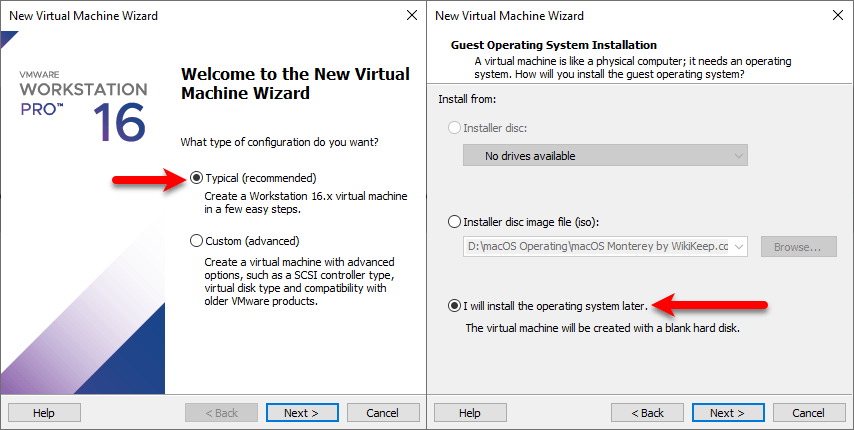
Once you have successfully installed VMware Workstation/Player on your Windows, then completed the installation of macOS Unlocker. After that, you have to create a new virtual machine for macOS Ventura 13, simply launch the VMware Workstation on the main window and click on Create a New Virtual Machine.
When the next window is opened select the “Typical (Recommended)” and click next, Then select “I will install the operating system later” and click next.
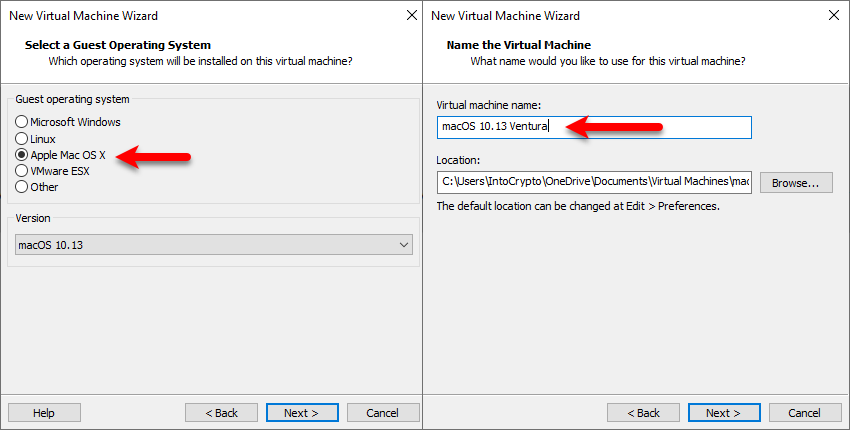
Now choose the guest operating system Mac OS X and click next, choose the virtual machine name macOS Ventura then specify the location and click next.
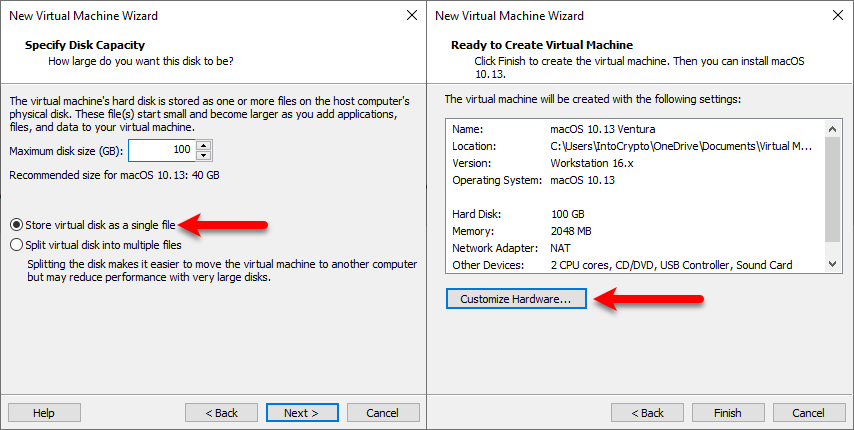
Here you have to specify the disk size according to macOS Ventura size, so in this case, So I will select 100GB, select “Store Virtual Disk as a single file” and click next. Then click on Customize Hardware to edit the virtual machine settings for macOS Ventura 13.
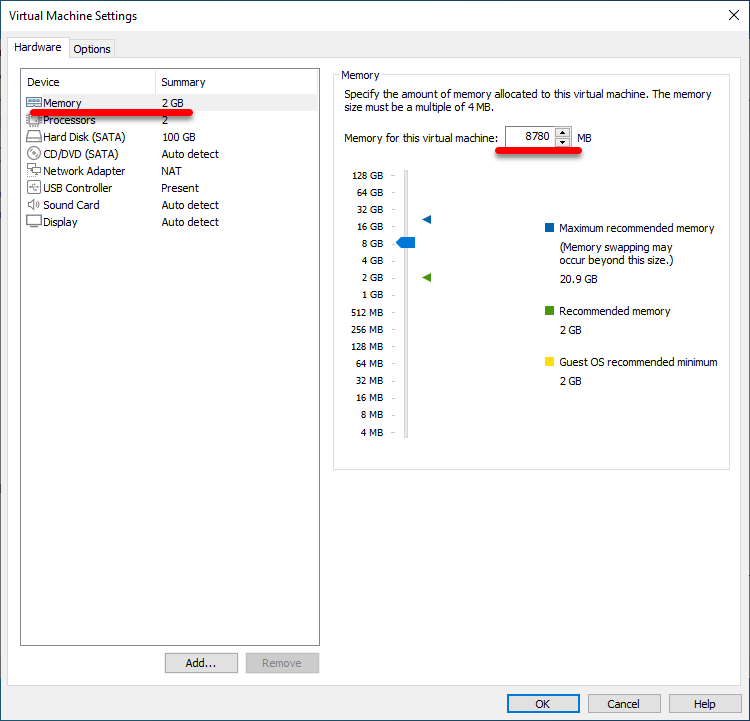
When the virtual machine settings window opened, from the left-handed window side select Memory>then increase the size of memory.
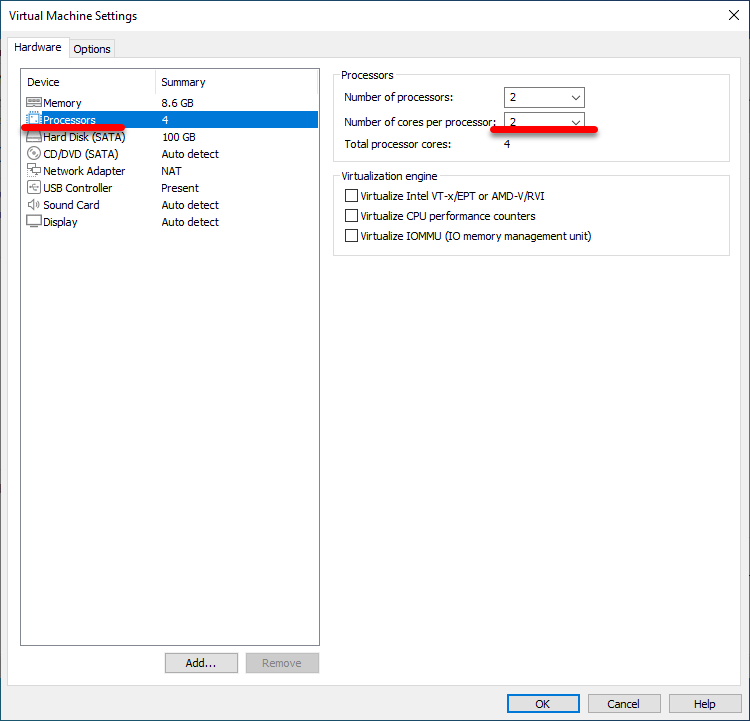
Select the processor tab, and increase the number of the core processors.
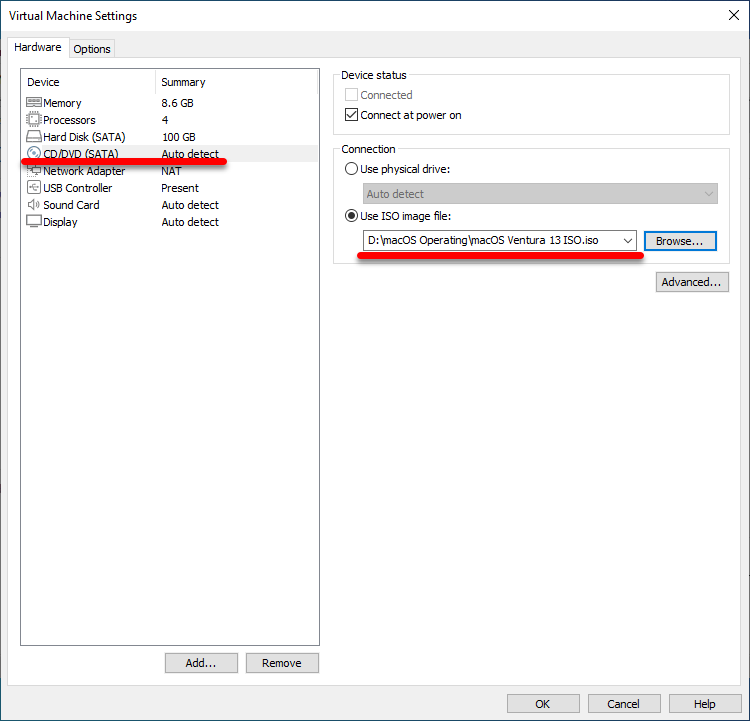
Select CD/DVD (SATA) click on “Use ISO Image File”, then click on the Browse option. Select the macOS Ventura 13 ISO image file and click on Open.
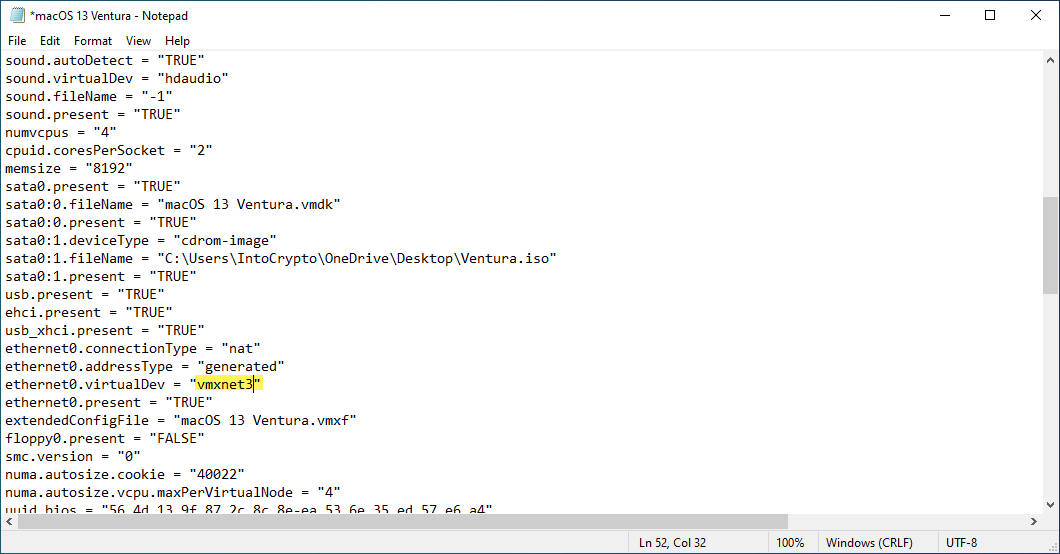
Step 4. Edit VMware VMX File
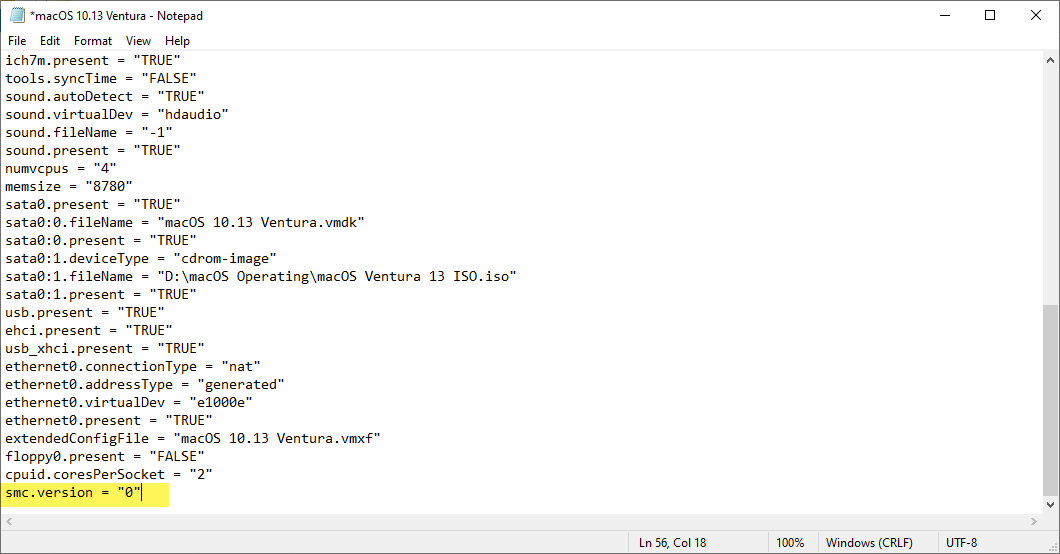
When you reached this step you have to edit the VMX file of the VMware to continue the installation of macOS Ventura on VMware Workstation. VMX file is a virtual machine configuration file, VMX file contains all the information of your Guest OS on the Virtual Machine. If you don’t edit the VMX file then you won’t be able to proceed with the installation of any macOS on the VMware Workstation.
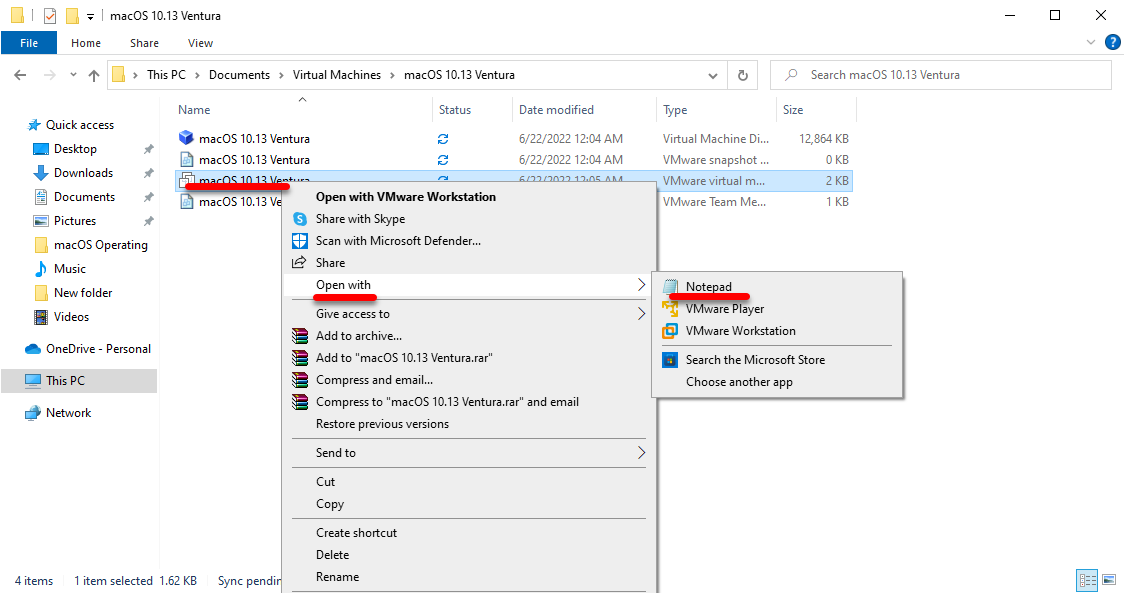
To edit the VMX file of VMware simply navigate to the place where you saved the VM machine. Then from there select the macOS vmx file right-click on that and open it with Notepad.
When the notepad window opened simply scroll down to the end and add the following code (smc.version = “0”) then click on save.
Step 5. Install macOS Ventura 13 on VMware
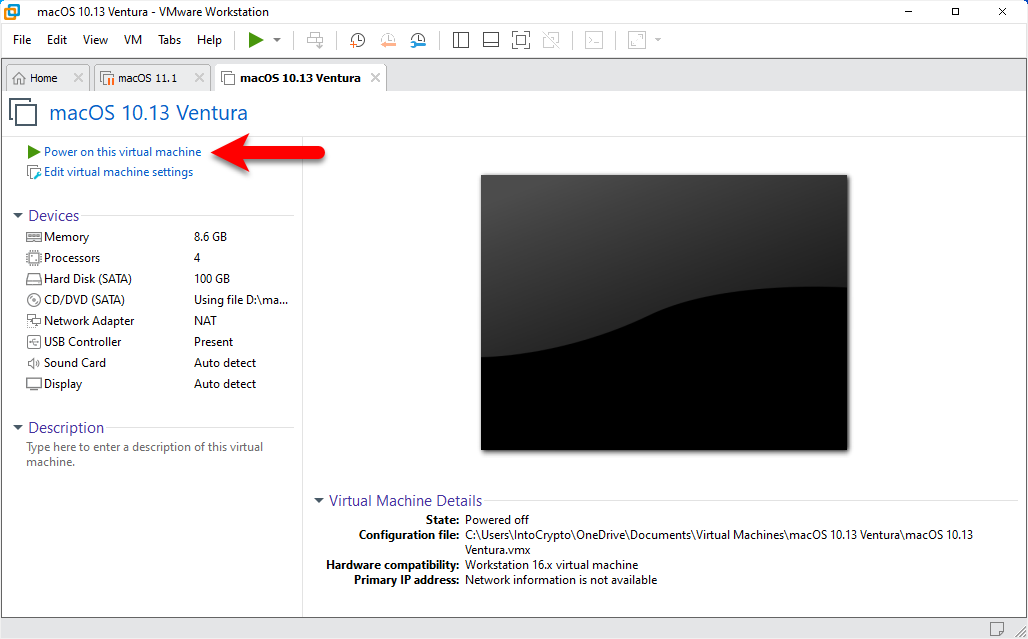
Now it’s time to install macOS Ventura on VMware on Windows PC, to install macOS Ventura simply open up the VMware, then select the macOS Ventura created virtual machine and click on “Power on This Virtual Machine”.
Now, wait for the Apple logo to bypass.

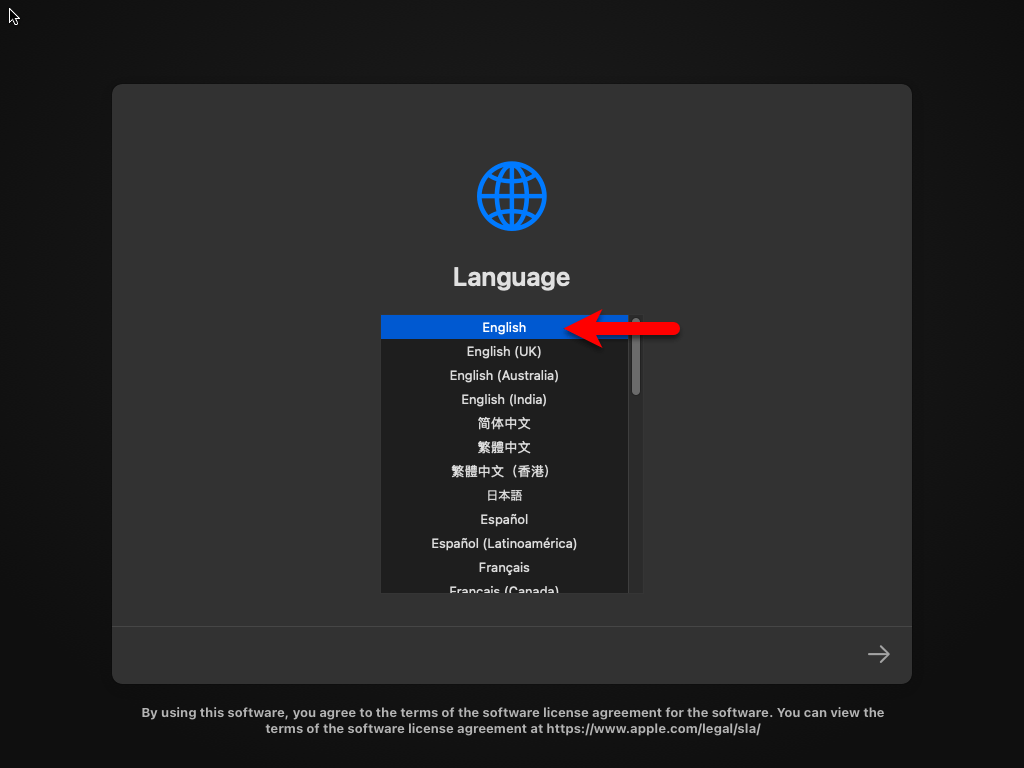
Now select the language in which you want to install macOS Ventura and click on the arrow option.
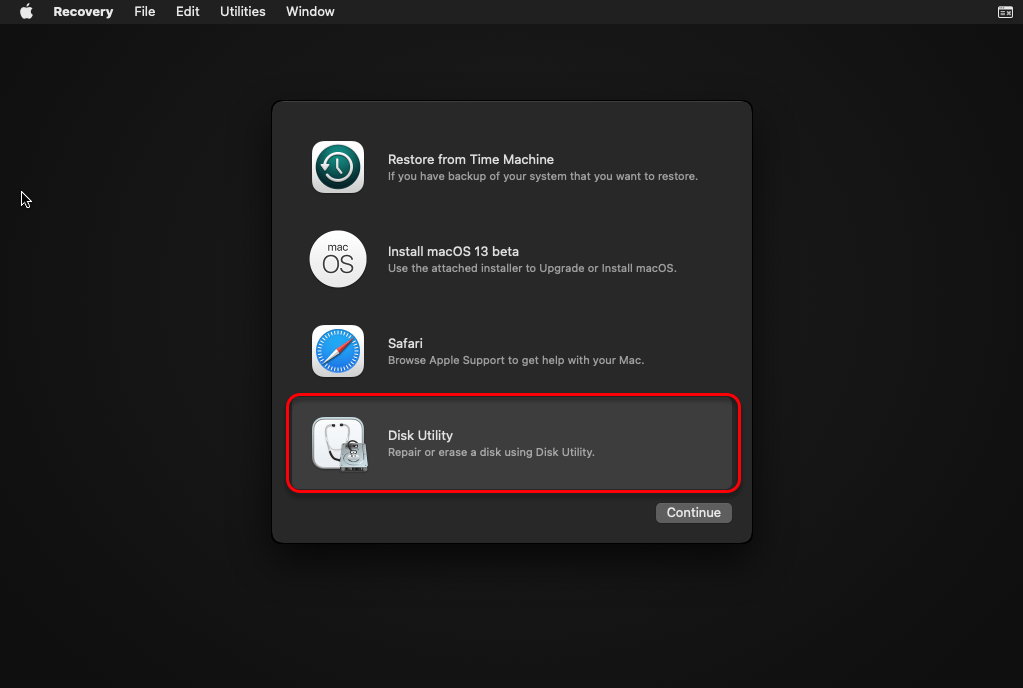
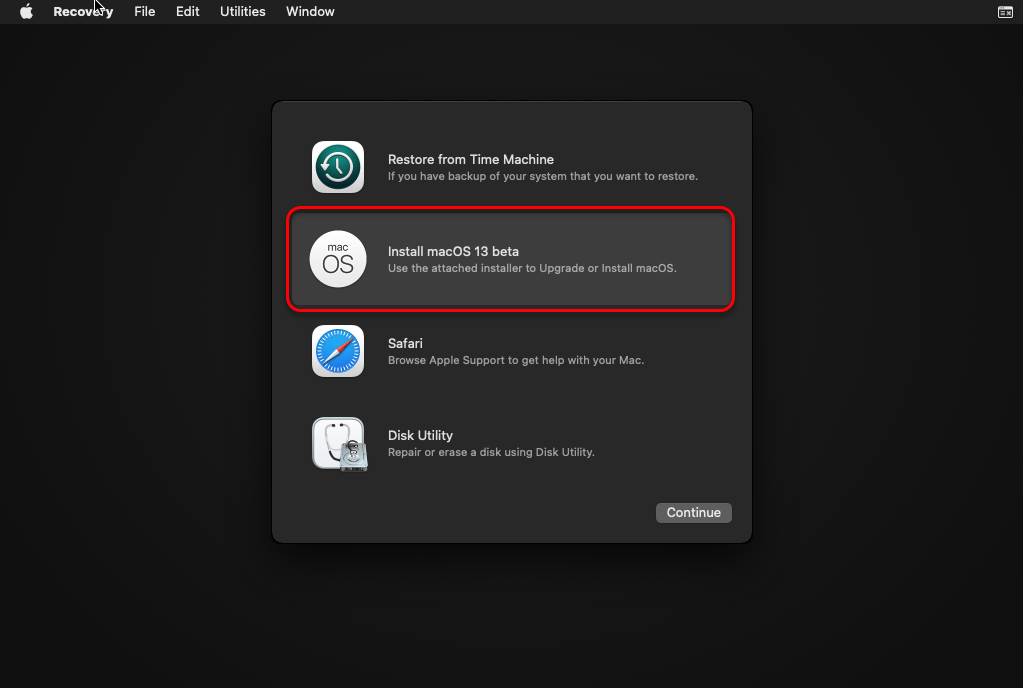
When the recovery window appeared choose “Disk Utility” and click on continue.
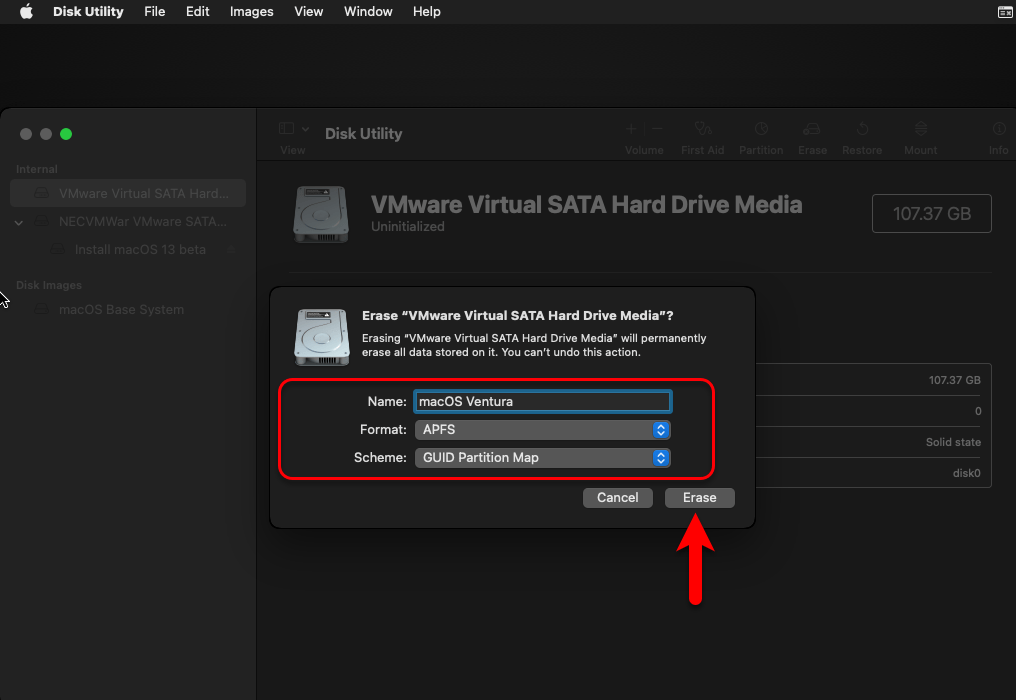
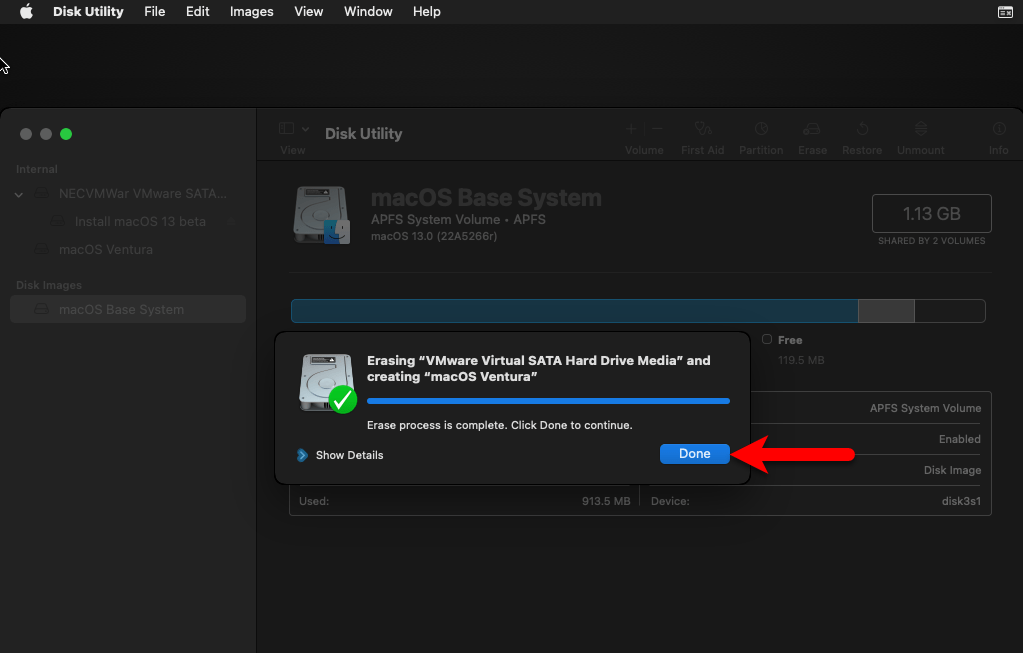
Now select “VMware Virtual SATA Hard Drive Media” from the left-handed window side, then click on Erase option. After that, another window will appear to rename the drive “macOS Ventura 13” leave the other two options by default, and click on Erase option.
Once the disk is erased successfully click on the Done option and close the disk utility.
When you come back to the Recovery window select “Install macOS Beta 13” and click continue.
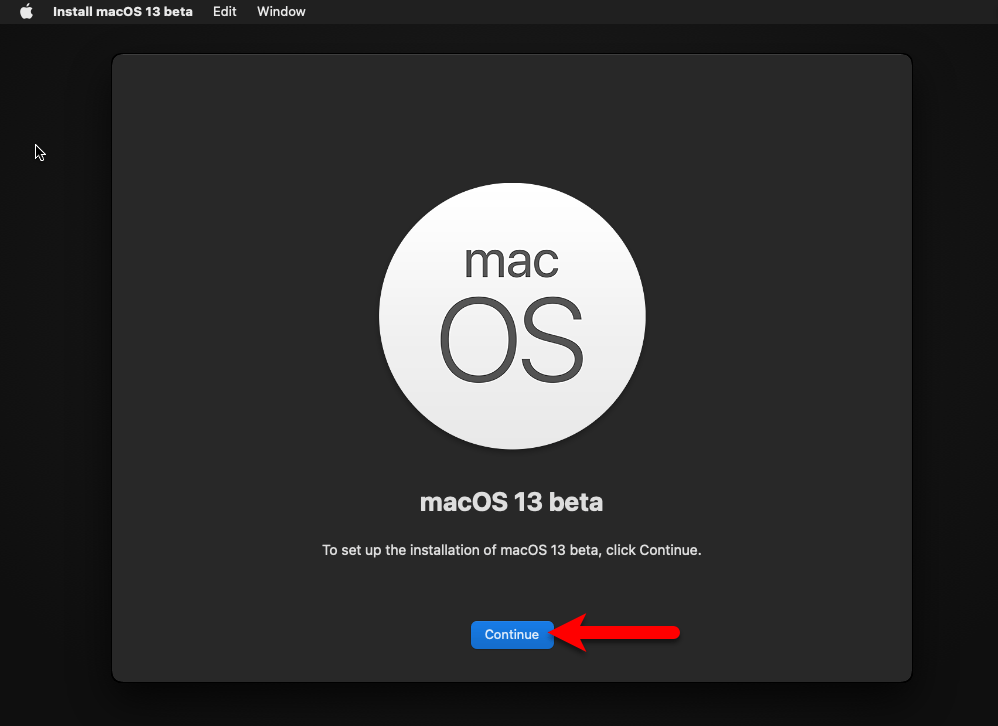
To set up the installation of macOS 13 Beta, click continue.
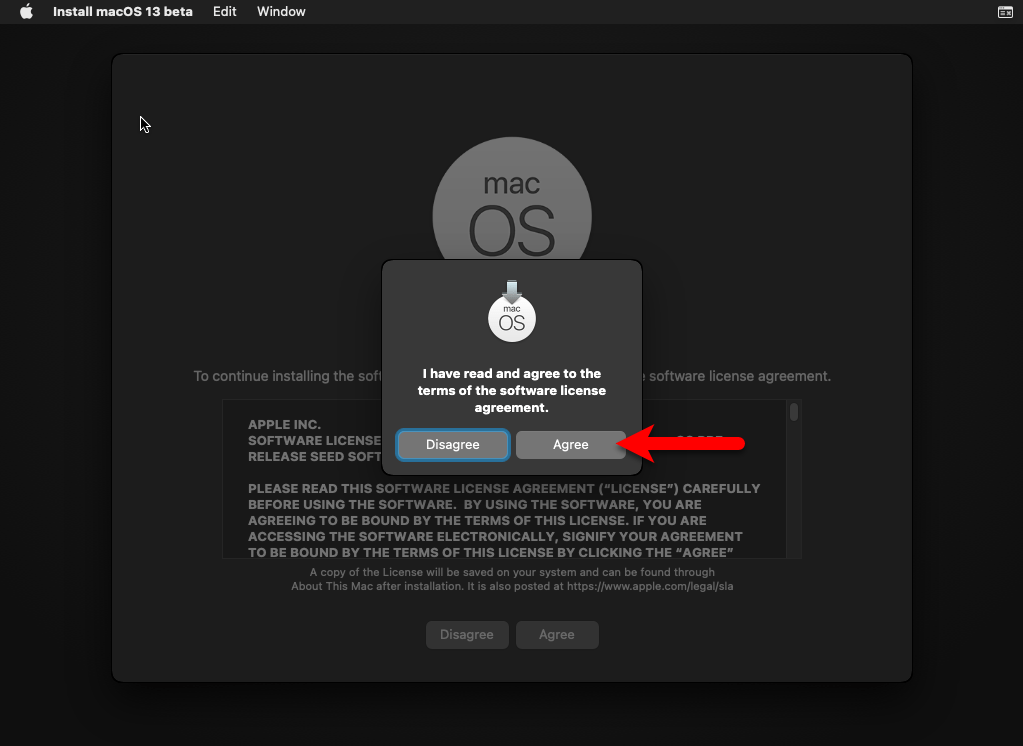
Agree with the terms and conditions of macOS Ventura.
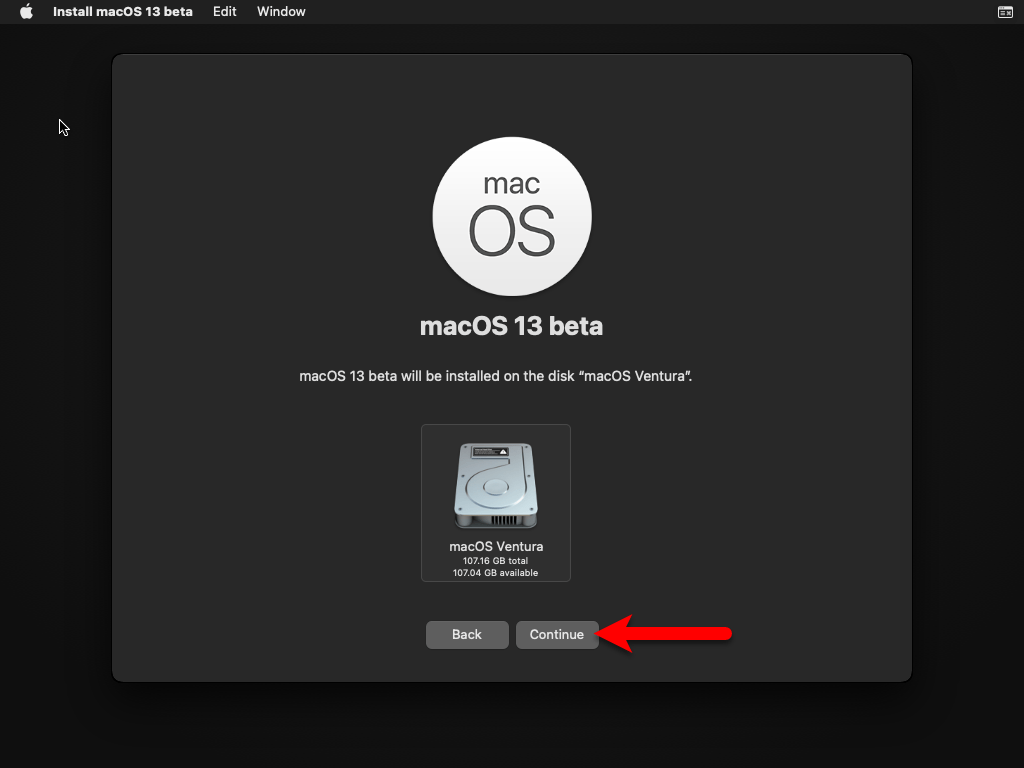
Now select the disk on which you want to install macOS Ventura 13 on it and click continue.
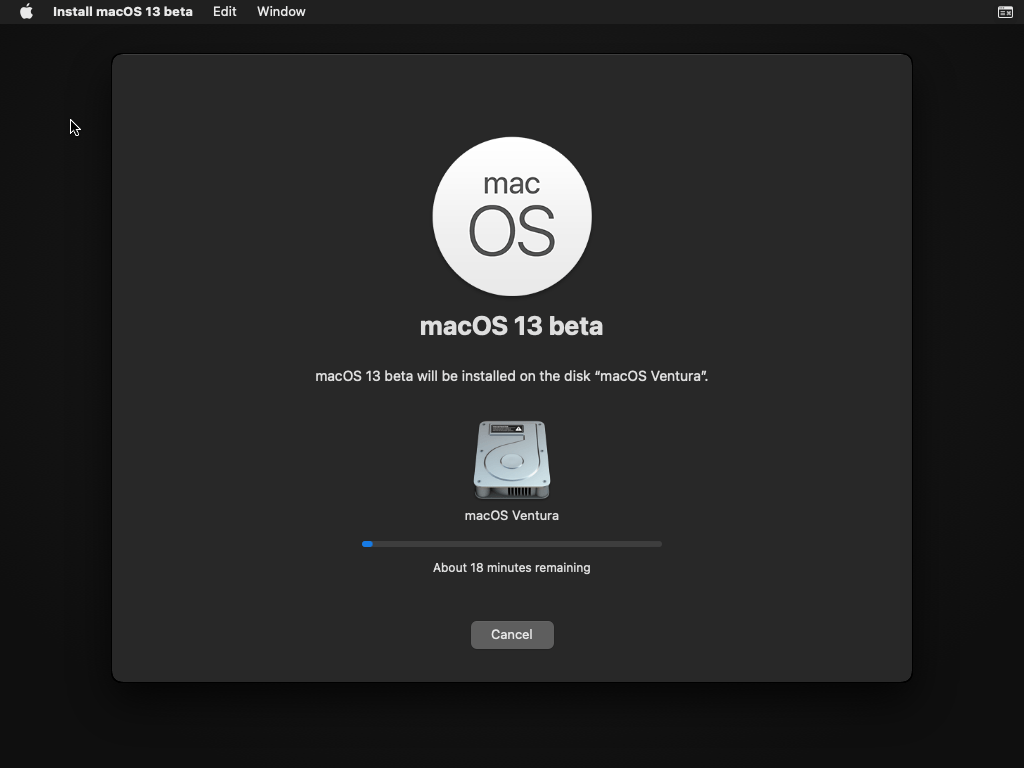
Now, wait up to 30 or 60 minutes to complete the installation of macOS Ventura version 13 on VMware until you reach to create a new account.
Step 6. Complete the Basic Settings of macOS Ventura
So once the installation of macOS Ventura version 13 successfully completed, therefore, you will be required to complete the basic settings to get ready for the first use on VMware on Windows PC.
- In the first step simply select your language and click on continue.
- Choose your written and spoken language and click continue.
- On the accessibility window simply click on Not now.
- Select My computer doesn’t connect to the internet and click continue.
- On the data & Privacy simply click continue.
- On the migration window simply click not now.
- Agree with the terms and conditions of macOS Ventura.
- Create your computer account by entering your name, and password and clicking continue.
- On the location services simply click continue.
- Select your time zone and click continue.
- On the Analytics window simply click continue.
- On the screen time window simply click set up later.
- Now choose your look for macOS Ventura, such as dark mode, or light mode.
- And finally, you are ready to go to use macOS Ventura on VMware on Windows PC.
[metaslider id=6903]
Step 7. Install VMware Tool on macOS Ventura to use the Full Screen & Other functionality
After the installation of macOS Ventura is successfully done on VMware Workstation/Player, therefore, you need to install the VMware Tool to enable some features and functionality. Such as Drag & Drop, Full-screen mode, internet connection, and graphic quality, for this purpose, you can check the below downlink and learn the way how to install the VMware tool on macOS Ventura.
Step 8. Connect macOS Ventura to the Internet on VMware
After installing the VMware tool on macOS Ventura if the internet connection didn’t fix. Therefore, you have to edit the VMX file of macOS Ventura to fix the internet connection. For this purpose, you need to change the Network Adapter or replace the command (e1000e to vmxnet3) Simply navigate to the Virtual Machine folder destination, right-click on macOS Ventura.vmx file, and open it with notepad. Then replace the commands from ethernet0.virtualDev = “e1000e” to ethernet0.virtualDev = “vmxnet3“.
Conclusion
That’s all about how to install macOS Ventura version 13 on VMware Workstation on Windows PC. Overall, I enjoyed it a lot after installing macOS Ventura 13 on VMware on Windows PC, experimenting with the way of installation, the new best features, and other improvements of macOS Ventura. However, if we consider macOS Ventura with other macOS operating systems, overall Apple has brought lots of changes to the new OS which looks quite interesting to install it on our actual Mac PCs.