While the future update of Windows 10 is called “Sun Valley”, the new brand version of Windows is leaked now. And the next huge Microsoft operating system is Windows 11 which will be pretty nice with big changes and huge features.
The latest update for Windows 10 was launched yesterday, and we are expecting the next big version of the Microsoft operating system Windows 11 with the “Sun Valley” feature to be available very soon. Windows 11 is available now in its beta version.
However, Microsoft is holding the Windows 11 to launch till the end of the year with its full version. But Windows 10 is much curious about it to see it sooner. Also, there is a Windows 11 leaked and available for users to test and sip its features on their PC, but still, it’s not much safe for the PC. Because officially Micorosft didn’t announce its full operating system.
Related:
Windows 11 Release Date?
Right now there isn’t any confirmed date for the release of the next Microsoft operating system generation. But rumors are saying soon, Microsoft will have a conference about releasing the next biggest generation of Windows 11 on 24 June 2021 at 11 A.M Eastern Time.
As the release of the Windows 10 conference. Microsoft owner Bill Gates told about the Windows operating system. That there won’t be any release of the Windows operating system after Windows 10. But again the world of technology had been changed with a certain of time. And no one can stick using Windows 10 for so long. Like Apple is announcing for ten years releasing macOS operating system, and on the recent event announced the latest operating macOS Monterey 12.
On June 9, 2021, the company of Microsoft launched a video about the recent operating system. The video was about 11 minutes full of slowed down up to 4000%. The meaning of the video is telling that the next operating system is Windows 11, and yeah right now the Windows 11 is available.
Windows 11 is having bunches of the latest features with a complete change in the interface that looks better look rather than Windows 10 operating system. Windows 11 with Sun Valley features look pretty nice and its internal look is perfect.
In the preview mode on Windows 11, the countless icons look redesign, giving better look to Windows 11 interface looks. The new UI is currently redesigned with the new font Segoe UI Variable, the Microsoft interface designer looking for users to pick a font for Windows 11.
Install Windows 11 on VMware on Windows PC
However, Windows 11 is in beta version or preview mode, now it’s better to test on separate platforms called VMware Workstation or VMware Player. If you are a Mac user then don’t have a Mac PC, easily you can test out Windows 11 on your Mac using VirtualBox or VMware Fusion.
So, through this post, I will show you how to install Windows 11 on VMware on Windows PC. I am testing Windows 11 on my Windows 10 PC to take out its features and changes. Before installing you need to complete its requirements such as VMware Workstation, and Windows 11 ISO file. You can download the requirements from the below downlinks.
- Download VMware Workstation Pro 16 For Free – Latest Version
- Download Windows 11 ISO Image file
Step 1. Install VMware Workstation on your Windows 10 PC
What is VMware? VMware, Inc. is an American cloud computing and virtualization technology company headquartered in California. VMware was the first commercially successful company to virtualize the x86 architecture. The above link will provide the free version of VMware Workstation, but if you download it from the official website of VMware it will cost. Also, it will able you to use it for 15 Days trial. But the above link is a pre-activated VMware Workstation Pro.
- Download VMware Workstation Pro from the above-given link.
- Launch the installation, and press next and continue every step by default.
- Once the installation is completed simply click Finish.
Step 2. Create a New Virtual Machine for Windows 11
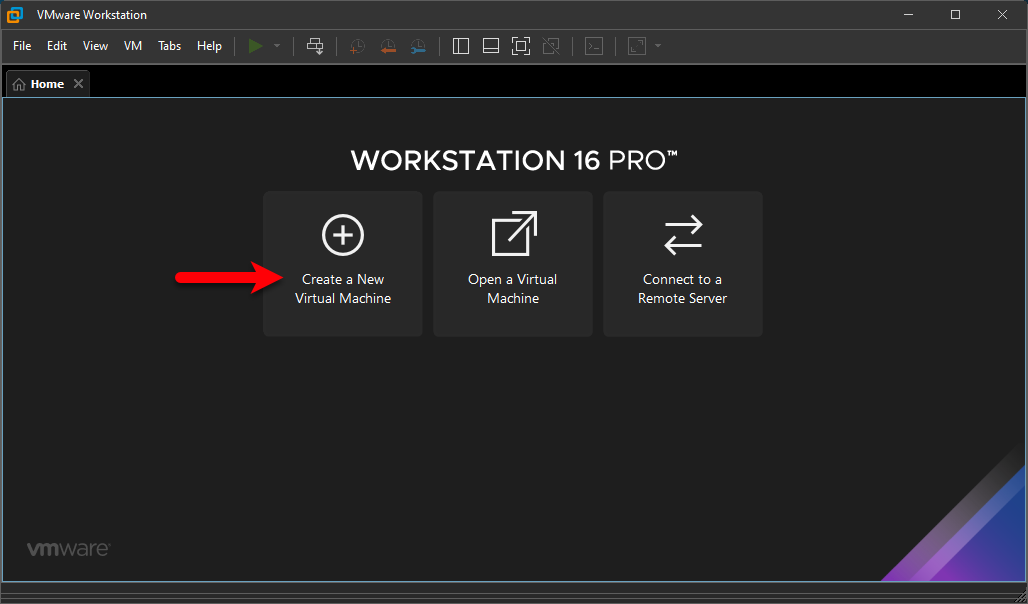
For creating a new virtual machine for Windows 11 open up the VMware Workstation. On the main screen click on Create a New Virtual Machine.
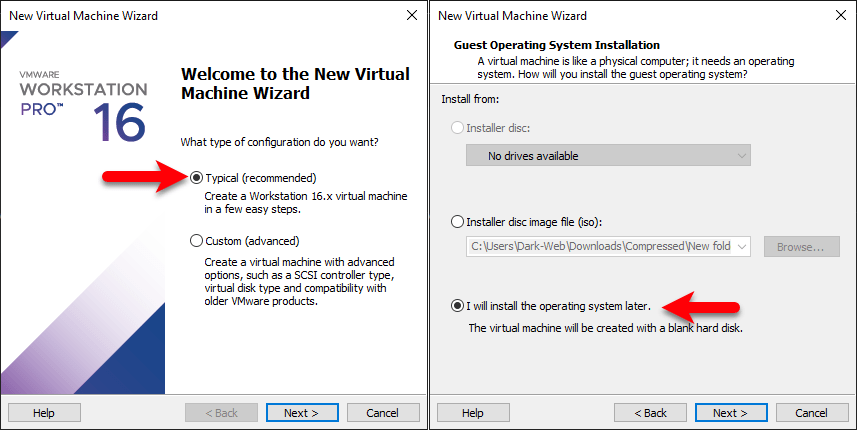
On the welcome Wizard screen select Typical (Recommended) and click next, Select I will install the operating system later, and click next.
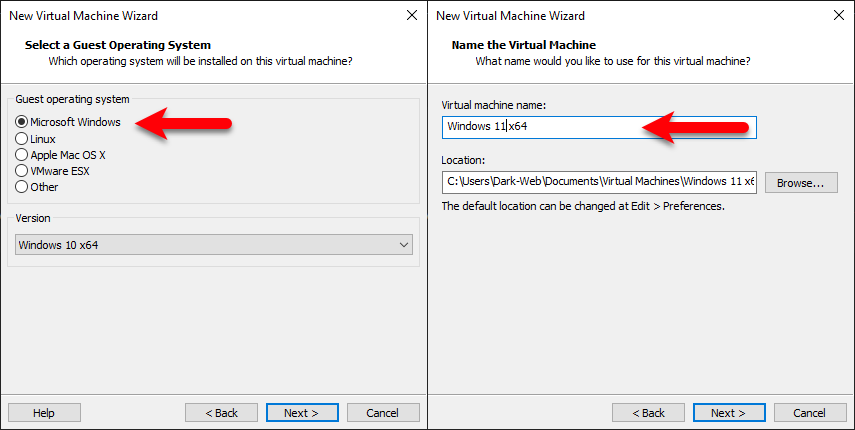
Select Microsoft Windows then select version Windows 10 X64-Bit and click next, select the Virtual Machine name and click next.
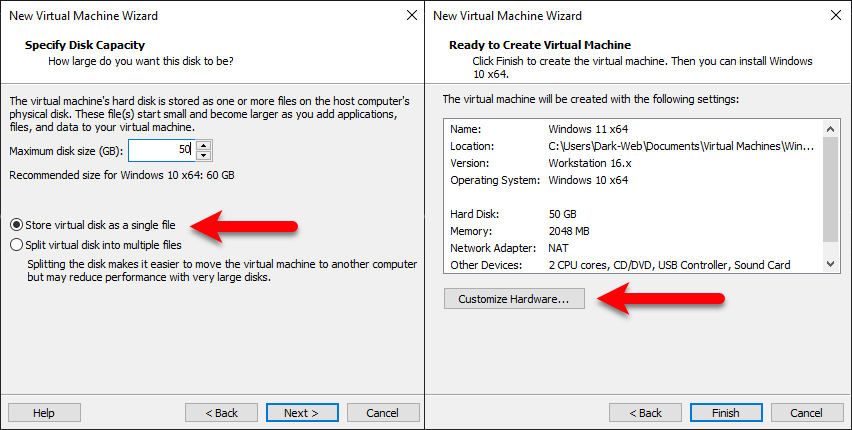
Select the Maximum disk size for Windows 11 then select the option Store virtual disk as a single file and click next. Once you reached the last window click on Customize Hardware.
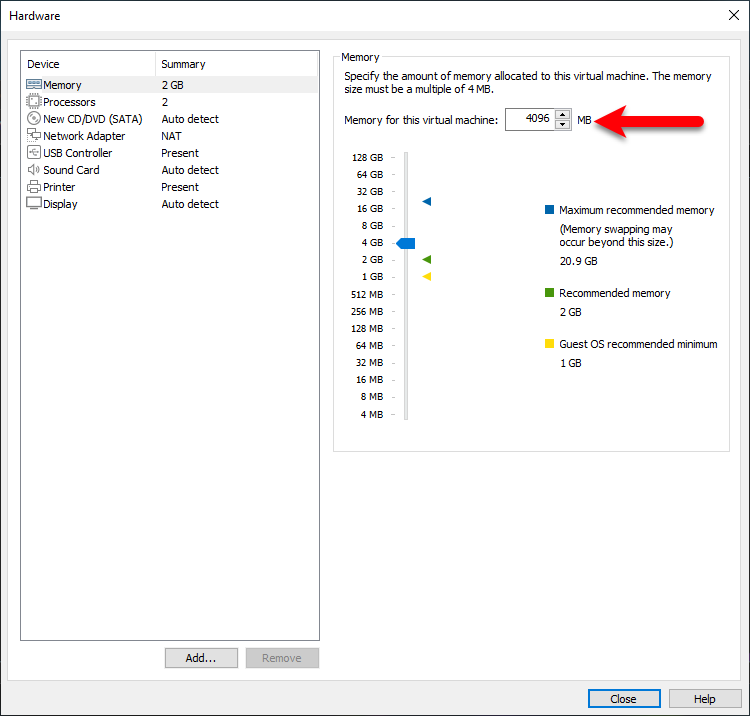
Once the settings window pops up select the Memory tab and increases the memory size.
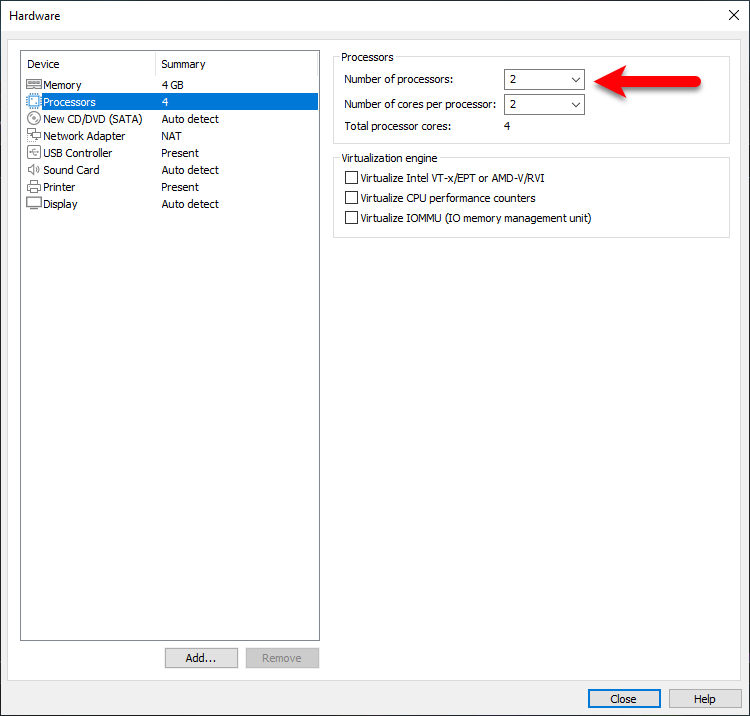
Select the Processor tab, and increase the number of processors.
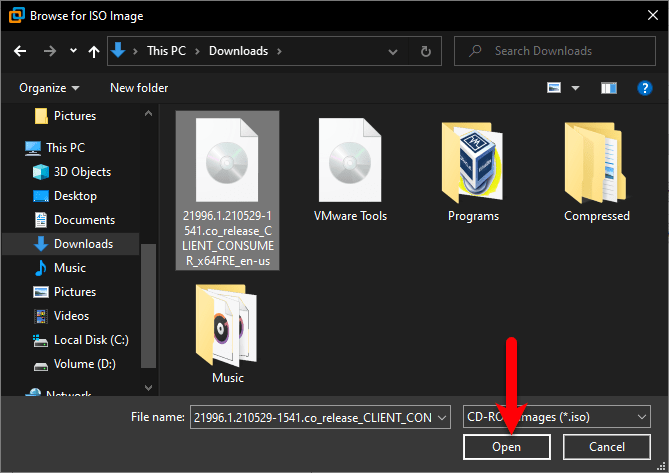
Select the “New CD/DVD (SATA)” tab, then select “Use ISO Image file” and click on Browse.
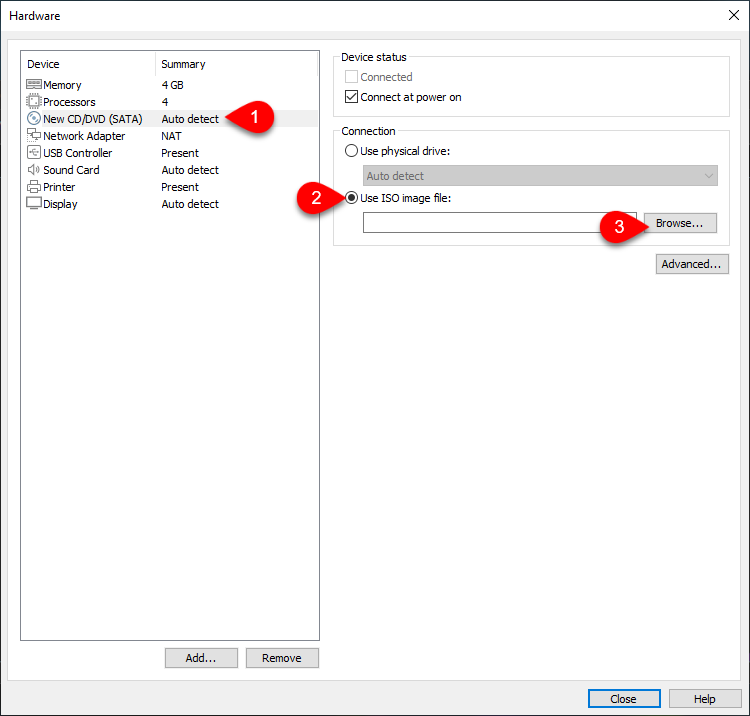
Select Windows 11 ISO image file and click Open.
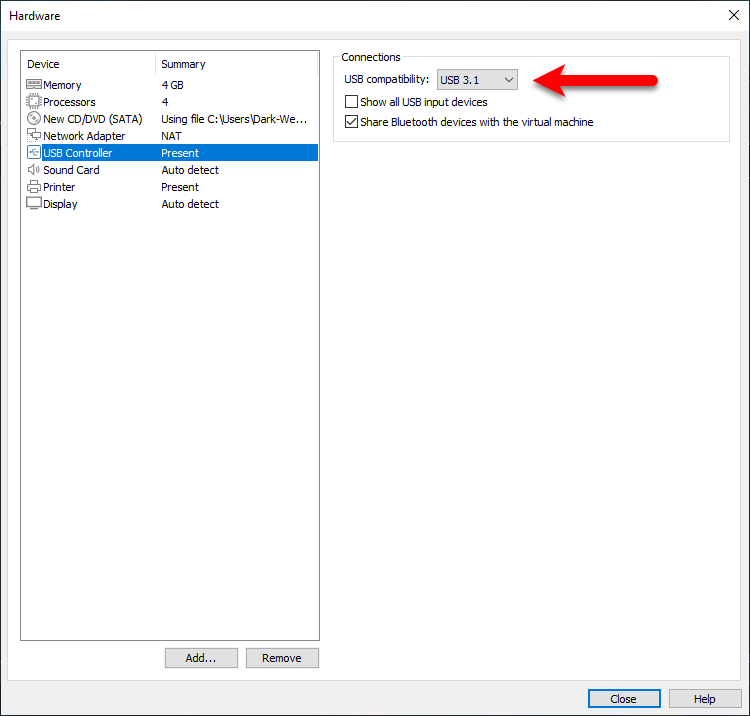
Choose the “USB Controller” tab, on the USB Compatibility select “USB 3.1” and click close.
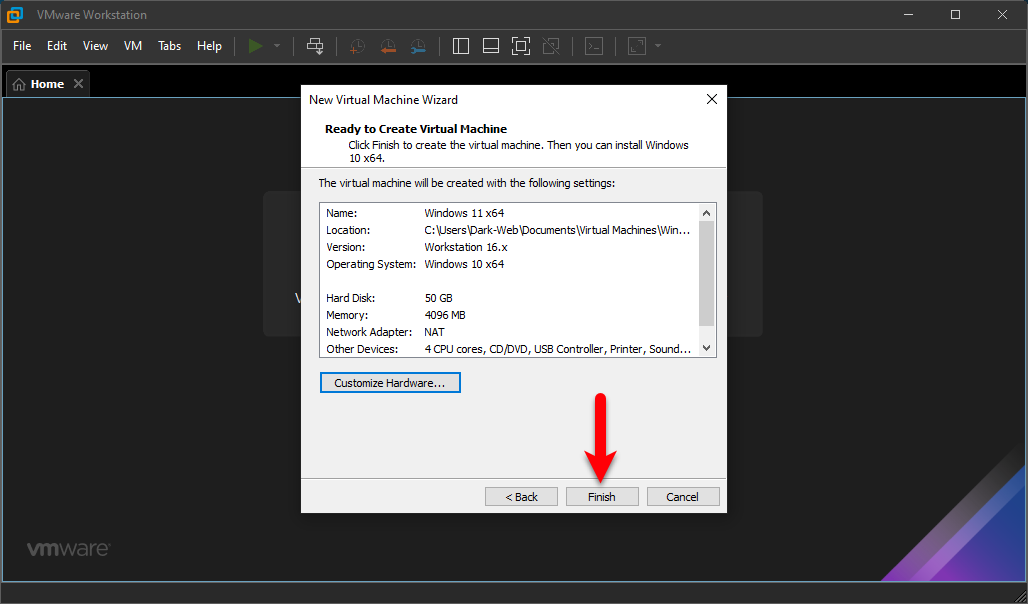
Now to make changes to the settings of the Windows 11 virtual machine simply click Finish to create a new virtual machine.
Step 3. Perform a Clean Installation of Windows 11
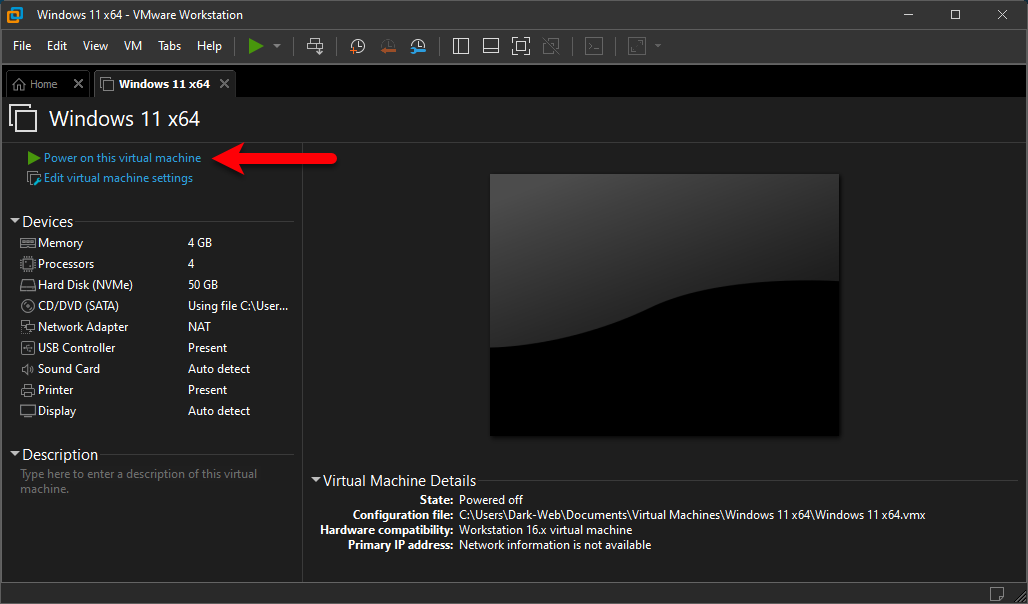
When everything is successfully created simply click on Powe on this virtual machine to start the installation.
- When Windows 11 launches the installation at the first screen press any key to boot into Windows 11 installation window.
- At the first screen select your language, time and date, country and click next.
- On the next screen click Install.
- Click on I don’t have the product key.
- Choose your Windows 11 Version and click next.
- Agree with the terms and conditions of Windows 11 and click next.
- Choose the option (Custom: Install Only Windows (Advanced).
- Now you have to create a virtual machine disk for Windows 11. The disk which you have created during creating the virtual machine. Don’t worry you won’t lose any data from your disk, the disk is separately mounted for Windows 11 on VMware Workstation. For creating click on the New option, and enter the disk size, and click on Apply.
- To create the virtual machine disk click on OK.
- Now the disk is being created for the installation click next.
- And finally, it starts installing Windows 11 on a VMware machine, wait until the installation should be completed. While the installation is completed automatically the virtual machine will restart.
- After restarting wait to prepare Windows 11 for the first use.
[metaslider id=5663]
- After that, the Windows 11 completed you have to complete the basic settings for the first use. On the welcome screen choose your language and click next.
- Choose your location and click next.
- If you want to add a keyboard layout simply click on “Add Layout”, if you want to go by default then click Skip.
- Wait until it should check for the update.
- Select the option “Set up for personal use” and click next.
- Enter your Microsoft account, if you don’t have any then click on create option. Once you entered the Microsoft account click next.
- Now create a PIN
- Enter your password and click OK.
- On the privacy setting click next.
- Accept the terms and Privacy of Windows and click Accept.
- On the screen of “Let’s customize your Experience” simply click Skip.
- Select the option “Only Store Files on this device” and click next.
- And wait for few moments until it should set up the settings.
- And at last Windows 11 is being installed on VMware Workstation on Windows PC.
[metaslider id=5729]
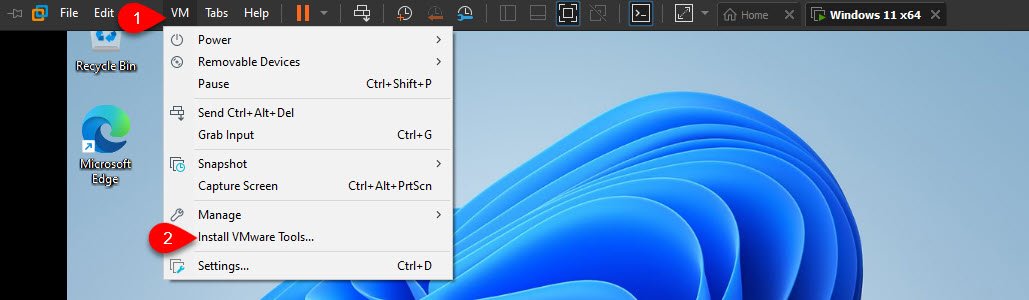
Step 3. Enter Windows 11 Full-screen Mode on VMware
This step is last but not list, however, once you have installed Windows 11 on VMware Workstation. You need to enter full-screen mode on VMware. To enter the full-screen mode you need to install a small tool called VMware tools. VMware tools allow you to enable all the features of Windows 11 or any other operating system on VMware Workstation.
On the top bar click on the VM option, and click Install VMware Tools.
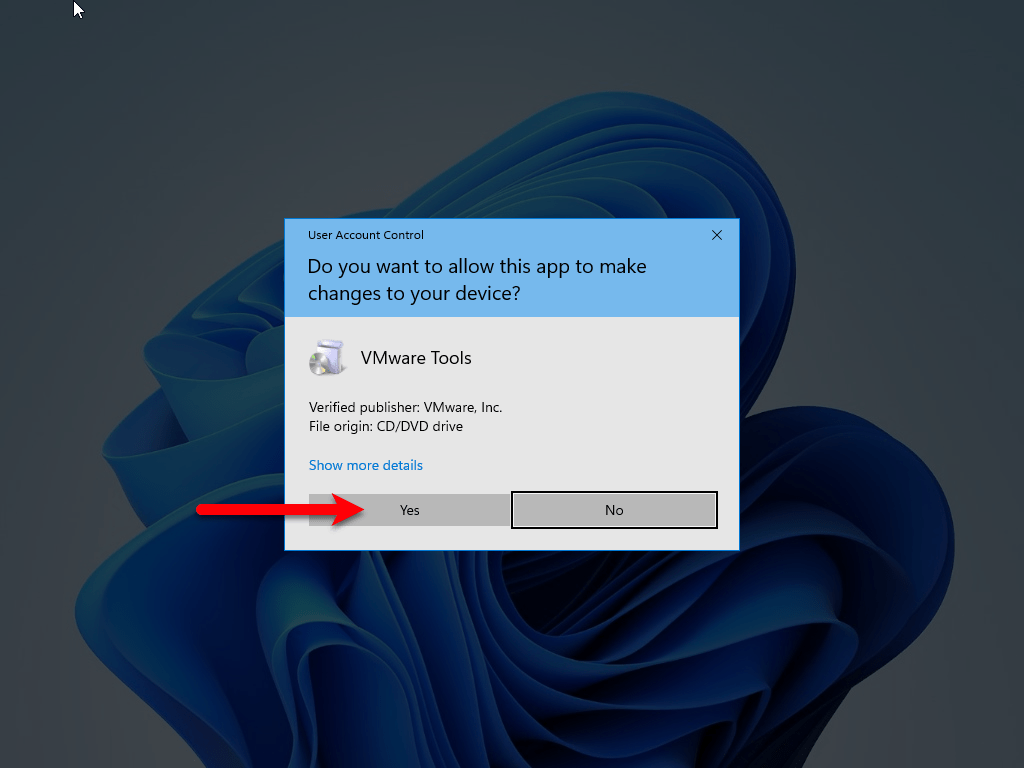
Wait for few seconds until the VMware Tools setup should appear on the screen. Click on Run setup to open the installation wizard.

Click on Yes to launch the installation.
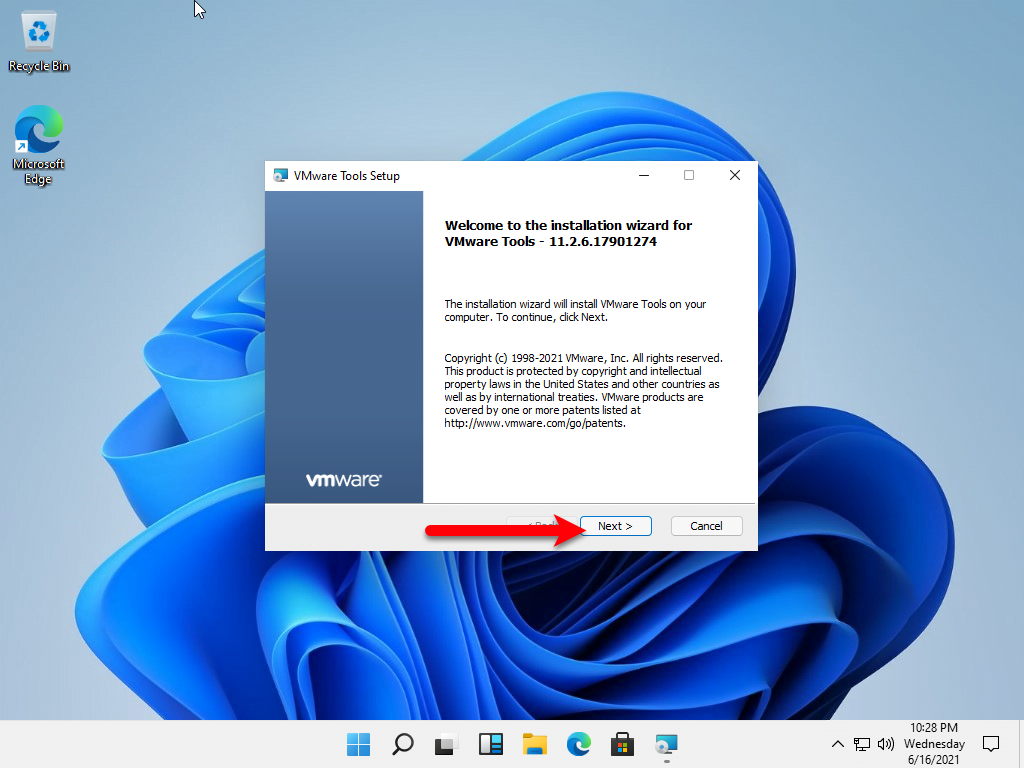
When the installation wizard opened click next.
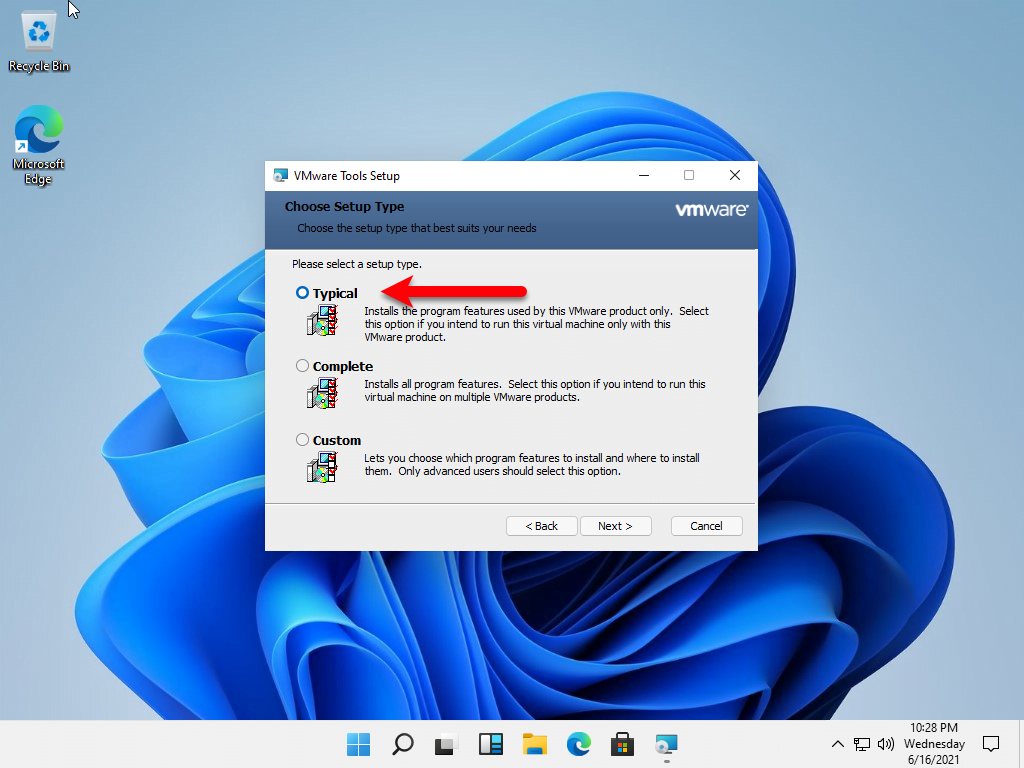
Select Typically and click next.
Now VMware Tools is ready to install click on Install.
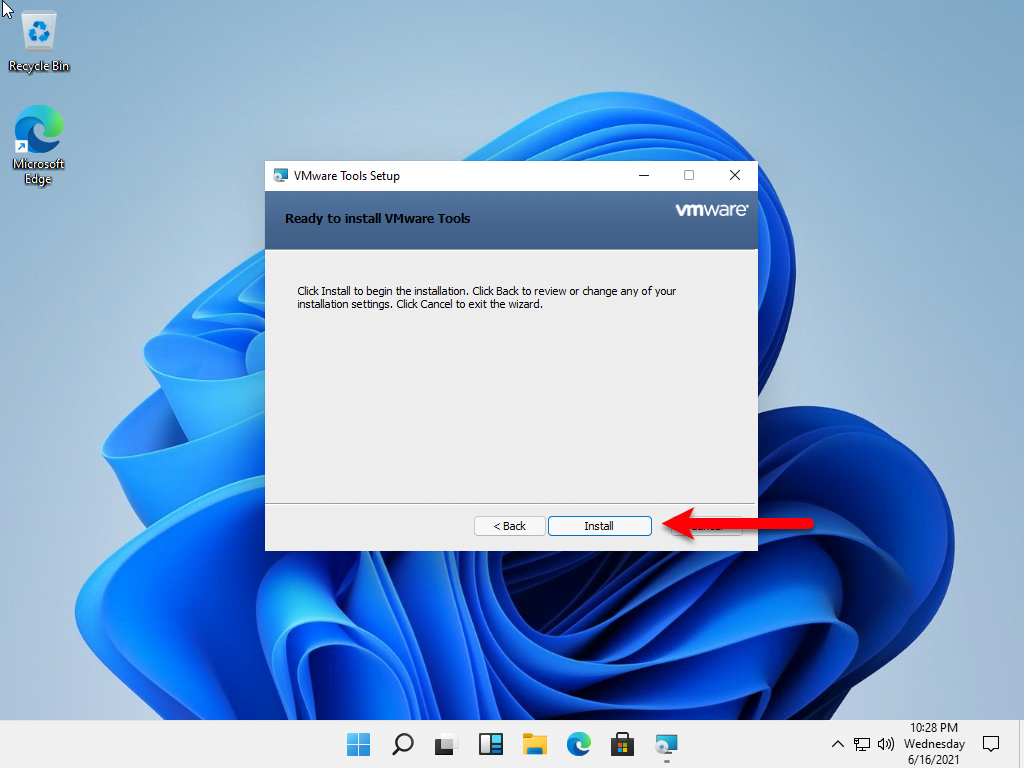
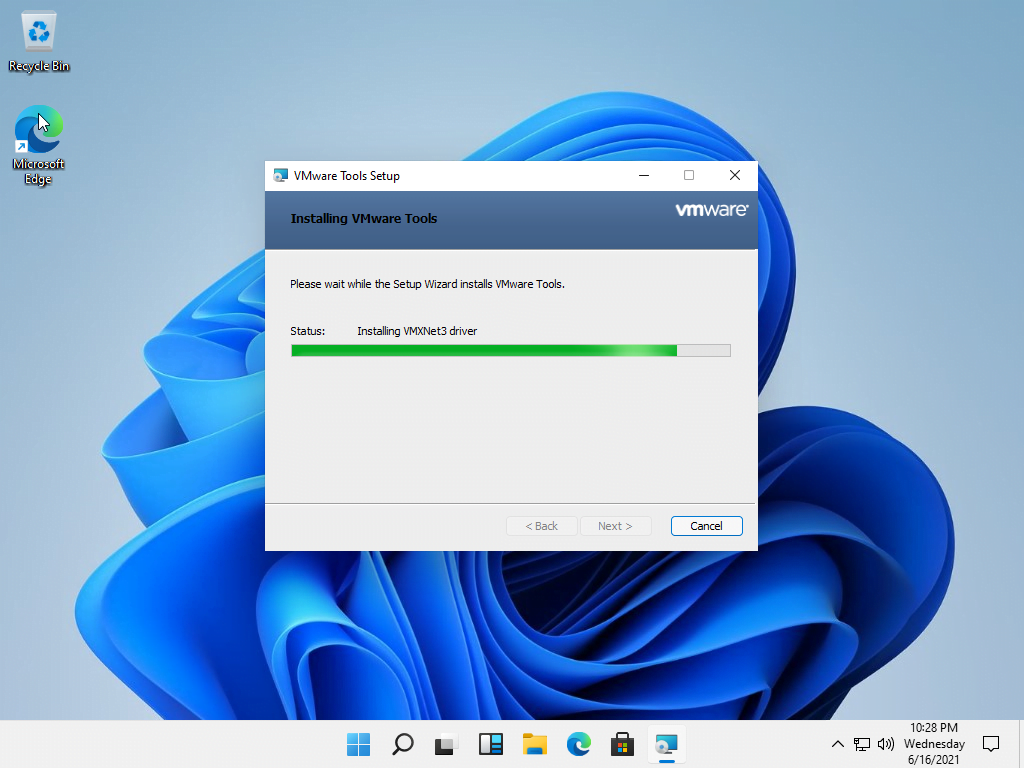
Wait for the installation until it should be completed.
Once the installation successfully completed click on Finish.
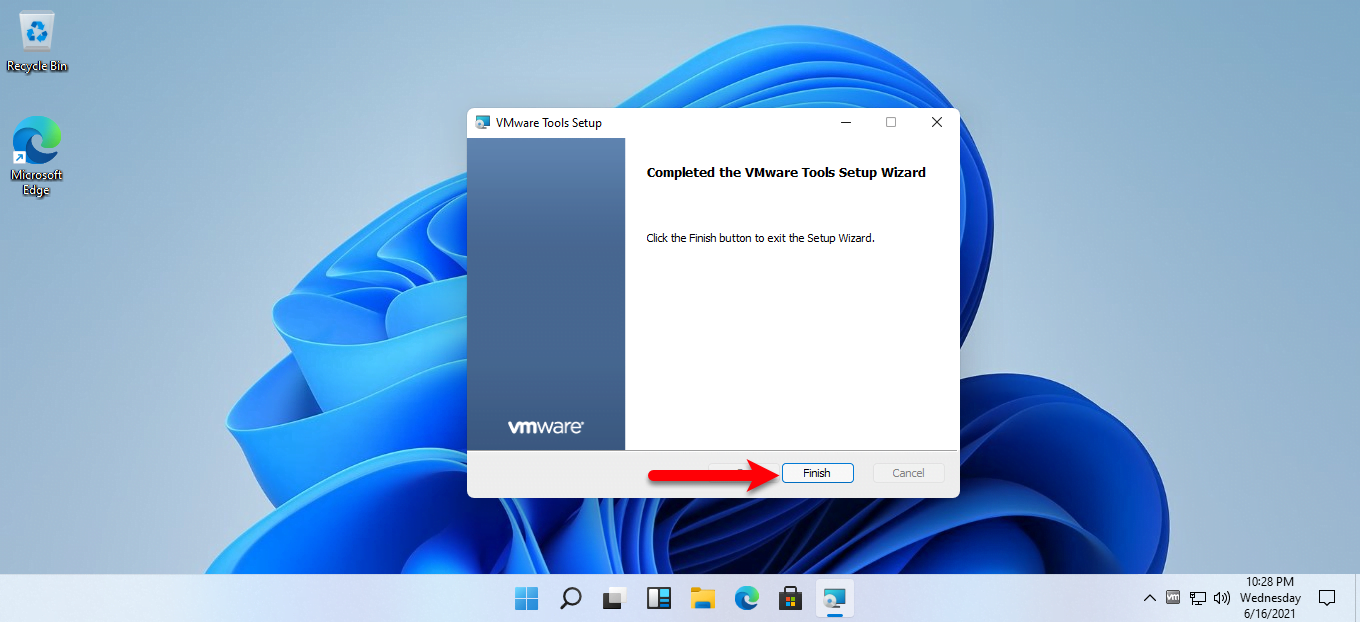
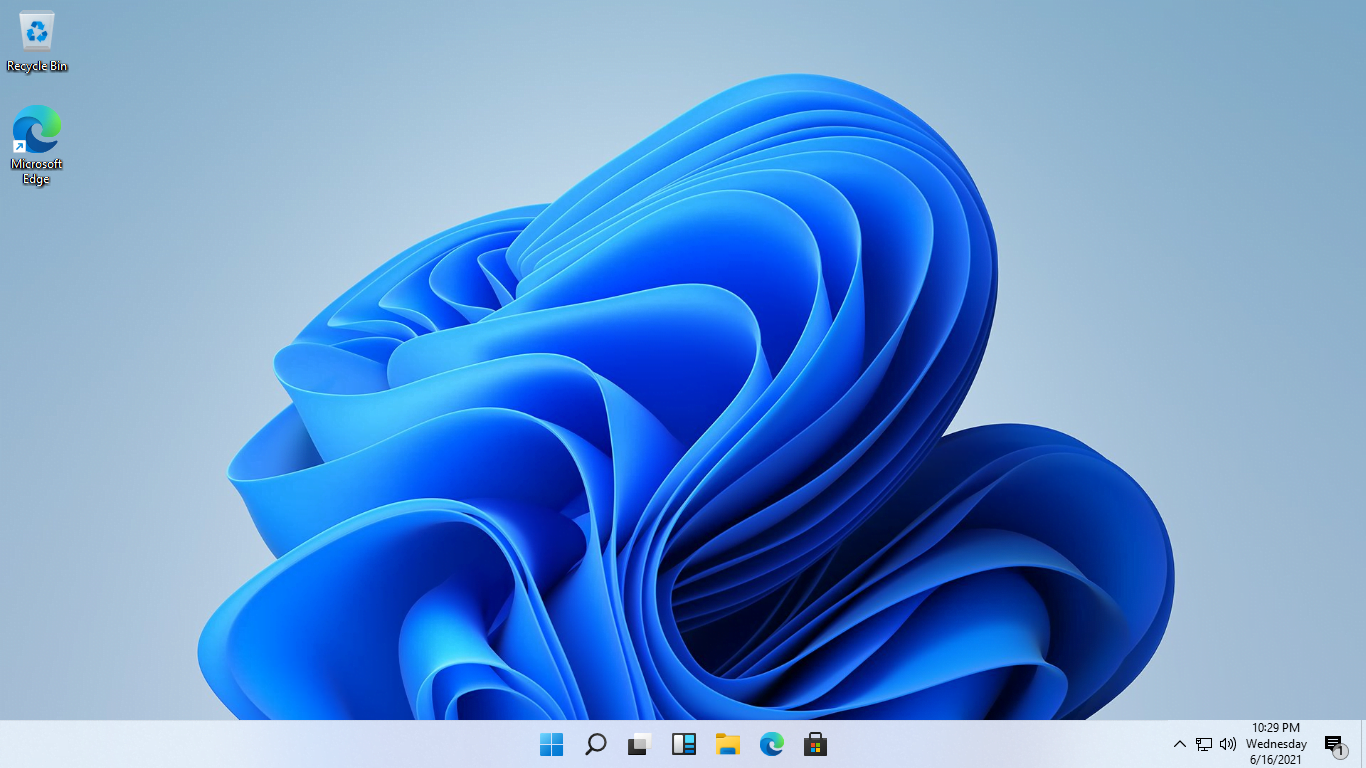
After clicking finish the system will require you to restart Windows 11. Again coming to Windows 11 you will see the full-screen mode.
If you faced any kind of problem feels free to share with us via the comment box section.
Hello Admin,
Great guide.
I followed all the steps and it worked fine 🙂
Thanks