macOS Big Sur 11 with a new interface look is pretty beautiful and more attractive. Even macOS Big Sur is being inspired by iOS 14, iPadOS 14. How it can happen, most of the iOS and iPadOS Applications are being added to macOS Big Sur. Although, the interface look of iOS 14 is added to macOS Big Sur.
With those great stuffs of macOS Big Sur, Apple Inc nominated macOS Big Sur operating system one of the biggest releases of Apple in 2020. Mostly, Apple added new functionality to macOS Big Sur settings, such as new Control Center, Notifications, Maps, and Curved round edges for every portion of macOS Big Sur look.
Currently, I am running macOS Big Sur Beta 3 version on my primary Mac. Or simply, you can create a separate volume alongside your macOS Mojave, macOS Catalina on a single SSD or HDD drives. Adding volume for multiple operating systems, has been added since the release of macOS High Sierra. Adding separate volume and run two or more than two operating systems on a single drive, without partitioning, sizing, etc.
Apple nominated the partition for the separate Volume “APFS”. By creating a separate APFS container volume on the running macOS disk, you can install the macOS Big Sur Beta version. And there won’t be any risk of losing your important data from your actual macOS install drive. While installing macOS Big Sur on separate APFS volume it means you will Dual Boot two operating systems. After installation easily you switch between two operating systems.
You can run two Mac products or two macOS operating systems at the same time on a Mac PC. Still, macOS Big Sur Beta is in Beta mode it means it unstable with your Mac and MacBook computer. That is the main reason that Apple releasing the Beta version that it may include Bugs issues to be fixed by Developers.
But still you can run macOS Big Sur alongside of macOS Catalina 10.15 on single drive. Wait for the final version of macOS Big Sur until it should release. Once the final version out you can delete macOS Catalina and update the macOS Big Sur to the final version.
Before following the guide to install macOS Big Sur on Separate APFS Volume, you need to completely back up your data. You can use a time machine for taking backup of your important data. Or there is third-party software that allows you to take backup.
Related:
- How to Install macOS Big Sur on Laptop – Complete Guide
- How to Clean Install macOS Big Sur on PC-Hackintosh?
Install macOS Big Sur on Separate APFS Volume
Whether you are using macOS High Sierra, macOS Mojave, or macOS Catalina on your Mac. But for installing macOS Big Sur as a dual boot on a separate APFS volume. You need to create an APFS Volume using the Startup disk.
Step 1. First of all, to begin the process you need to download the macOS Big Sur installer file. And now macOS Big Sur Beta 3 version available. You can download it from “System Preferences” and “Software”. When the downloading completed the installation will start, so close the installation window.
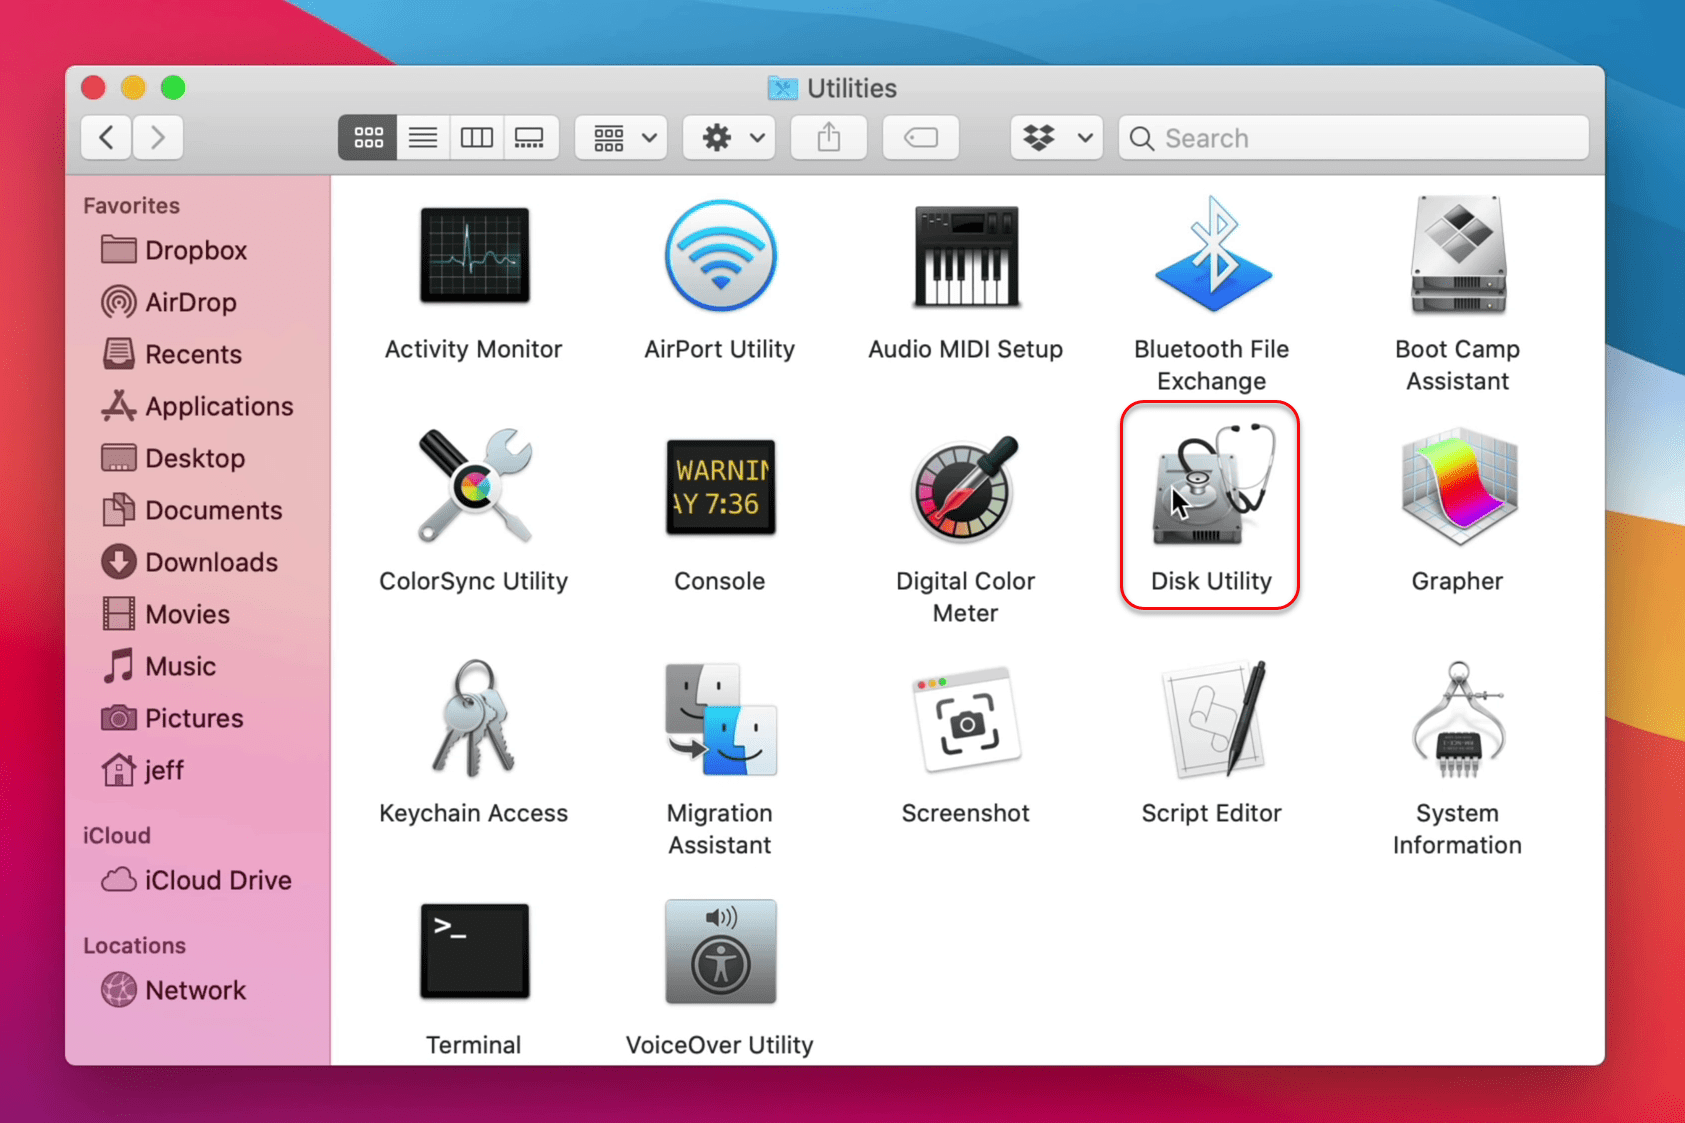
Step 2. To create an APFS Volume open up the “Disk Utility” from the search spotlight. Or the second method opens the “Applications>Utilites” folder, then double-click on “Disk Utility” to open.
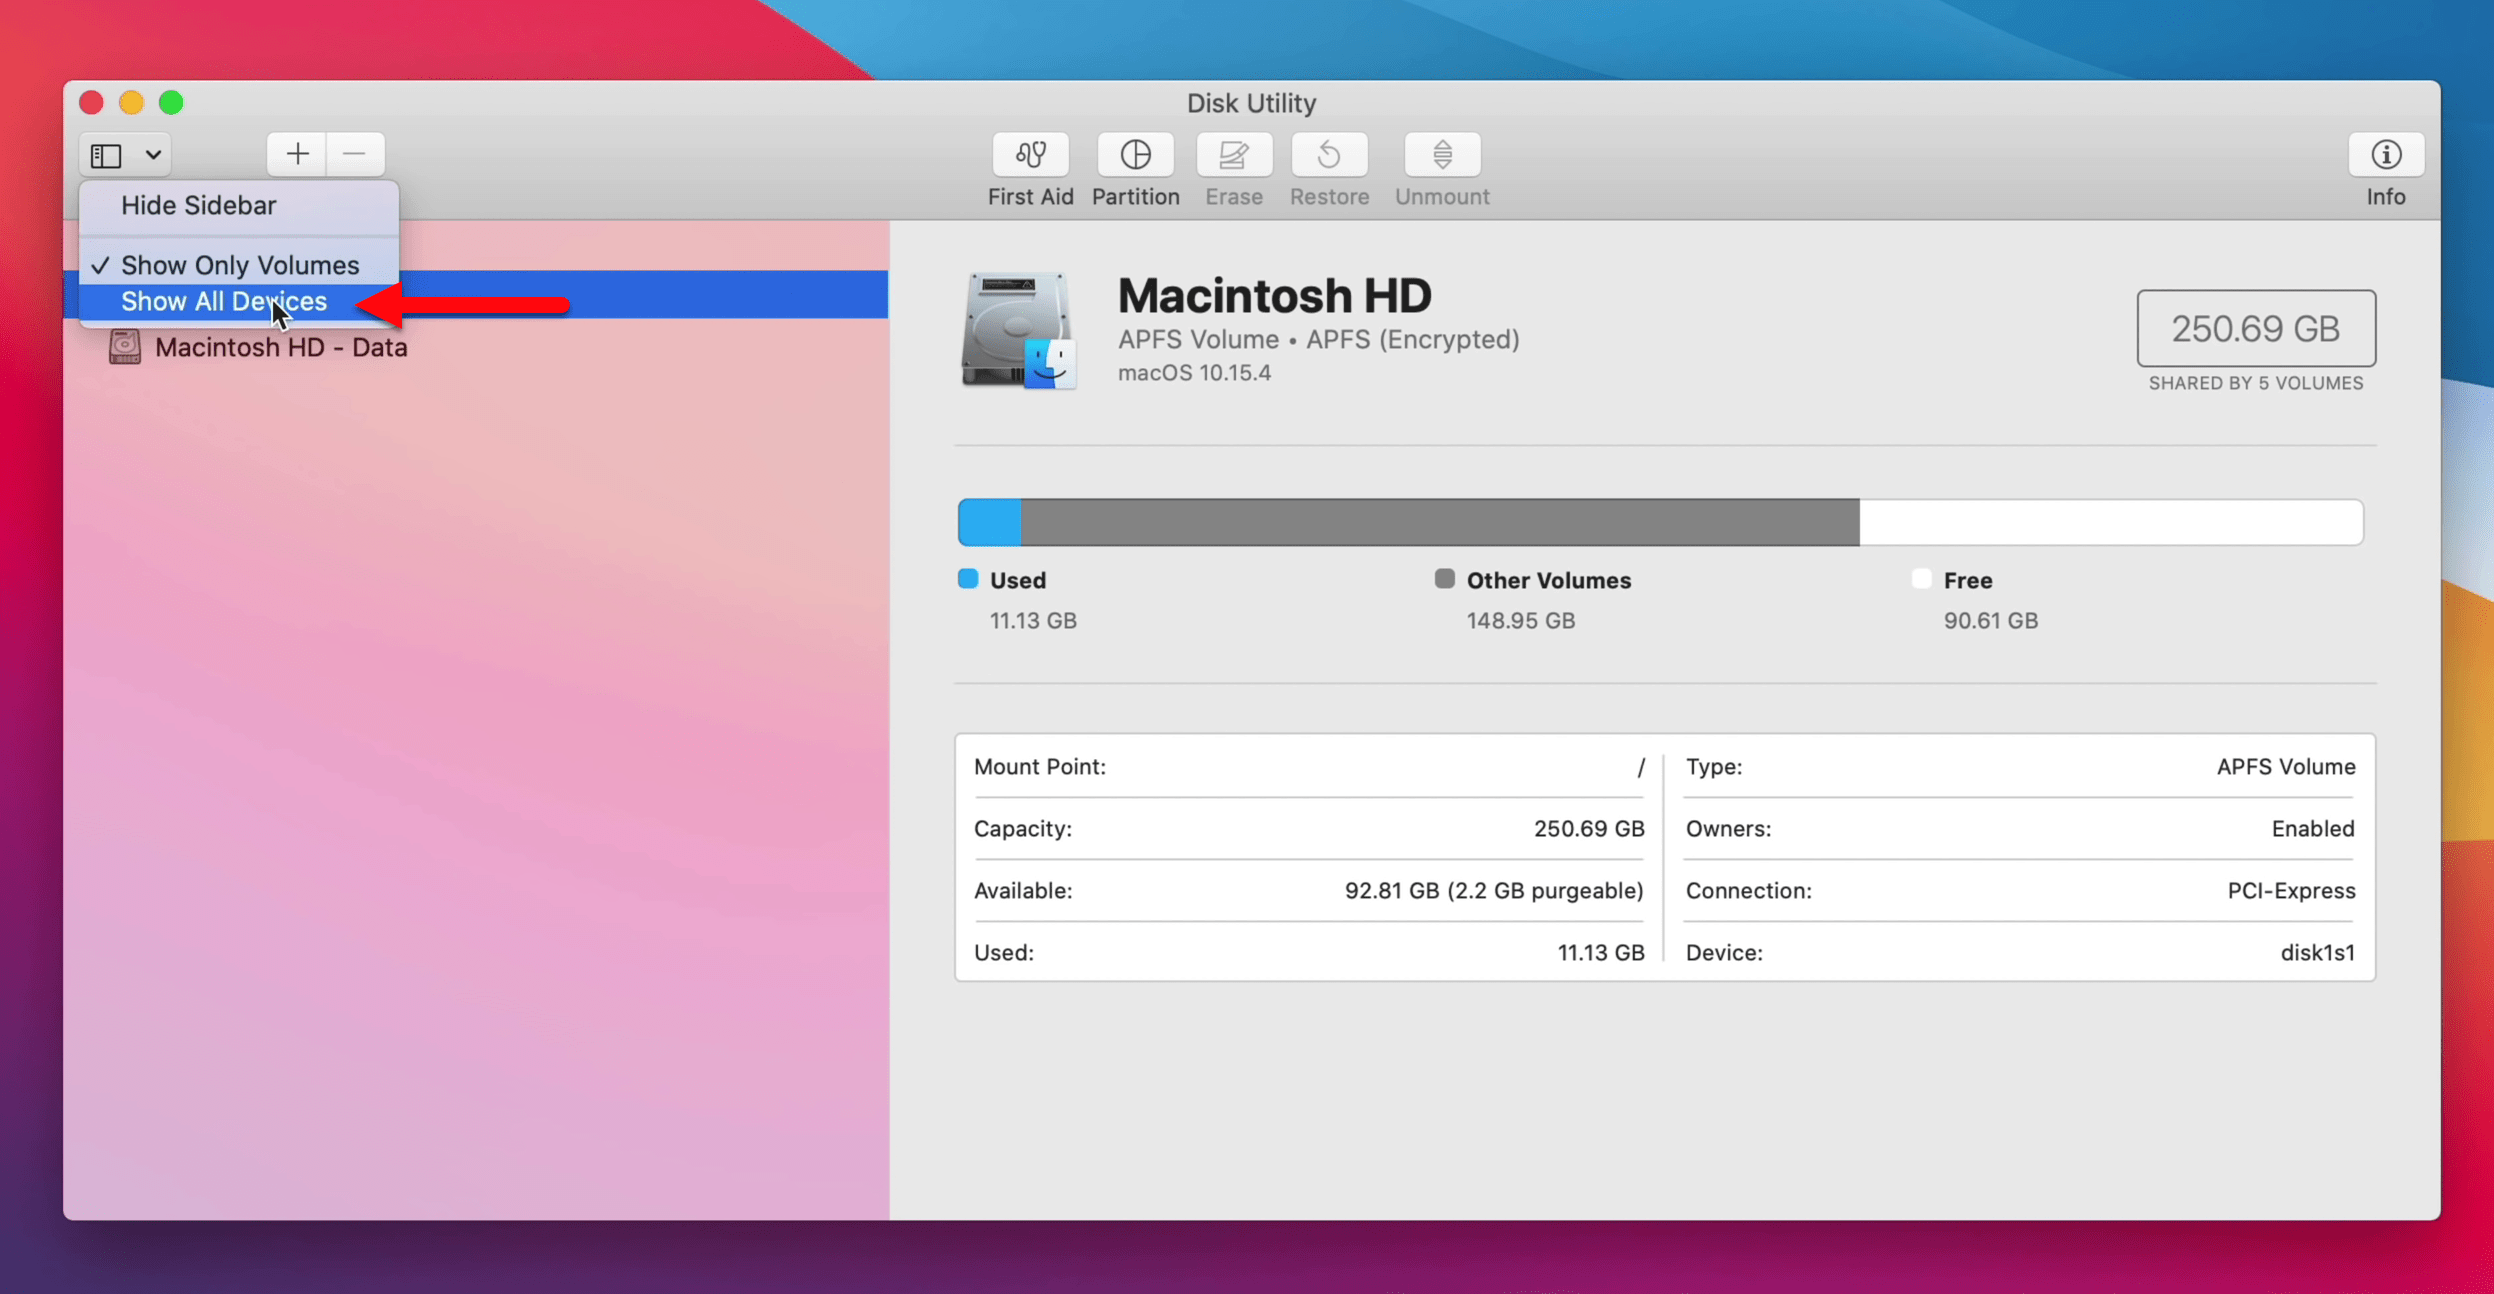
Step 3. If the current volume is hidden or highlighted in the utility window click on “View” and select “Show All Devices” to show more details about the disk.
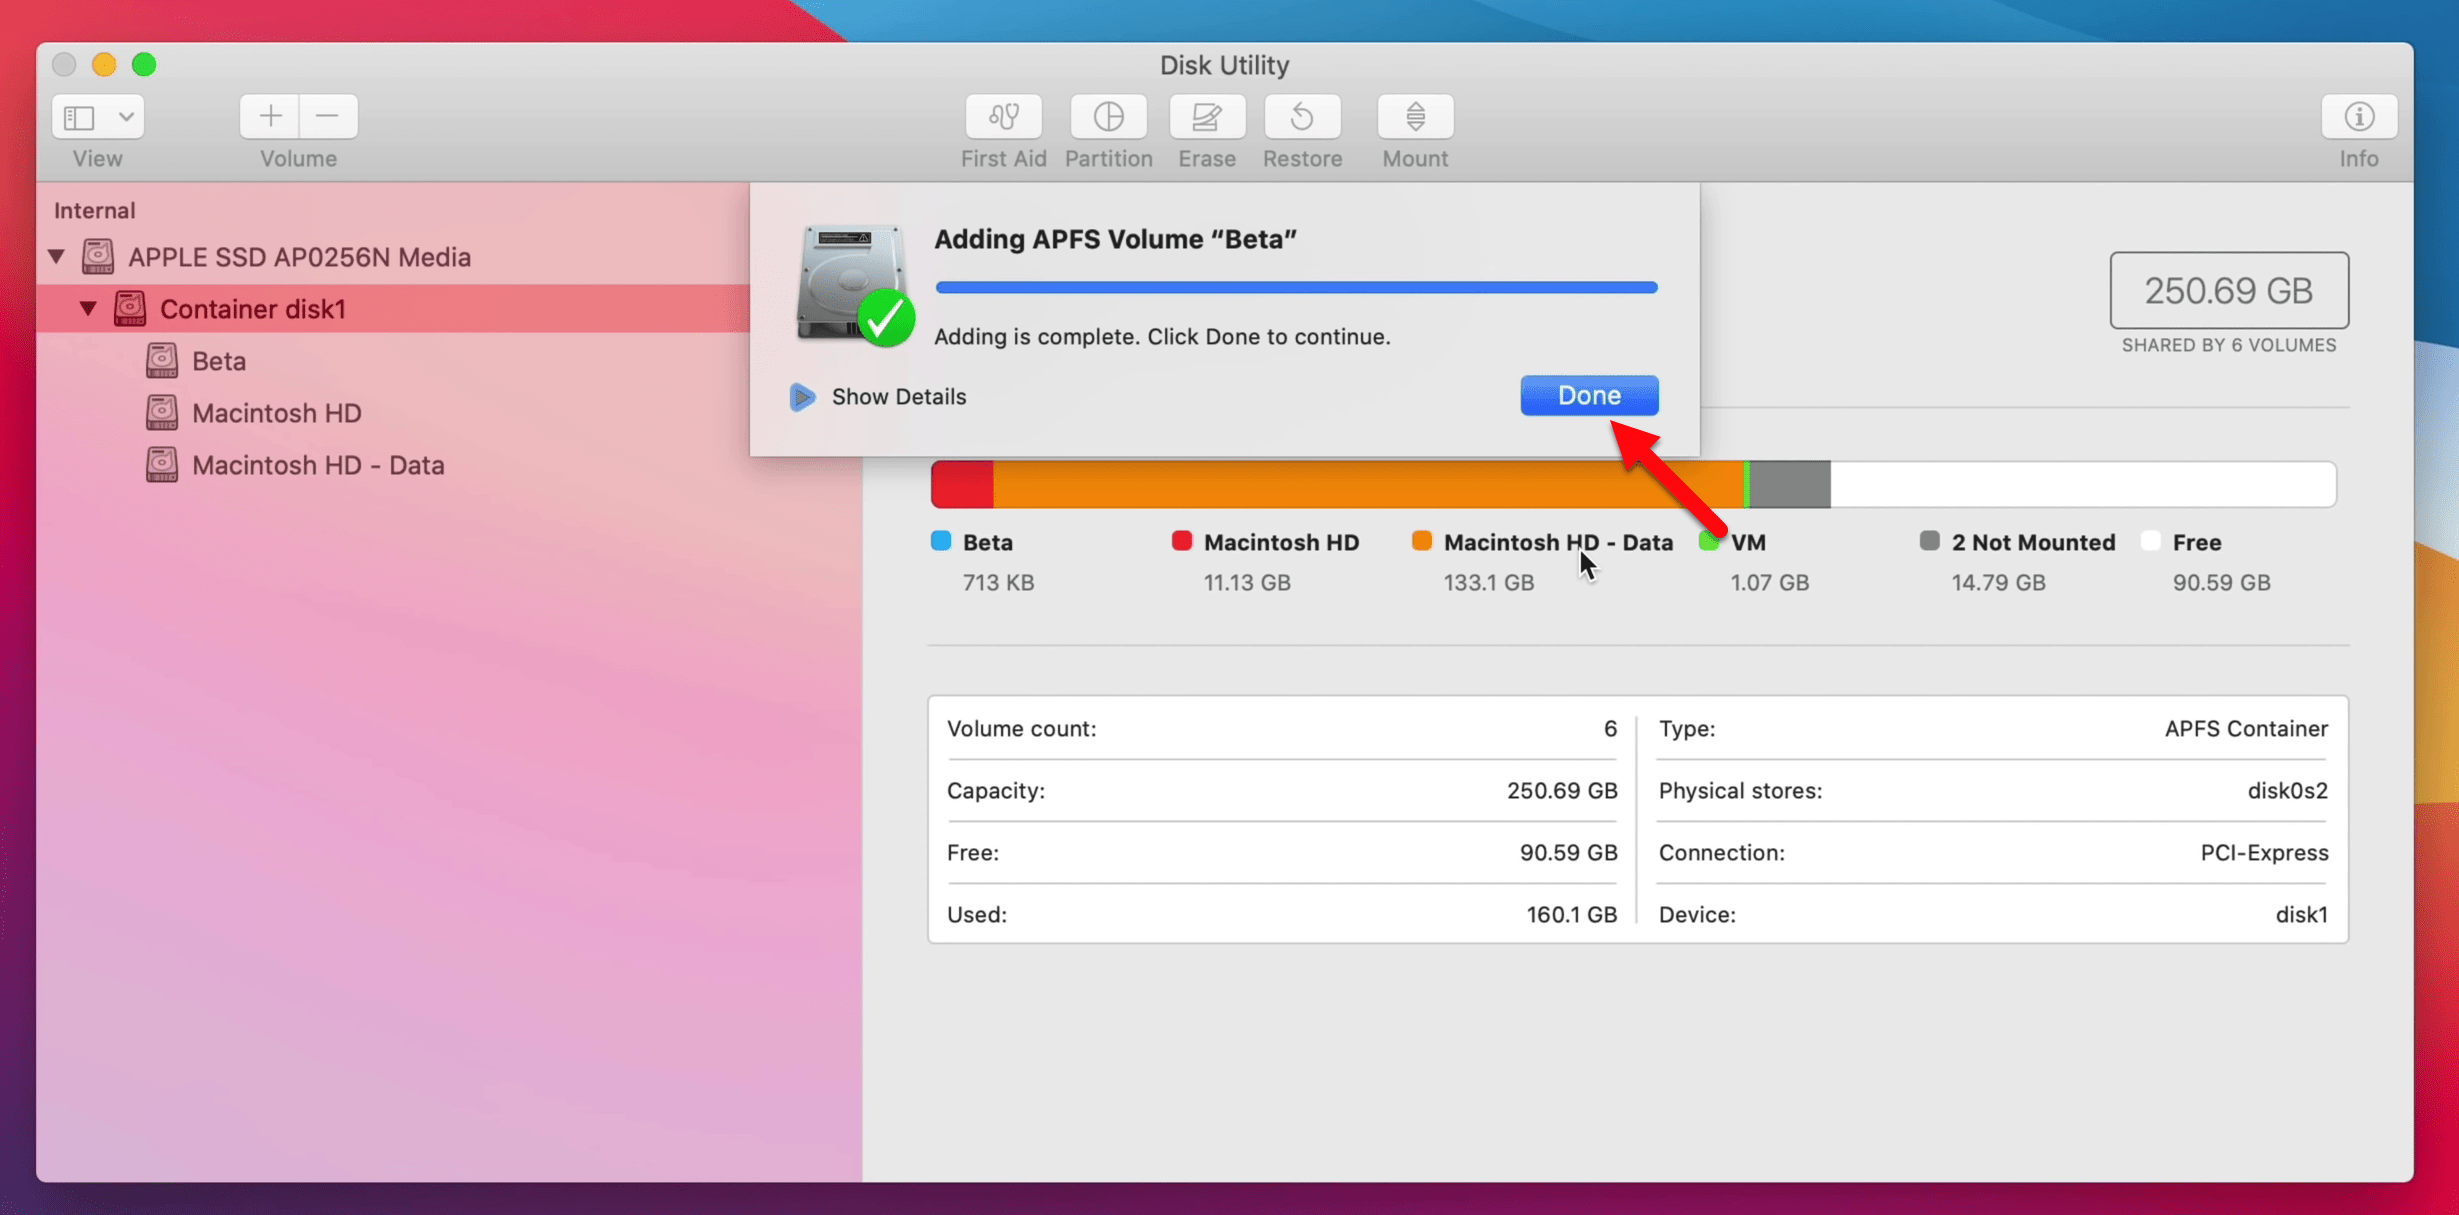
Step 4. So you can see how internal Apple SSD is organized, I have an APFS Container, and that container house multiple APFS Volumes. So, click select the container disk1 and click on (+) sign above the volume for adding another APFS Volume. When another window pop up add the APFS volume according to below down settings.
- Name: macOS Big Sur Beta
- Format: APFS
- For the size of the disk, click on “Size Options” and click on Add option to create APFS Volume.

Step 5. When the APFS volume created click done, and close the disk utility.
Start Installing macOS Big Sur on APFS Volume
Step 6. Now the APFS volume for dual-booting of macOS Big Sur with macOS Catalina is ready. So, head over to the launch pad and double-click on “Install macOS Beta” to launch the installation.

Step 7. To set up the installation of macOS Big Sur, click continue.

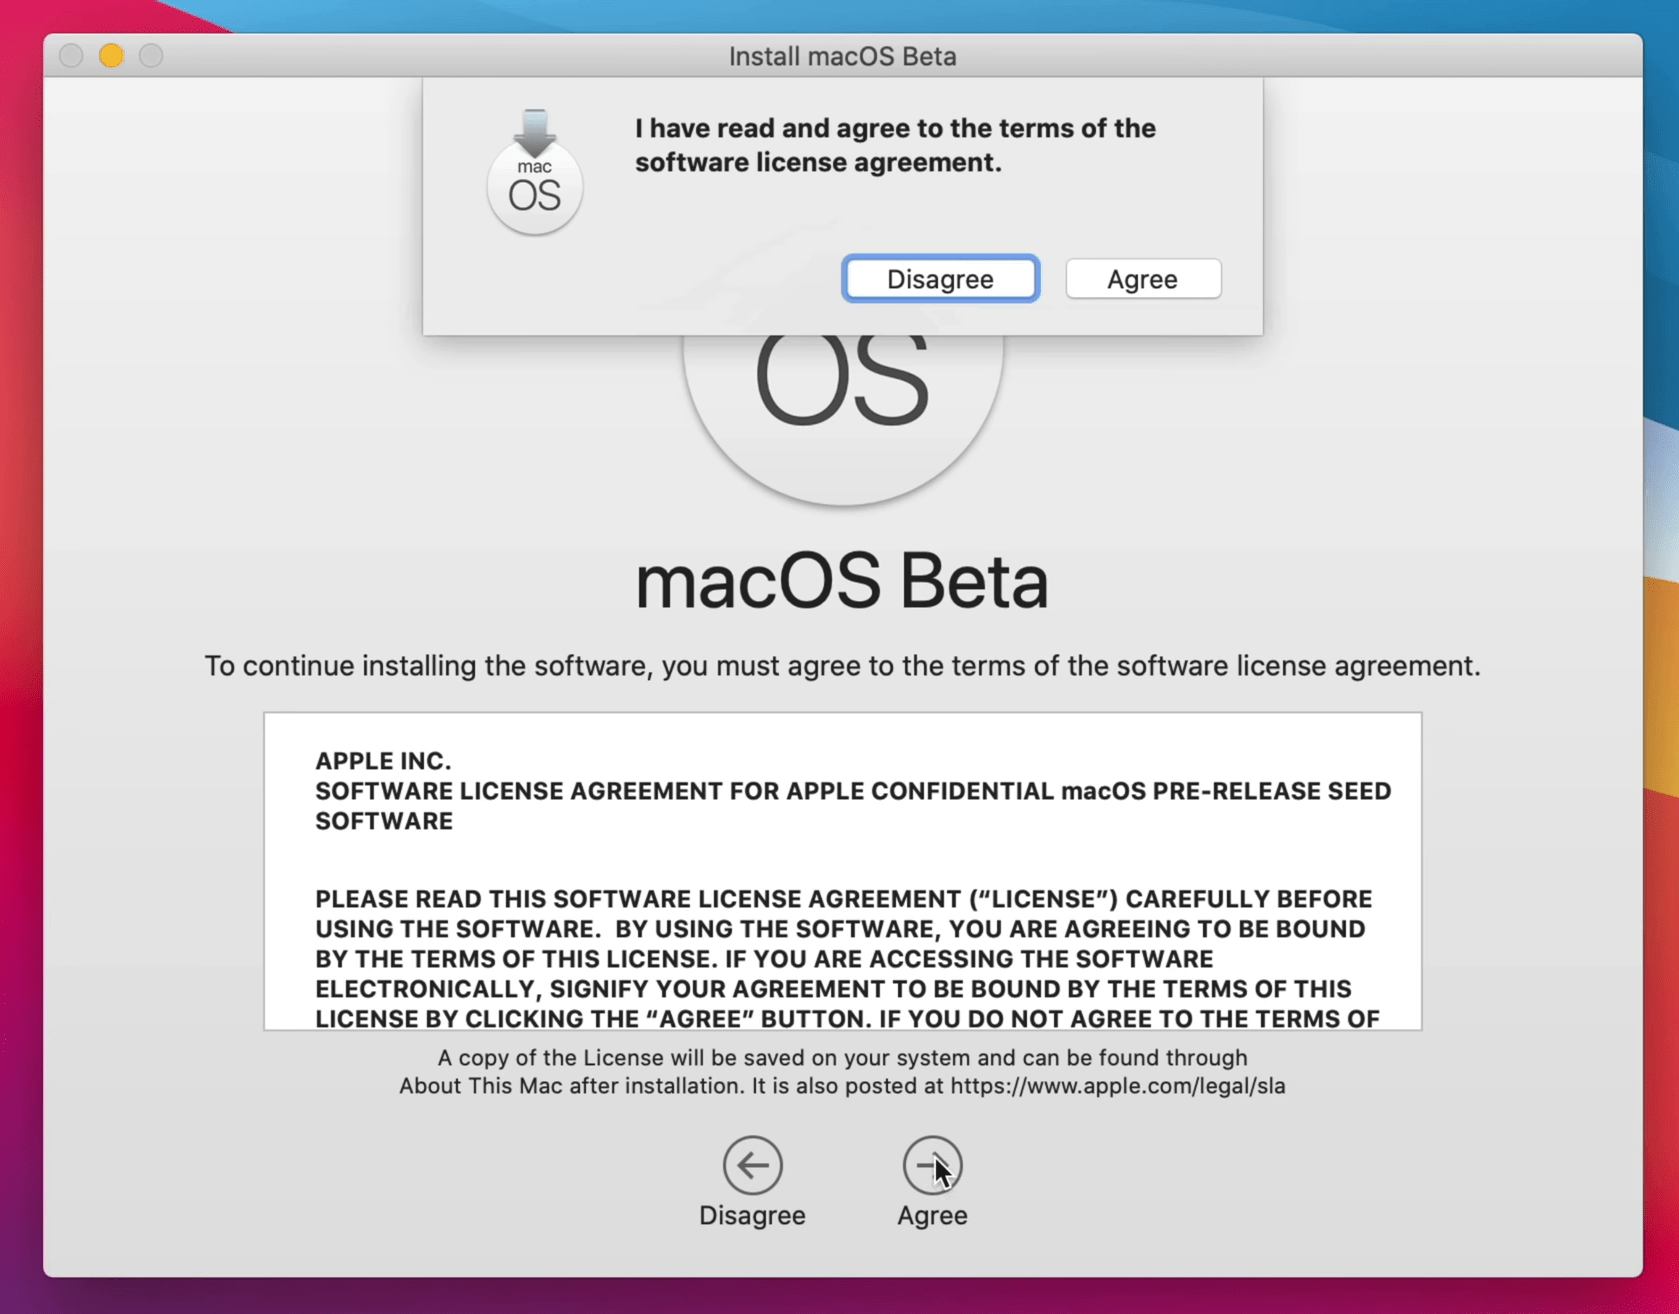
Step 8. Agree with the terms and conditions of macOS Big Sur.
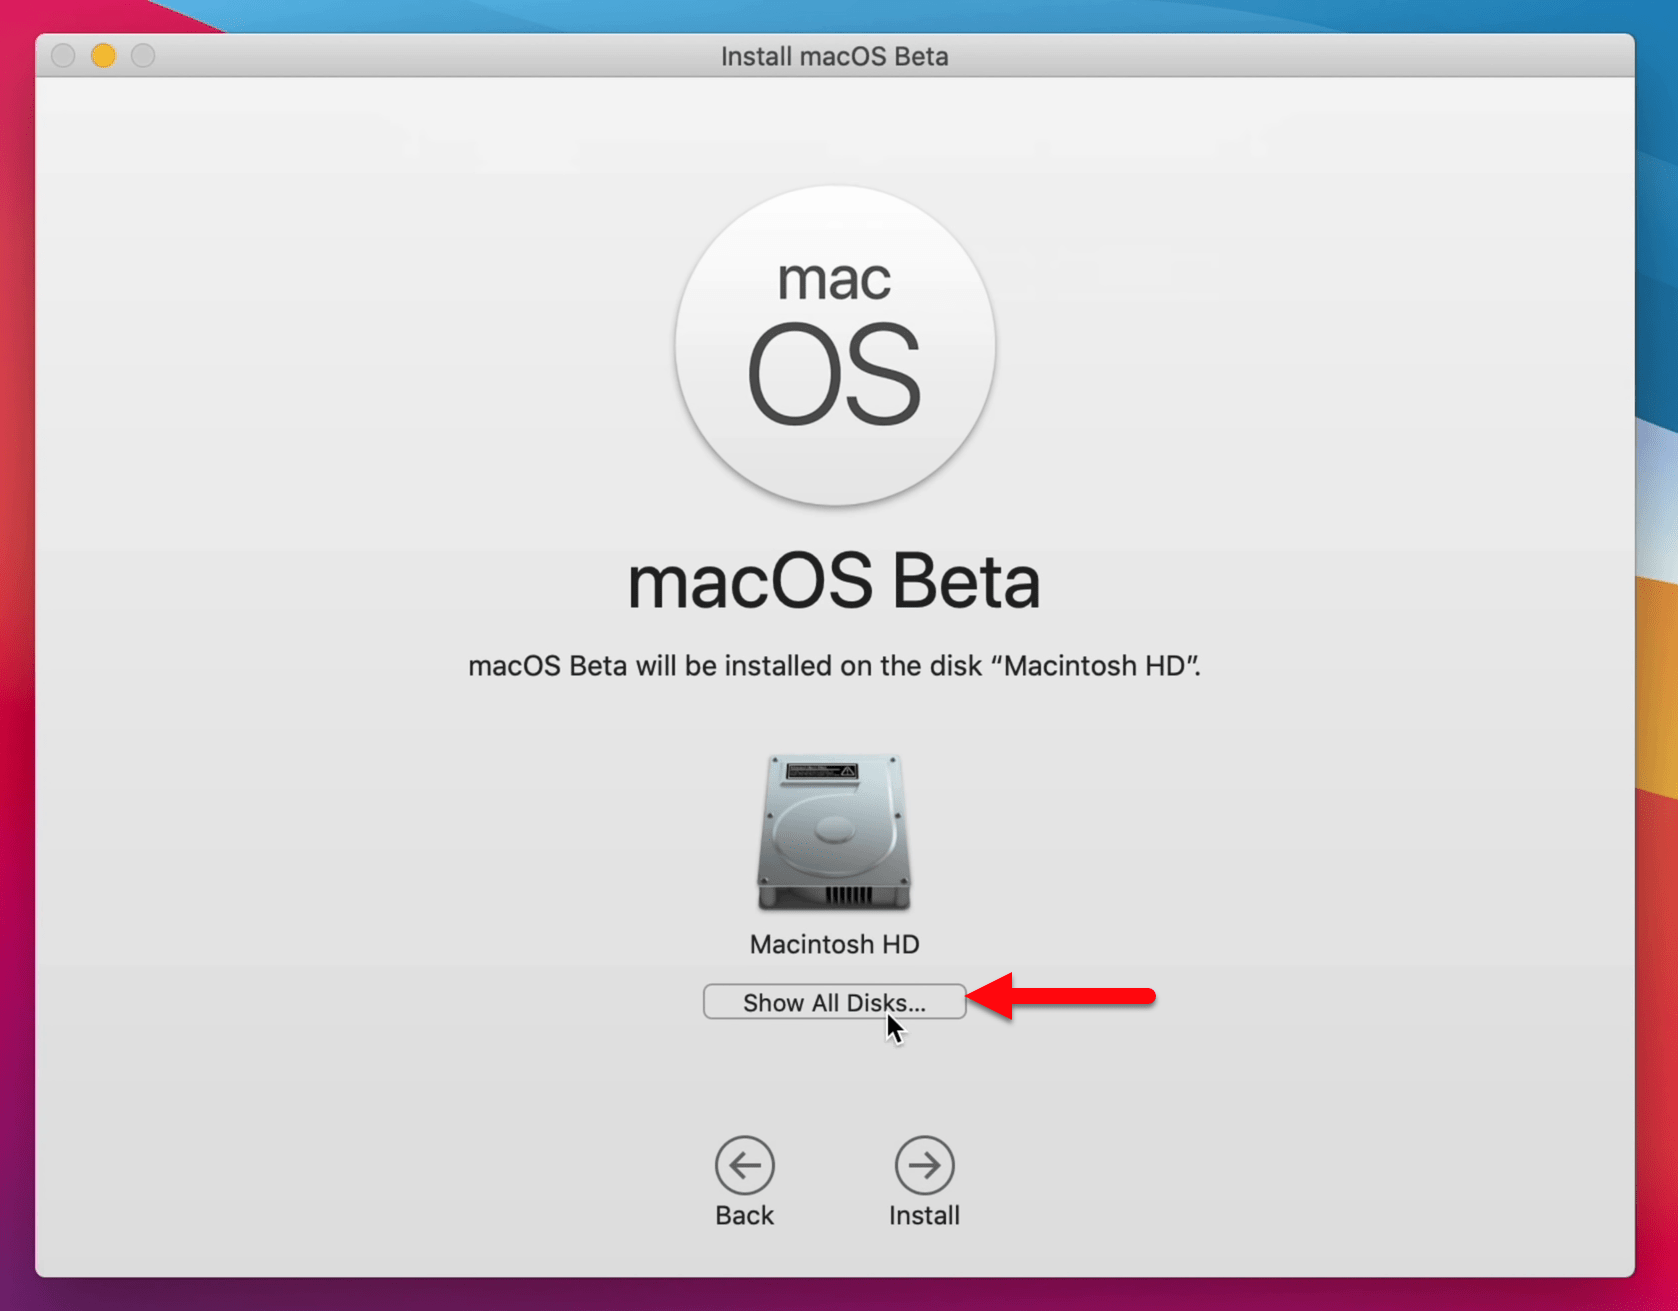
Step 9. Here the disk is hidden where to install macOS Big Sur, so to expose the hidden disk click on “Show All Disks”.
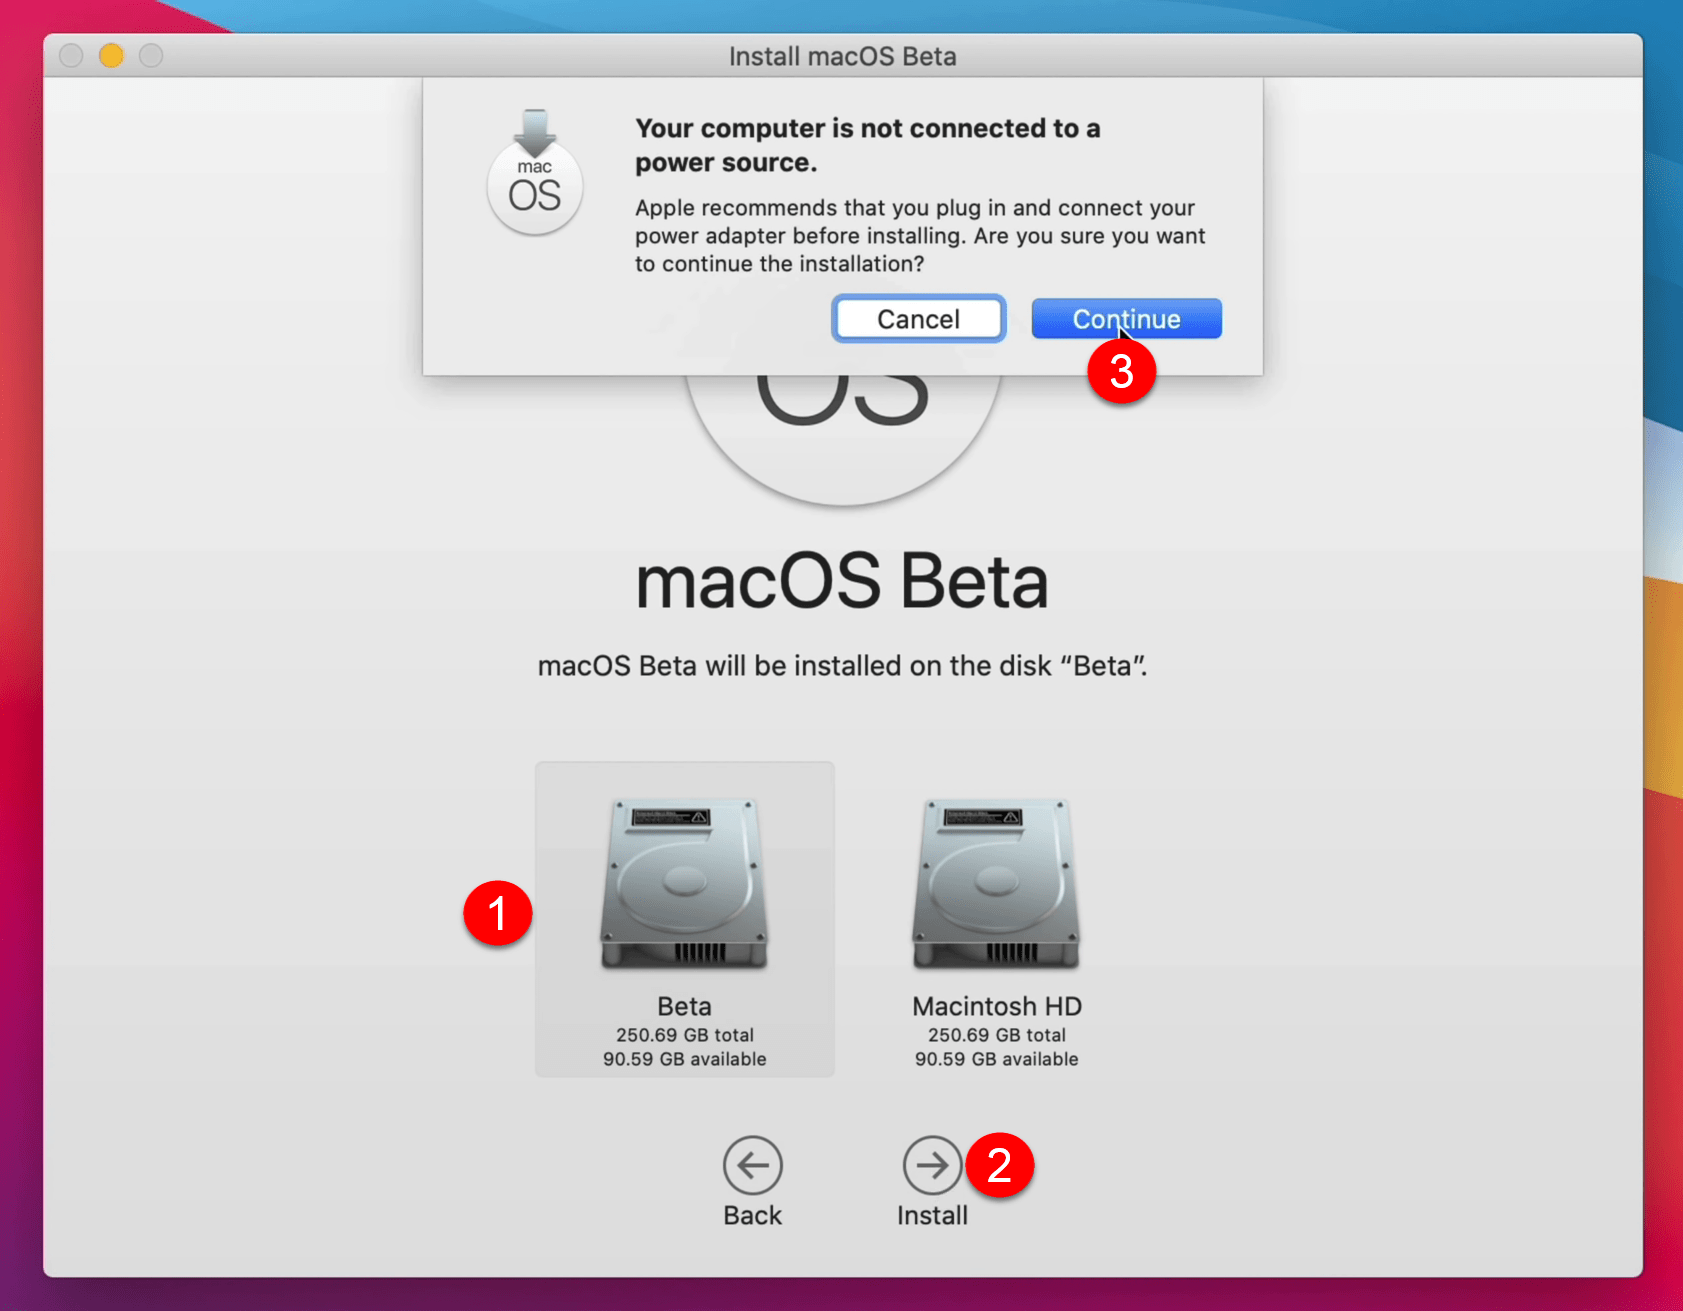
Step 10. Select the created APFS Volume of macOS Big Sur which you have created then click “Install”. And another notification will pop up “Your Computer is not connected to a source” simply click continue.
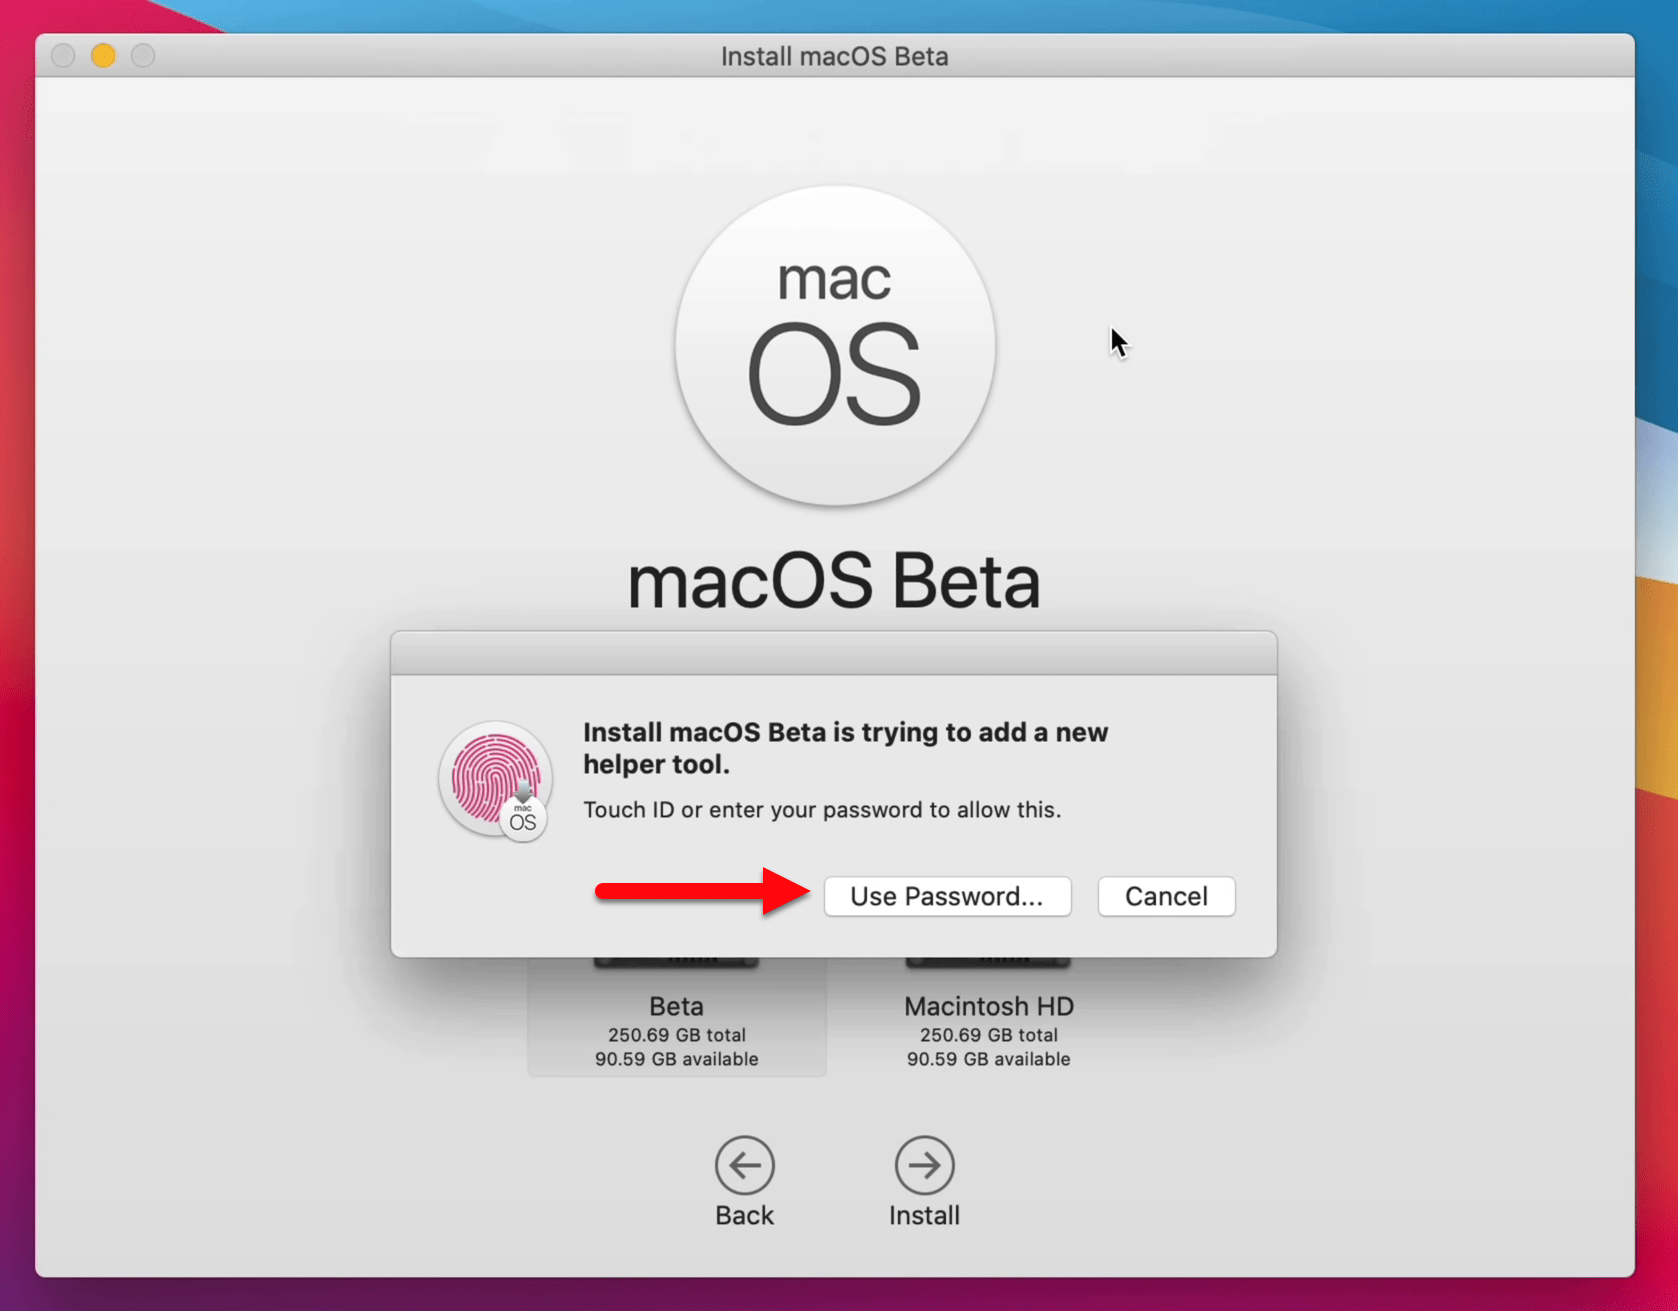
Step 11. Install macOS is trying to add a new helper tool, it means for its confirmation you need to enter your password.
Step 12. When the helper tool confirmed the macOS Big Sur starts the installation.
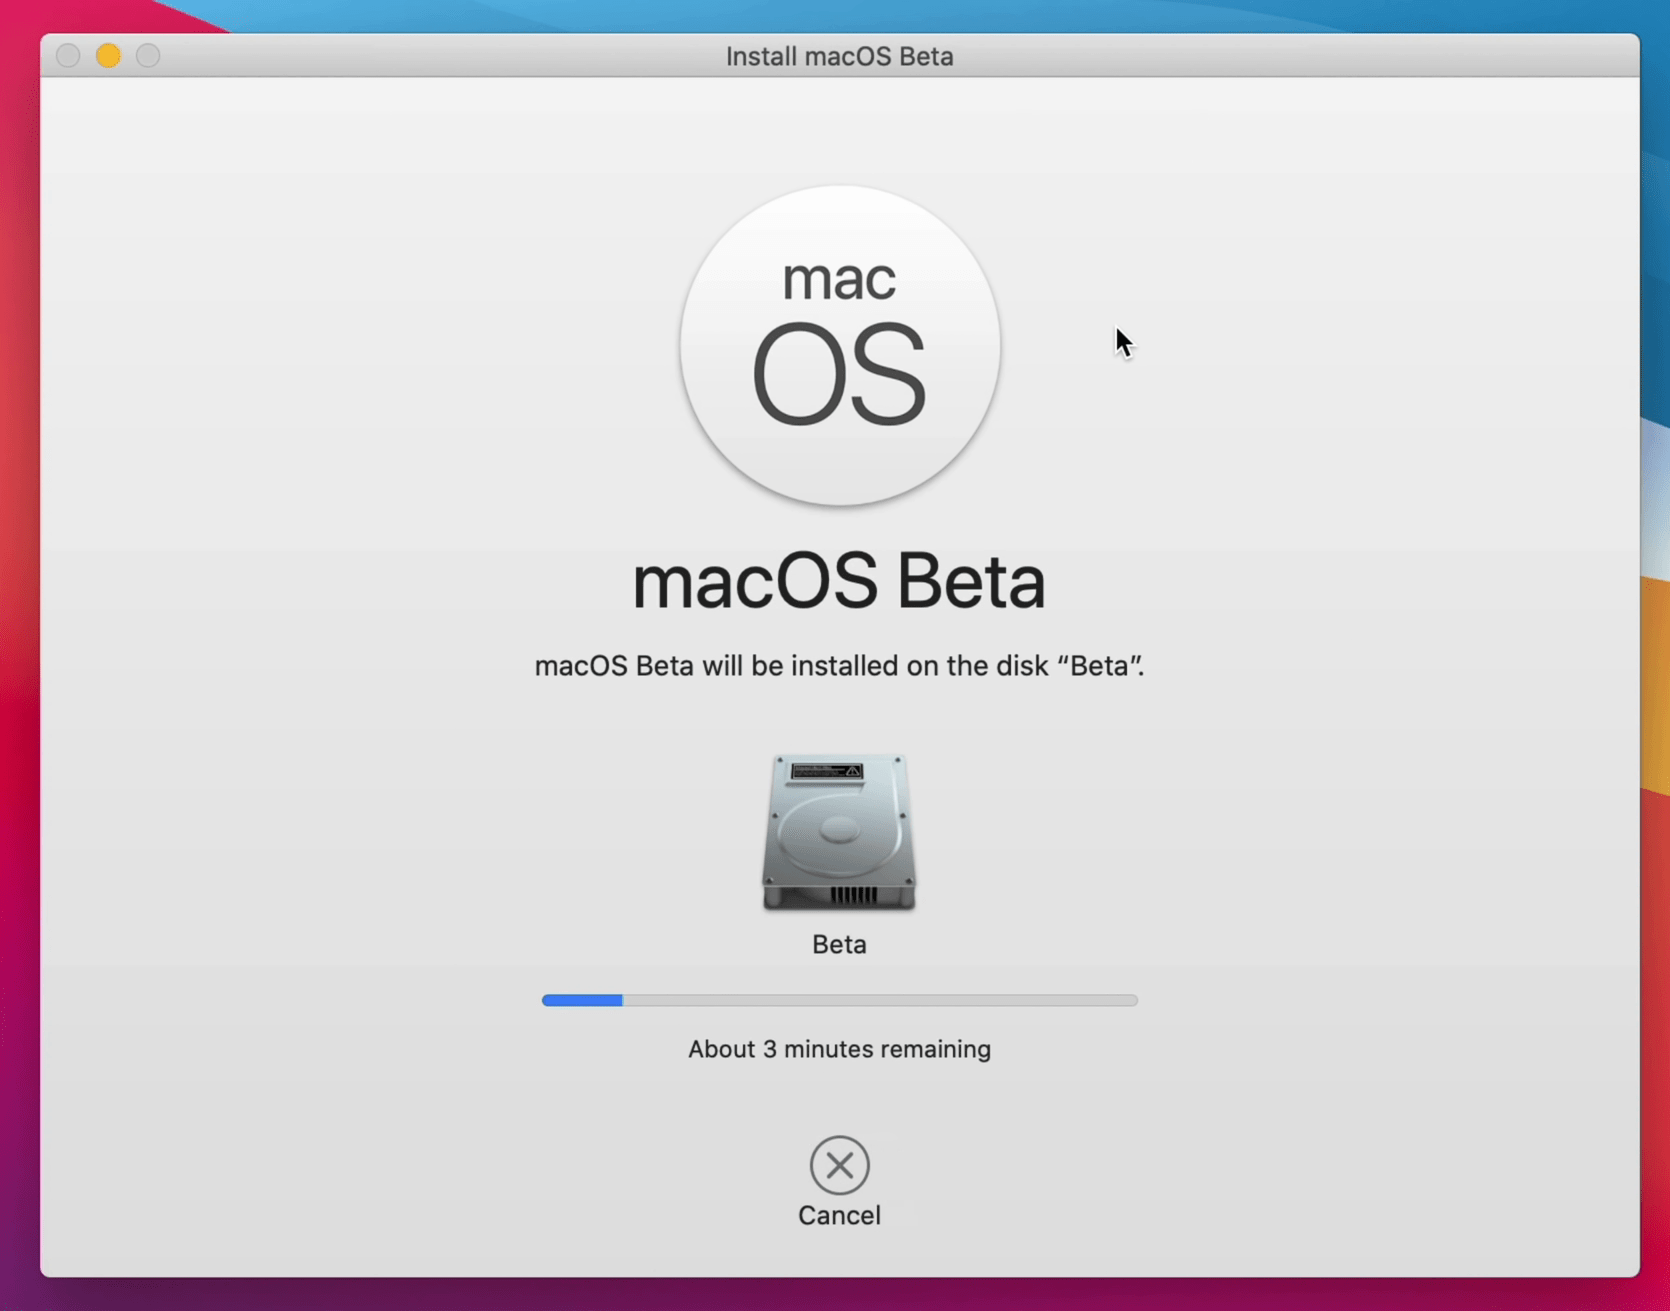
Step 13. When the installation completed, the macOS Big Sur is completely guaranteed to the separate APFS Volume. And ask you to continue the installation process after restarting.
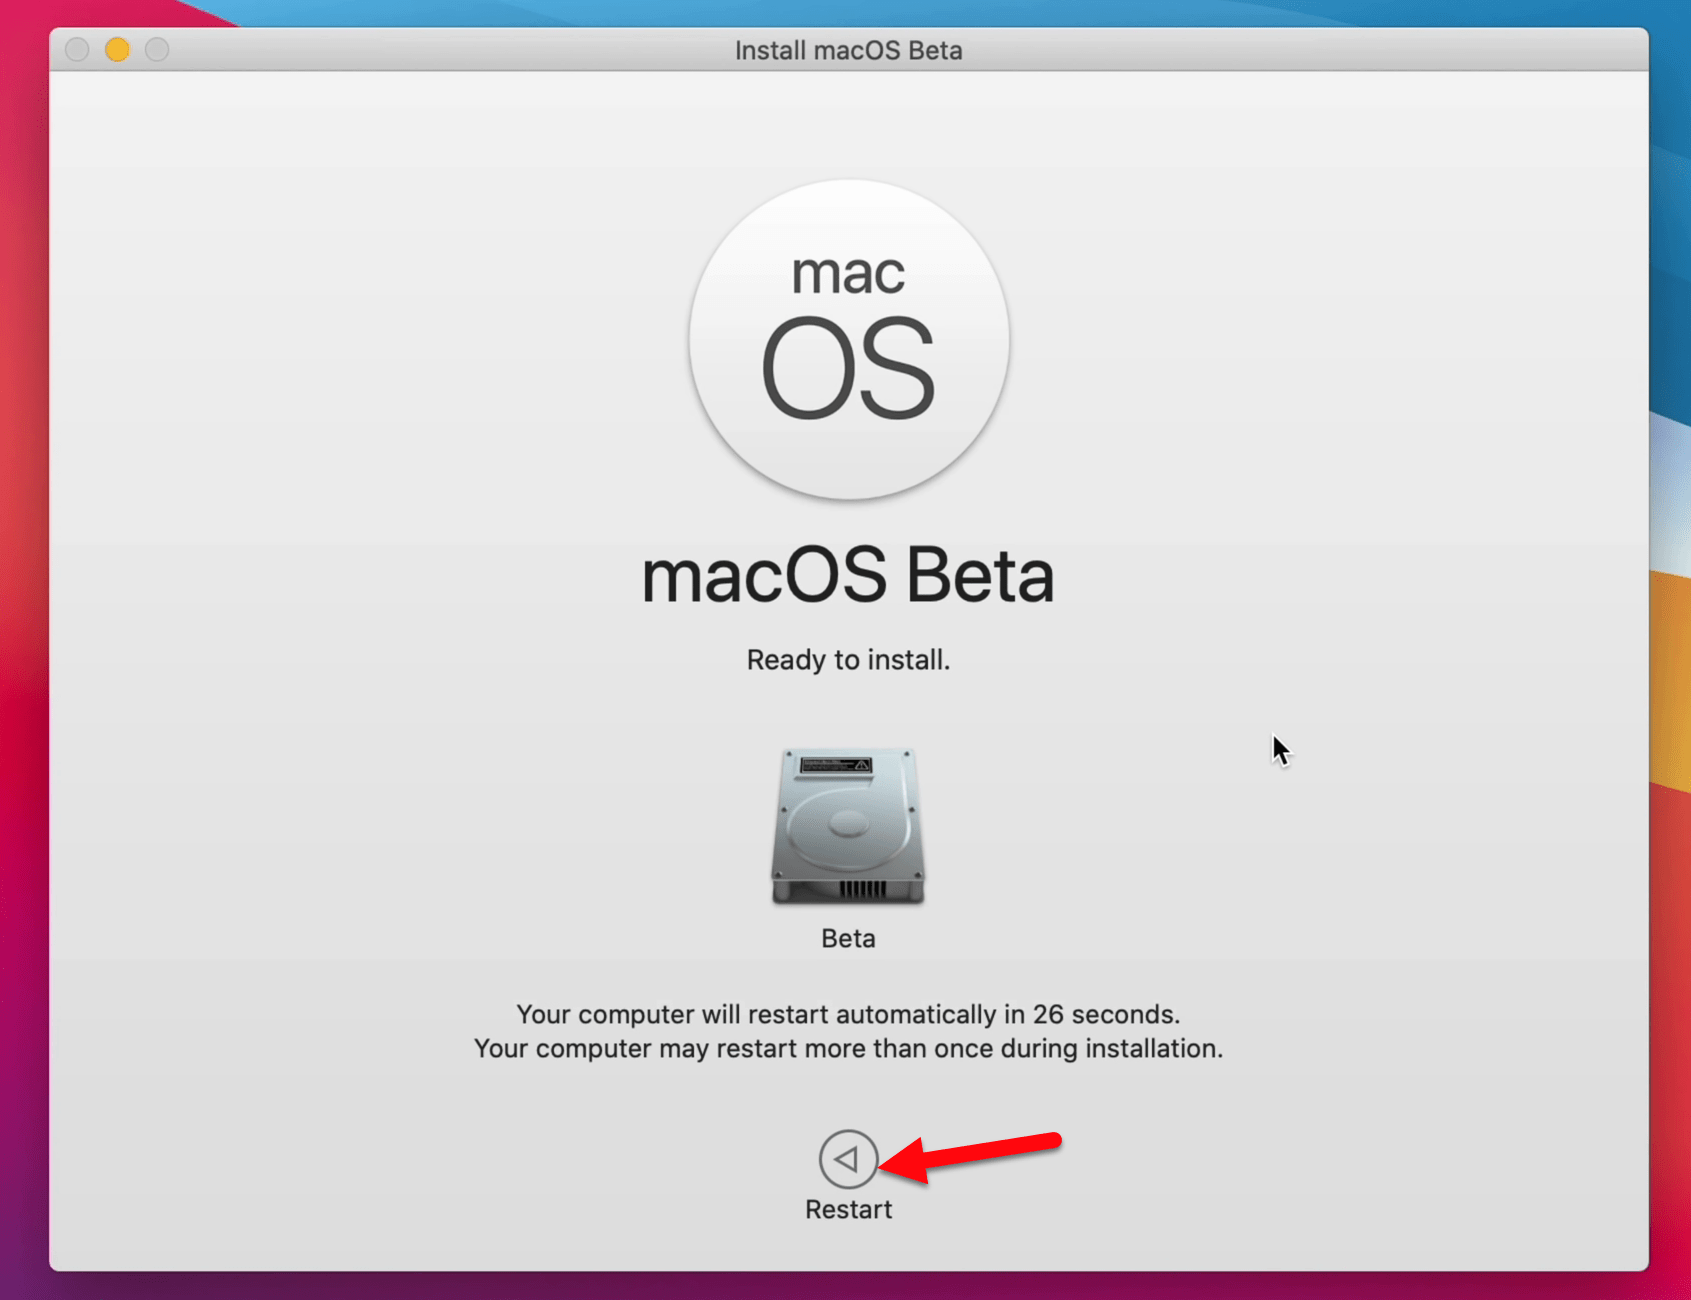
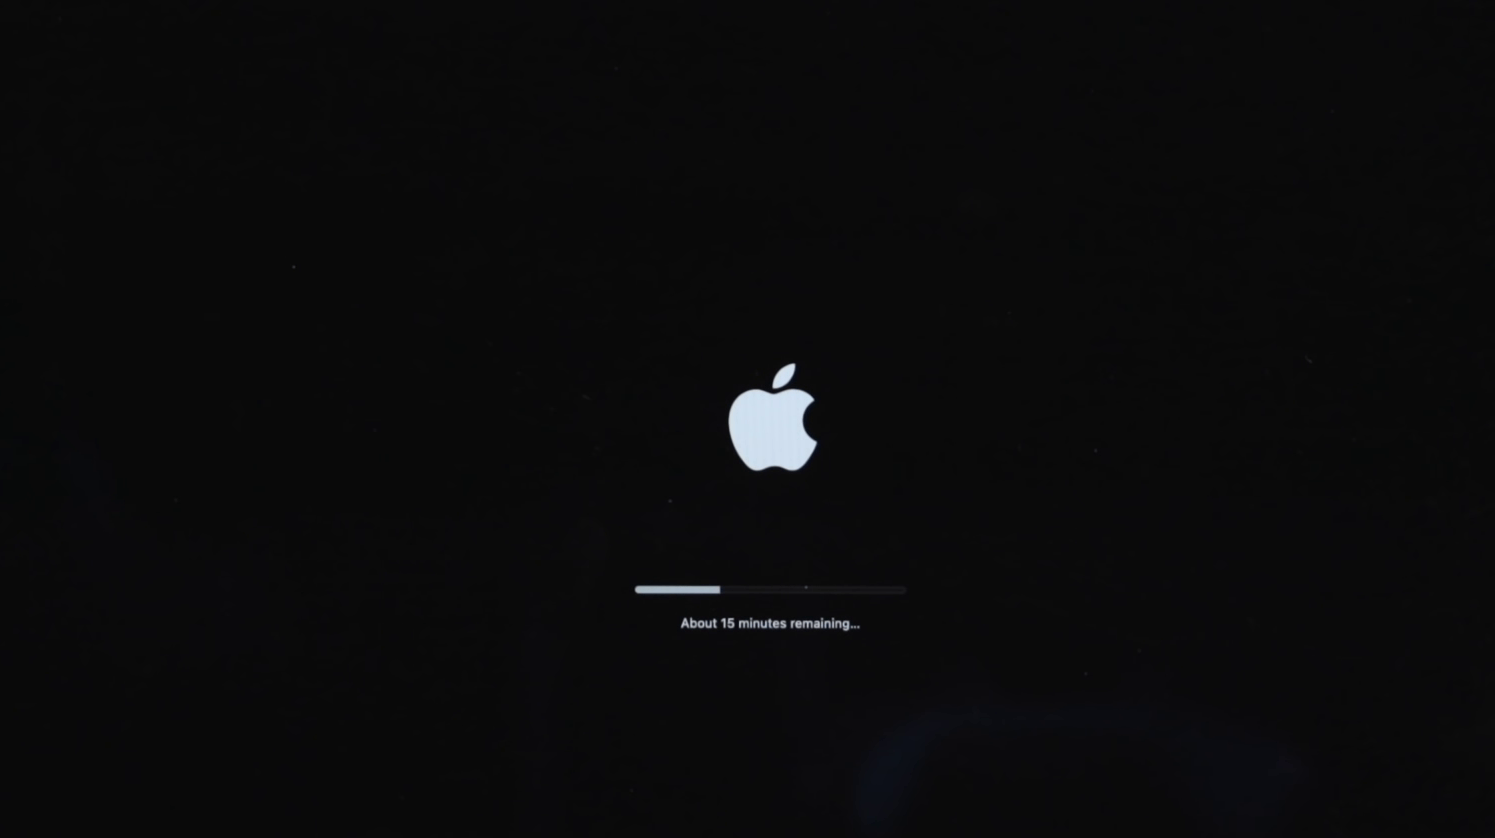
Step 14. After restarting the installation process will keep continue, and this step of the installation will cover some time.
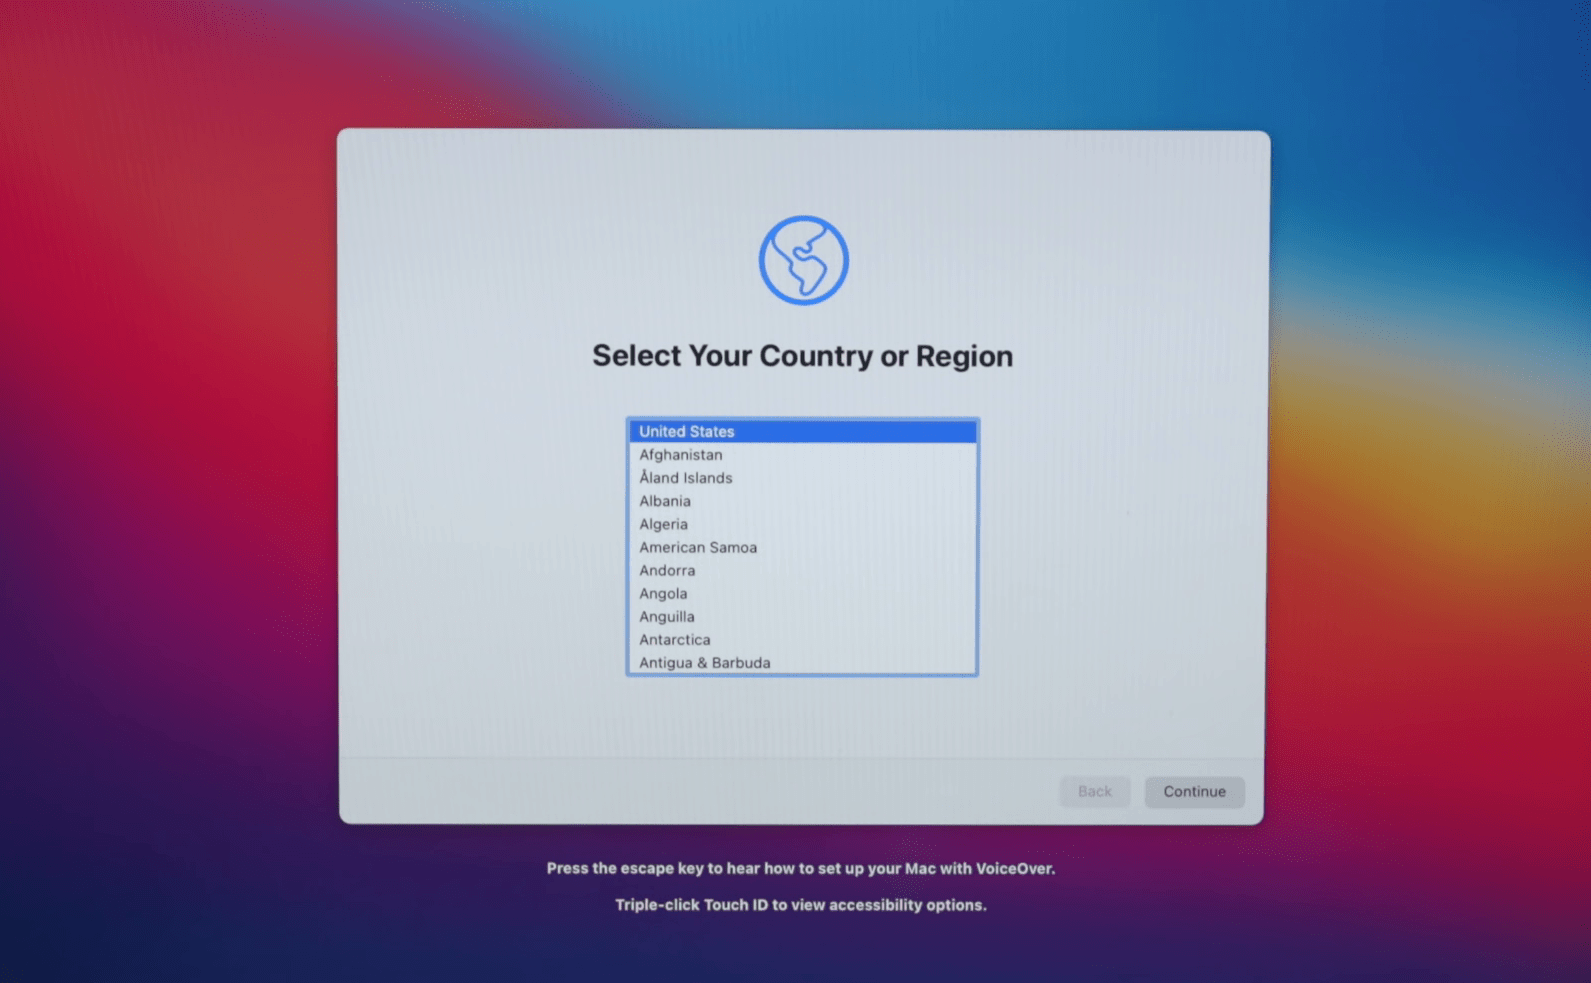
Step 15. When the installation completed you have to complete the macOS Big Sur basic set up utility, at the first window select your country and region and click continue.
Step 16. After macOS Big Sur installation successfully completed, if the macOS Catalina APFS Volume is encrypted. You have to decrypt that because it will help you whether you want to use macOS Big Sur or macOS Catalina on your Mac during the startup. To decrypt that open “System Preferences” and click on “Startup” to open.

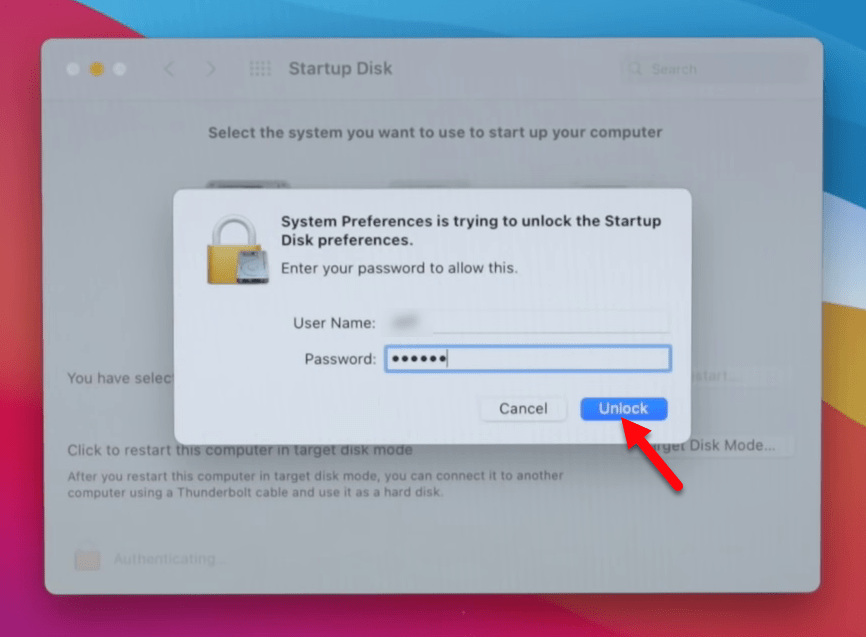
Step 17. Now click on the left lock icon and enter your password and press unlock.
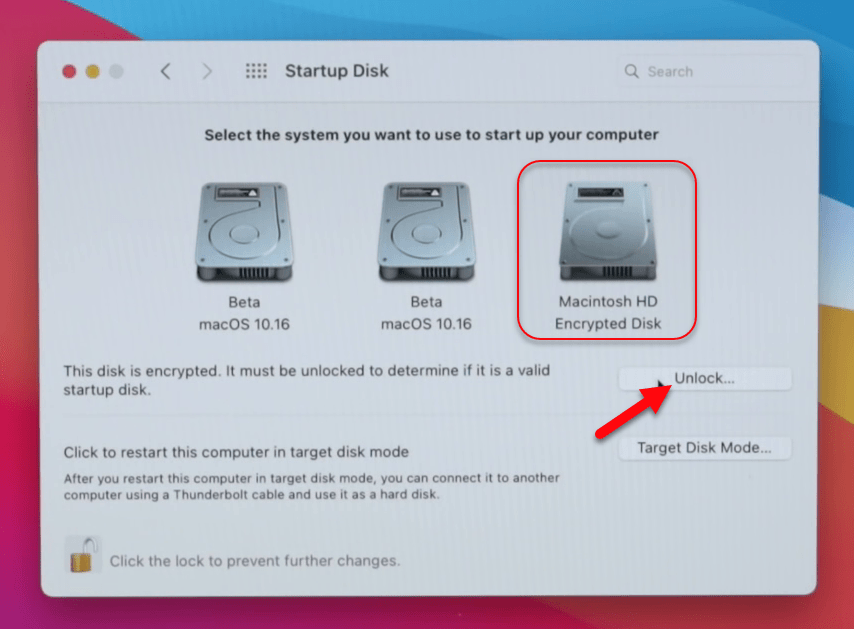
Step 18. Now macOS Catalina is being installed on “Macintosh HD” volume, select that, and press on the “Unlock” option.
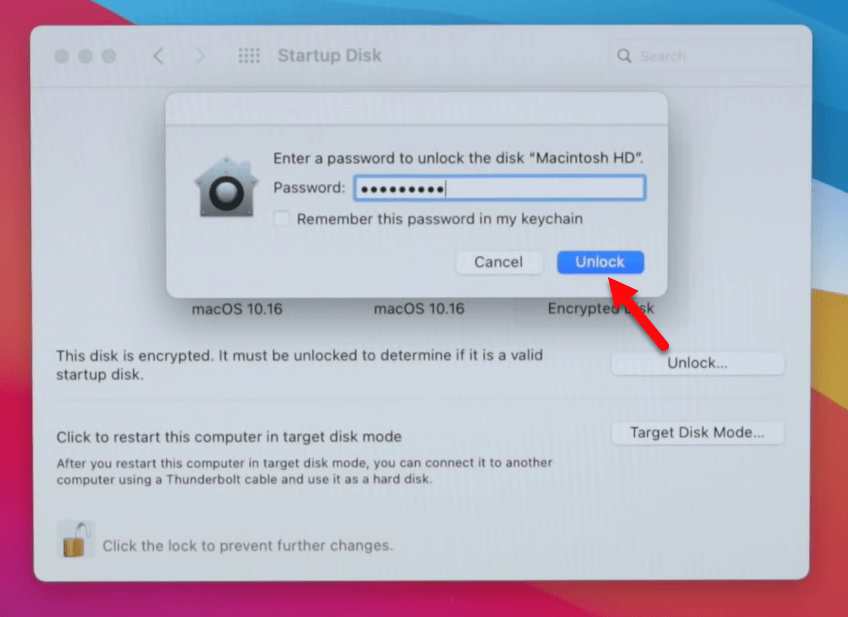
Step 19. Now enter your password and press Unlock.
Step 20. After you unlocked the macOS Catalina volume you will require to restart your Mac.
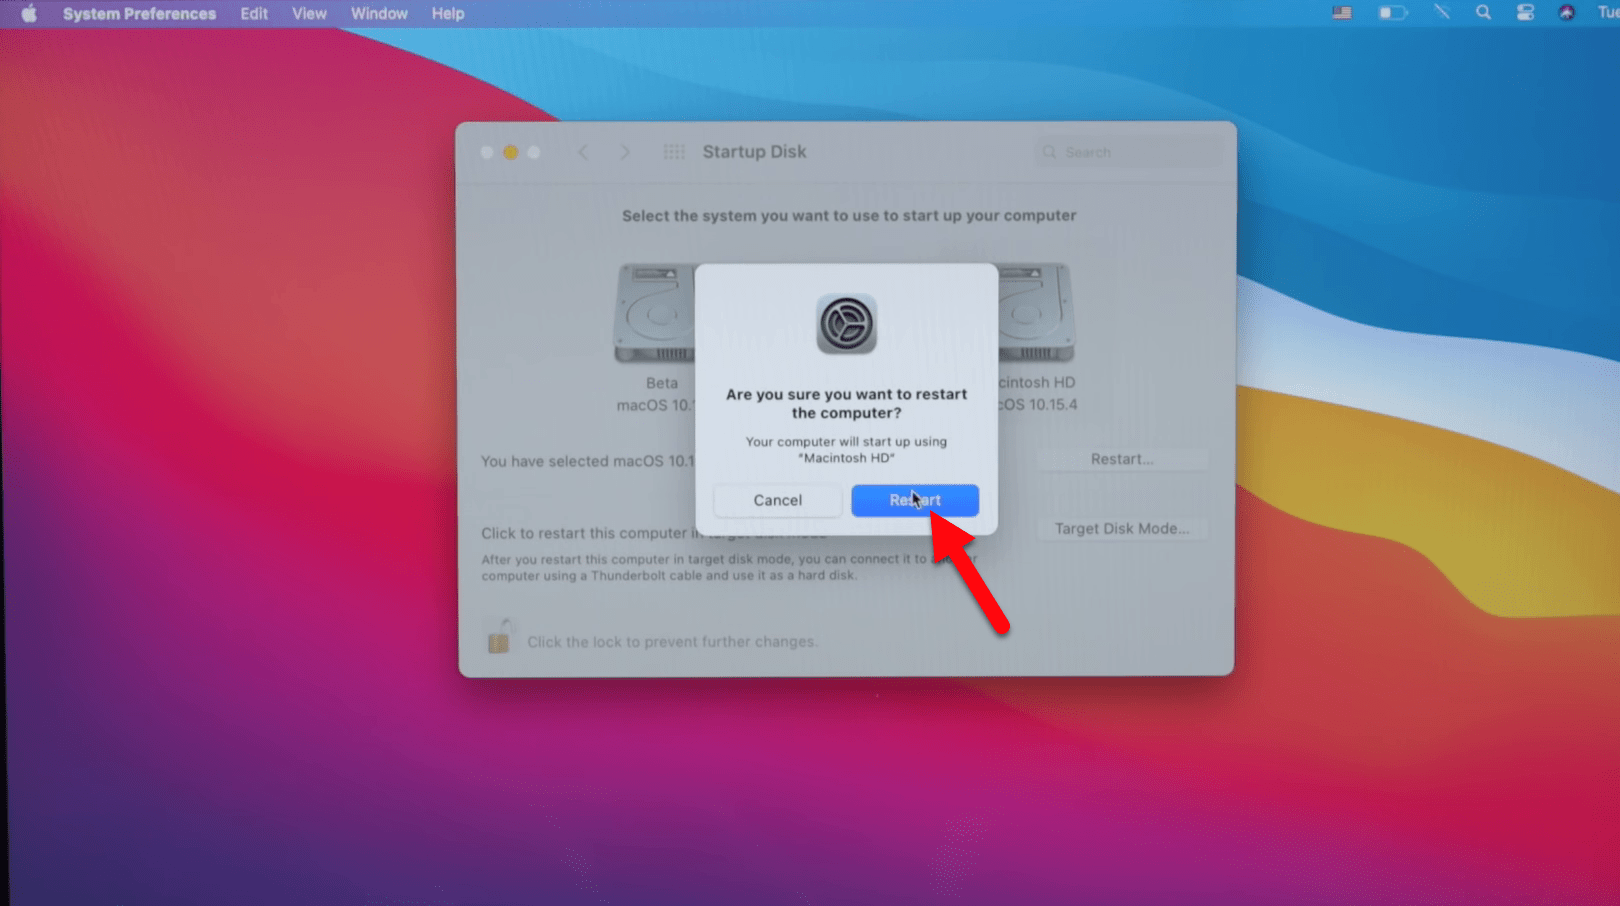
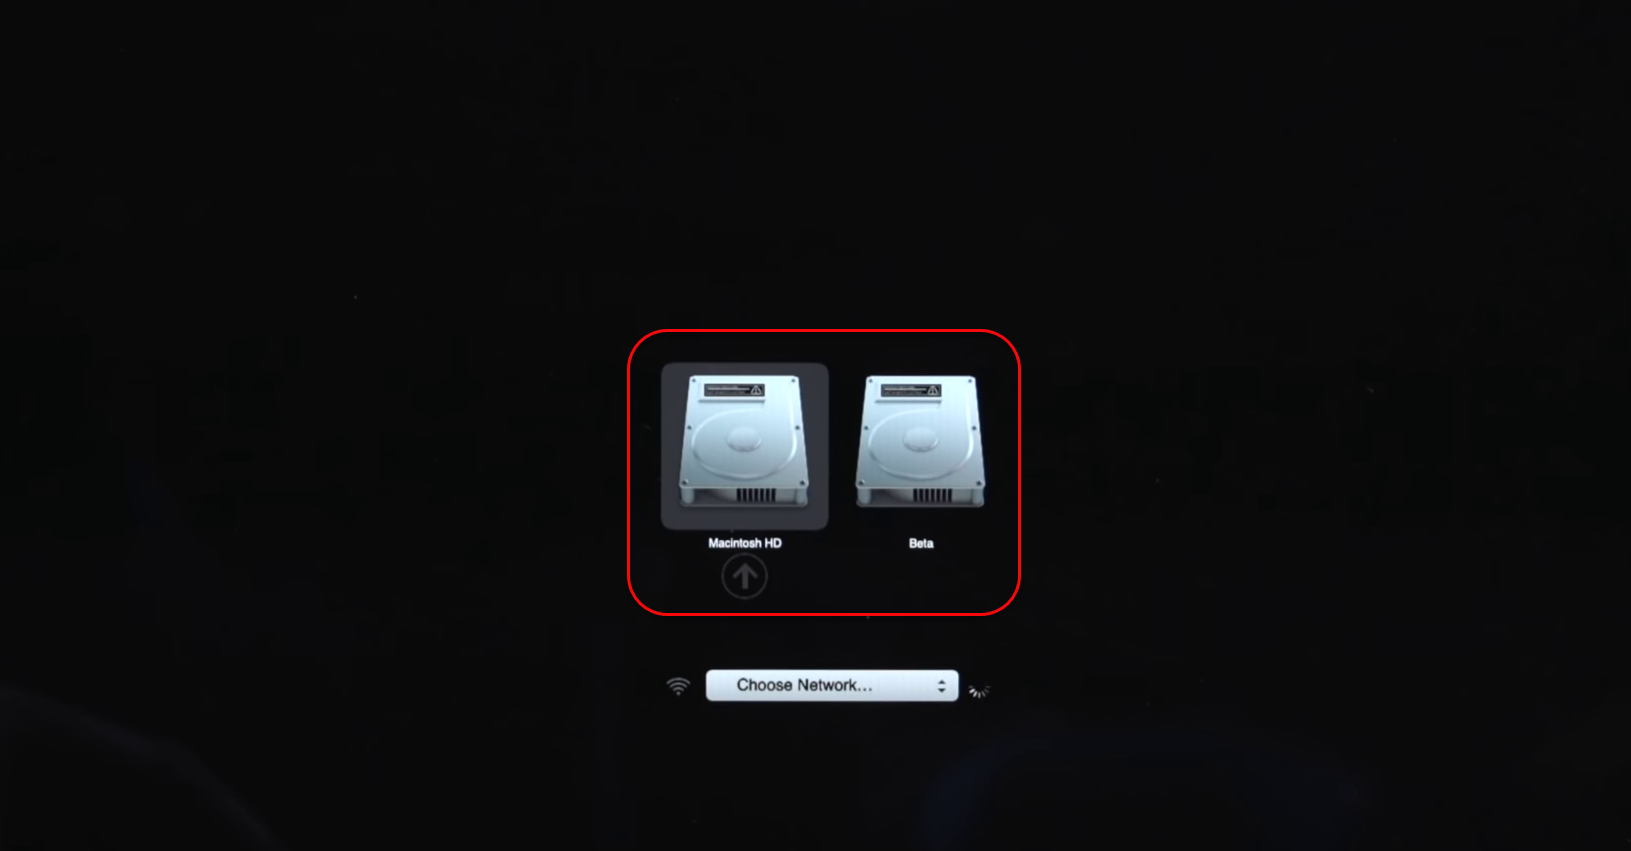
Step 21. And here it is macOS Big Sur is ready on “Beta” drive, and macOS Catalina is on “Macintosh HD”. Therefore, you can choose whether to Boot macOS Big Sur or macOS Catalina from the Boot startup screen.
You can always install the Beta version on the top of any macOS operating system on your primary Mac or MacBook. You won’t face any kind of problem during the installation process, always it allows you to switch between two different operating system on a single hard disk drive. Now head over to macOS Big Sur and macOS Catalina operating system and enjoy using it on your primary Mac.